W1772/W1773 37" Drum Sander |
|
|
|
|
|
|
|
|
| |
|
|
|
|
|
|
|
|
|
|
|
|
|
|
|
|
|
|
|
|
|
|
|
|
|
|
|
|
|
|
|
|
|
5. Use a screwdriver to pry and rotate the bearing so it |
|
|
|
|
|
|
|
|
| |
|
|
|
|
|
|
|
|
| ||
|
|
|
|
|
| Mounting Flange |
|
| ||
is horizontal to the |
|
|
|
|
|
|
|
| ||
|
|
|
|
|
|
|
|
| ||
es, as shown in Figure 43. |
|
|
|
|
|
|
|
|
| |
6. Slide the bearing out of the bearing housing, as |
|
|
|
|
|
|
|
|
| |
shown in Figure 44. |
|
|
|
|
|
|
|
|
| |
7. Remove any metal or abrasives trapped in the bear- |
|
|
|
|
|
|
|
|
| |
ing grease groove and grease port (see Figure 45), |
|
|
|
|
|
|
|
|
| |
or contaminants will be pumped into the new bear- |
|
|
|
|
|
|
|
|
| |
ing when you lubricate it, causing bearing failure. |
|
|
|
|
|
|
|
|
| |
|
|
|
|
|
|
|
|
|
|
|
8. Clean and inspect the |
| Figure 43. Bearing positioning for | ||||||||
|
|
|
|
| removal. | |||||
burrs, wear, and other damage; replace/repair as |
|
|
|
|
|
|
|
|
| |
required. The bearing race should rotate inside of |
|
|
|
|
|
|
|
|
| |
|
|
|
|
|
|
|
|
| ||
the bearing housing smoothly. If the race is loose or |
|
|
|
|
|
|
| |||
| Bearing |
|
|
|
|
| ||||
wobbles inside of the bearing housing, replace the |
| Housing |
|
|
|
|
|
|
| |
|
|
|
| |||||||
bearing housing (Figure 44). |
|
|
|
|
|
|
|
|
| |
|
|
|
|
|
|
|
|
| ||
|
|
|
|
|
|
|
|
|
|
|
NOTICE |
|
|
|
|
|
|
|
|
|
|
Make sure the bearing grease hole in the bearing lines |
|
|
|
|
|
|
|
|
|
|
up with the grease groove in the bearing housing and |
|
|
|
|
|
|
|
|
|
|
that no obstructions prevent bearing lubrication. |
|
|
|
|
|
|
|
|
|
|
|
| Guide Pin |
|
|
|
|
|
| ||
|
|
|
|
|
|
| ||||
|
|
|
|
|
|
|
|
|
|
|
|
|
|
|
|
|
|
|
|
|
|
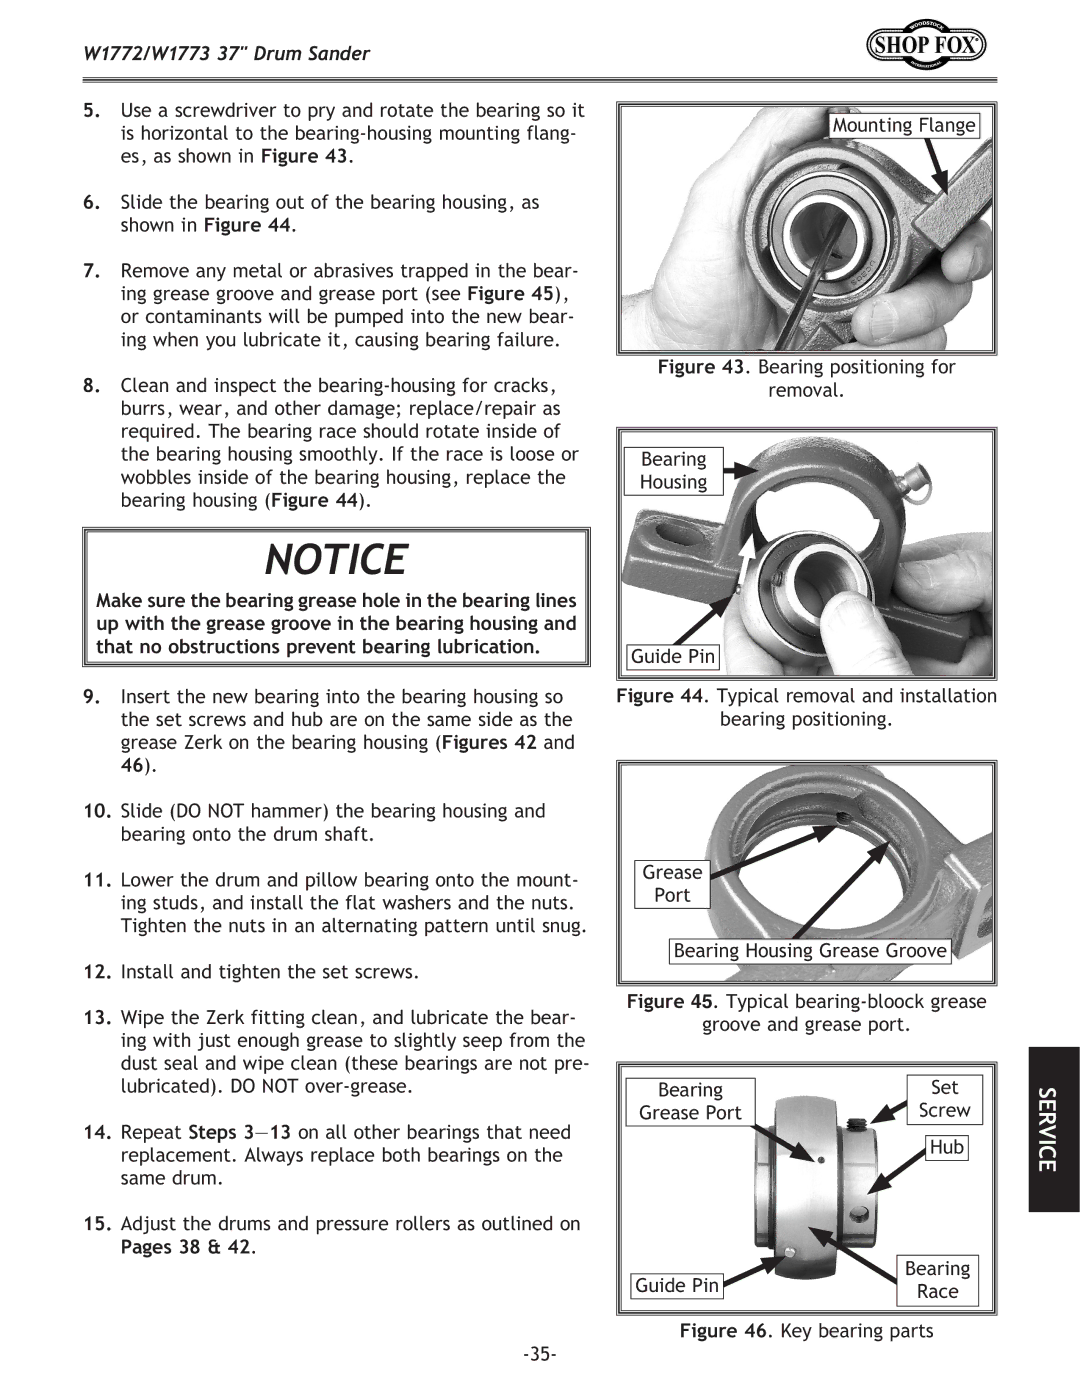
9.Insert the new bearing into the bearing housing so the set screws and hub are on the same side as the grease Zerk on the bearing housing (Figures 42 and
46).
10.Slide (DO NOT hammer) the bearing housing and bearing onto the drum shaft.
11.Lower the drum and pillow bearing onto the mount- ing studs, and install the flat washers and the nuts. Tighten the nuts in an alternating pattern until snug.
12.Install and tighten the set screws.
13.Wipe the Zerk fitting clean, and lubricate the bear- ing with just enough grease to slightly seep from the dust seal and wipe clean (these bearings are not pre- lubricated). DO NOT
14.Repeat Steps
15.Adjust the drums and pressure rollers as outlined on
Pages 38 & 42.
Figure 44. Typical removal and installation
bearing positioning.
Grease |
Port |
Bearing Housing Grease Groove |
Figure 45. Typical bearing-bloock grease
groove and grease port.
Bearing | Set | SERVICE |
Grease Port | Screw | |
| Hub | |
|
| |
Guide Pin | Bearing |
|
Race |
| |
|
|
