Manuals
/
Yamaha
/
Home Audio
/
Home Theater System
Yamaha
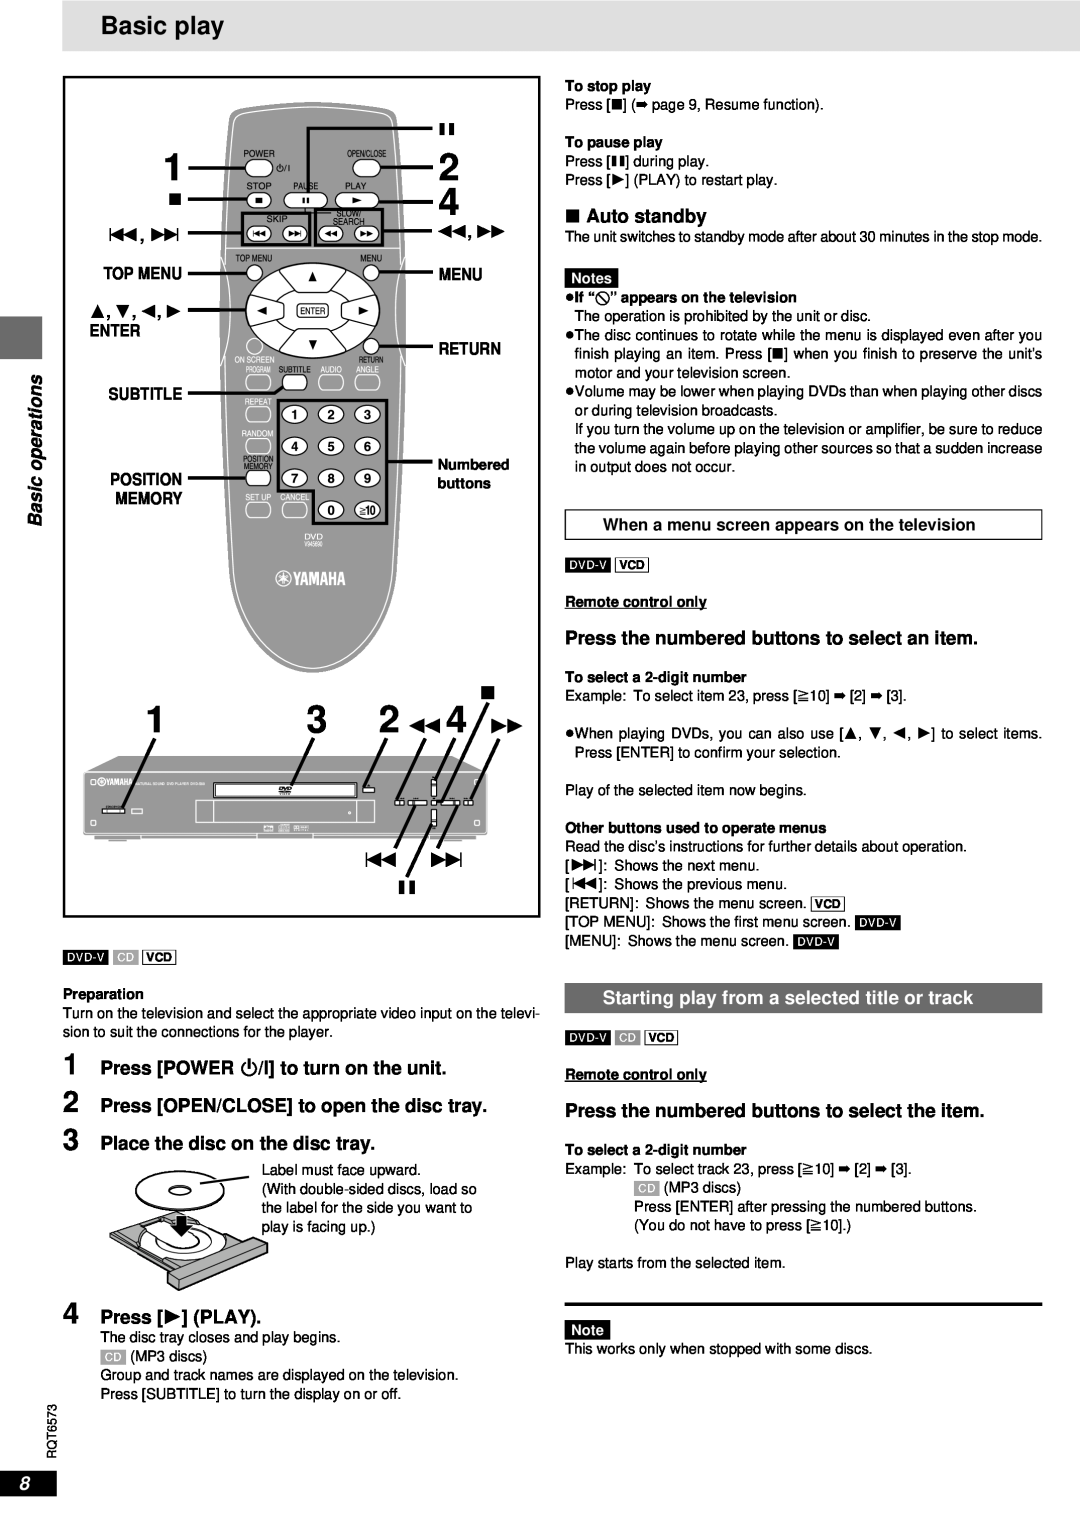
HOMETHEATER SOUND SYSTEM Basic play, operations, Press POWER Í/I to turn on the unit
Models:
HOMETHEATER SOUND SYSTEM
AVX-S80
1
1
2
3
4
5
6
7
8
9
10
11
12
13
14
15
16
17
18
19
20
21
22
23
24
25
26
27
28
29
30
31
32
33
34
35
36
37
38
39
40
41
42
43
44
45
46
47
48
49
50
51
52
53
54
55
56
57
58
59
60
61
62
63
64
65
66
67
68
69
70
71
72
73
74
75
75
Download
75 pages
8.7 Kb
58
59
60
61
62
63
64
65
66
67
Troubleshooting
Specification
Install
Password
Setting the sleep timer
Decoder indicators
Before connecting components
Maintenance
qPRESET/BAND
Checking The Accessories
Page 63
Image 63
Page 62
Page 64
Page 63
Image 63
Page 62
Page 64
Contents
AVX-S80: AVR-S80+ NX-S80S+ NX-S80C+ SW-S80
AVX-S80
HOME THEATER SOUND SYSTEM
OWNER’S MANUAL
IMPORTANT SAFETY INSTRUCTIONS
FCC INFORMATION for US customers
Note to CATV system installer
Special Instructions for U.K. Model
CAUTION: READ THIS BEFORE OPERATING YOUR SYSTEM
We Want You Listening For A Lifetime
For U.K. customers
REMOTE CONTROL FEATURES
CONTENTS
USING BASIC FUNCTIONS
TUNING
About this manual
FEATURES
INTRODUCTION
Built-in 5.1-channelpower amplifier
AVR-S80
CHECKING THE ACCESSORIES
INSTALLING BATTERIES IN THE REMOTE CONTROL
Notes on batteries
5VOLUME +/–
CONTROLS AND FUNCTIONS
Front panel
2Remote control sensor
4DSP program buttons
Remote control
9POWER
3CODE SET
Handling the remote control
Using the remote control
Lights up when the t, g, PRO LOGIC
Front panel display
1 Decoder indicators
q DSP indicator
Adjusting speaker output levels P.18
PREPARATION STEPS
Installing batteries in the remote control P.3
Speaker setup P.9
Front speakers
SPEAKER SETUP
Speaker placement
Notes
Mounting the front and rear speakers on a wall
Installing the speakers
Placing the center speaker
Placing the front and rear speakers
Using the Yamaha Speaker Stand SPS-80option
Types of audio jacks
Connecting TV and audio/video
CONNECTIONS
components
For AV component
The connection example
For Audio component
For Video Component
1 Set up the AM loop antenna, then connect it
Connecting the antennas
Connecting indoor FM antenna
Connecting the AM loop antenna
Connecting the speakers
2 Open the tab
4 Return the tab to secure the wire
Notes
Exchanging the speaker cables
Memory back-up
Connecting to an external amplifier
Connecting the AC power cord
Turning on the power
Notes
ADJUSTING SPEAKER OUTPUT LEVELS
Using the test tone
1 Press AMP 2 Press TEST to output the test tone
5 Adjust the volume to the desired level
BASIC PLAYBACK
VIDEO 1 AUTO
Basic operations
While playing a source
When you have finished using this system
Setting the sleep timer
Input modes and indications
1 Press AMP
70mm Spectacle
Selecting a sound field program
Feature of DSP programs
Program
Notes
Table of Program Names for Each Input Format
USING BASIC FUNCTIONS
2 Press q/DTS
Selecting PRO LOGIC
Virtual CINEMA DSP
While playing a 2-channelsource 1 Press AMP
Normal Stereo Reproduction
Displaying the information about input signal
About 96-kHzsampling digital signals
SILENT CINEMA DSP
Notes
RECORDING
Timer playback/recording
4 Start recording on the recording component
Automatic tuning
TUNING
Automatic and manual tuning
630 kHz
1 Press PRESET/BAND to select the FM band
Presetting stations
Automatically presetting stations for FM stations
Manually presetting stations
4 Press PRESET/BAND again
Exchanging preset stations
Tuning in to a preset station
2 Press and hold PRESET/BAND for more than
CT Clock Time mode
Description of RDS data
PTY Program Type mode
RT Radio Text mode
Notes
Changing the RDS mode
PTY SEEK function
To cancel the steps 1 or
Precautions when performing the setting
Setting the manufacturer code
2 INPUT TV MODE
Other component controlling functions
1 TV POWER
1 AV POWER
2 3 4 5 6 7 8 9 0
1 AV POWER
7 Numeric buttons/CANCEL
2 SUBTITLE
Initial settings
Adjusting the items on the SET MENU
SET MENU
List of SET MENU items
1B FRONT front speaker mode
settings
1 SPEAKER SET speaker mode
1A CENTER center speaker mode
1D BASS LFE/bass out mode
2 LFE LEVEL
1 Press d/u to select the item to be adjusted
2 Press j to adjust the LFE level
2 Press j / i to adjust the dynamic range
3 SP DLY TIME speaker delay time
4 D. RANGE dynamic range
6HP TONE CTRL headphone tone control
DIMMER
9 SP/PRE OUT output source settings
7 INPUT MODE initial input mode
8 DISPLAY SET brightness of front panel display
For 5ch Stereo
ADJUSTING THE LEVEL OF THE EFFECT SPEAKERS
3 Press j / i to adjust the speaker output level
4 Press j / i to adjust the speaker output level
While playing a source 1 Press AMP
CHANGING THE PARAMETER SETTINGS FOR DSP PROGRAMS
Adjusting the delay time
4 Press j / i to adjust the delay time
3 Press u / d to select the parameter
Changing parameter settings
PRO LOGIC II Music parameter descriptions
1 Press AMP 2 Select PRO LOGIC II Music
General
TROUBLESHOOTING
to page
Tuner
Remote control
GLOSSARY
TUNER SECTION
SPECIFICATIONS
AUDIO SECTION
VIDEO SECTION
LIST OF MANUFACTURER’S CODES
Device Code:
Device Code:
Device Code:
V940570
Printed in Malaysia
AVX - S 8
CONNECTION GUIDE
1 : Insert the plug with its mark facing up
NATURAL SOUND DVD PLAYER DVD-S80
DVD-S80
DVD/VIDEO CD/CD PLAYER
OWNER’S MANUAL
Dear customer
We Want You Listening For A Lifetime
Getting
PRECAUTIONS
Table of contents
started
2. MIXED 2 CH jacks
Accessories
Connection
1. OPTICAL jack
2. S VIDEO jack
Connecting the power cable
Connection
1. VIDEO jack
1 Press POWER Í/I to turn on the unit
1 3·4·5·6
The remote control
QUICK SETUP
G ? A 2 A @
Handling precautions
Control reference guide
Disc information
Basic
1 Press POWER Í/I to turn on the unit
Basic play
operations
Press 2 or
Press : or
Press 6 or
Press 6 or
Press REPEAT
Convenient features
1 Press PROGRAM
Advanced operations
1 Press TOP MENU or MENU
1 Press 1 while a track is highlighted to display
the tree screen
DVD-Videoonly and press 1 PLAY
Press ANGLE
Increasing your enjoyment of movies
Advanced operations
Press SUBTITLE
Press 3, 4 to select the menu
Using On-ScreenMenu Icons
4 Press 3, 4 to select the setting
1 Press ON SCREEN
Advanced operations
Using On-ScreenMenu Icons
Disc information
Unit information
Advanced operations
Audio menu
Display menu
Items
Changing settings
Advanced operations
Menus
2 Press 2, 1 to select the menu’s tab
Common procedures
1 Press SET UP to show the menus
Entering a password Ratings
Operation
Troubleshooting guide
Power
Page
Maintenance
Glossary
Reference
Specifications
Top
Page
Image
Contents