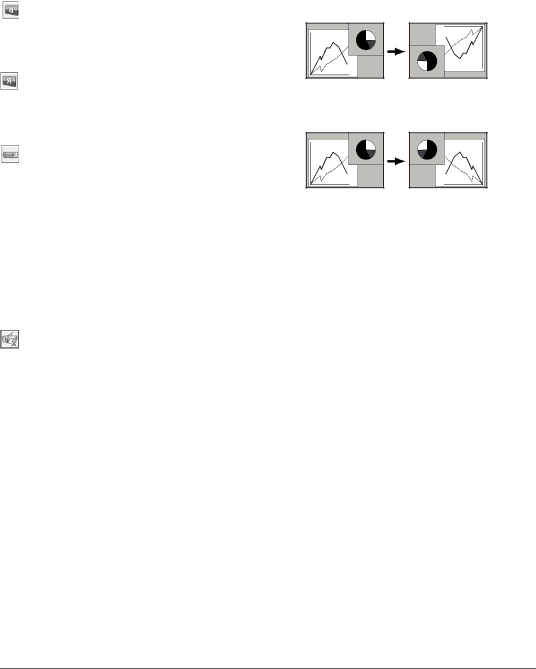
Eiki LC-XD25 owner manual Terminal, Standby mode, Ceiling Rear

Page 50

Setting

Ceiling

When this function is "On", the picture is top/bottom and left/right reversed. This function is used to project the image from a ceiling mounting the projector.

Rear

When this function is "On", the picture is left/right reversed. This function is used to project the image to a rear projection screen.

Terminal

The COMPUTER IN 2/MONITOR OUT terminal on the back of the projector is switchable for computer input or monitor output. (See page 9) Select Computer 2 or Monitor Out with the Point 7 8 buttons.

Computer 2 . . . computer input

Monitor Out . . . monitor out

Terminal function is not available when selecting Computer 2 to the input source. Change the input source to the others (Computer1 or Video) so that the Terminal function will be available. (p.26, 37, 38)

Standby mode

This function is available when the projector is turned off and in Stand-by. It is recommended to use Eco under normal condition.

Normal . . . . . nor mal power consumption in Stand-by condition.

Eco . . . . . . lower power consumption than Normal mode in Stand-by condition.

Ceiling

Rear

50

Image 50
Contents Model LC-XD25 Features and Design Table of Contents To the Owner Risk of Electric Shock Do not OpenSafety Instructions Moving the Projector Installing the Projector in Proper PositionAir Circulation Compliance Federal Communications Commission NoticeBack Bottom Part Names and FunctionsFront Air Intake Vent front and bottomRear Terminal Top Control Remote Control Two AA size batteries Remote Control Battery InstallationOperating Range Positioning the Projector InstallationAdjustable Foot Projector side Using the ferrite coreConnecting the AC Power Cord Connecting to a Computer Cables used for connectionConnecting to Video Equipment Connecting to Component Video and RGB Scart Equipment Basic Operation Selected Input Source and Lamp ModeVideo / PC selection window Input signal guidance window Turning On the ProjectorBasic Operation PIN Code Input Dialog BoxTurning Off the Projector Top Control How to Operate the On-Screen MenuRemote Control On-Screen MenuMenu Bar Keystone Correction Zoom and Focus AdjustmentAuto setup function Sound Adjustment Remote Control OperationZoom buttons Timer buttonAuto PC button Keystone buttonDirect Operation Computer InputInput Source Selection Source Select MenuSelecting Computer System Manually Computer System SelectionPC System Menu Menu Operation Auto PC Adj Auto PC AdjustmentTo store adjustment parameters Manual PC Adjustment To clear adjusted data ResetMode free To store adjusted dataImage Level Selection Image Select Menu icon Image Level Adjustment True Screen Size AdjustmentNormal Custom WideFull Digital zoom For zooming in and out the imagesDigital zoom + Zoom buttonVideo button Video InputInput Source Selection Video Input Source Selection S-video, Component, RGB Scart 21-pin Video Component RGB ScartAV System Menu Video or S-video Video System SelectionAuto AV System Menu ComponentCinema User preset image in the Image Adjust Menu. p.43 Color TintNoise reduction ProgressiveProvide the image at a normal video aspect ratio Setting Menu Language SettingSetting LanguageAuto Keystone Auto setupInput search Display KeystoneBlue back Capture Logo Logo and Logo PIN code lock settingsLogo select Logo select CaptureLogo PIN code lock Logo PIN code lock Logo PIN code lock Dialog BoxRear Standby modeCeiling TerminalOn start Remote control PIN code lock Security Key lock and PIN code lock settingsKey lock Change the PIN code Change the PIN code lock settingEnter a PIN code Fan Fan controlLamp counter Factory defaultClosed Caption Factory default Then check the matters below Maintenance and CleaningIndicator emits a red light Projector is shut down and the WarningCleaning the Air Filter Attaching the Lens CoverCleaning the Projection Lens Cleaning the Projector CabinetLamp Replacement Order Replacement Lamp Reset the lamp replacement counterLamp Handling Precautions Resetting the Lamp CounterTroubleshooting AppendixPower management function can not work while Freeze or No Show function is running. see pages 24Exclamation mark appears Remote Control does not workIndicator blinks or lights On the screen Top Control does not workInput PC AdjustMenu Tree SoundScreen Image Select Image AdjustSystem Image Select Setting Indicators and Projector Condition Indicators Projector ConditionCompatible Computer Specifications FreqTechnical Specifications Model No AccessoriesOptional Parts Service Port Connector Terminal Mini DIN 8-PIN Configurations of TerminalsDimensions SerialLogo PIN Code Lock No PIN Code Number MemoEiki International, Inc