Eiki LC-XD25 owner manual Security Key lock and PIN code lock settings

Page 53

Security (Key lock and PIN code lock settings)

This function allows you to use Key lock and PIN code lock function to set the security for the projector operation.
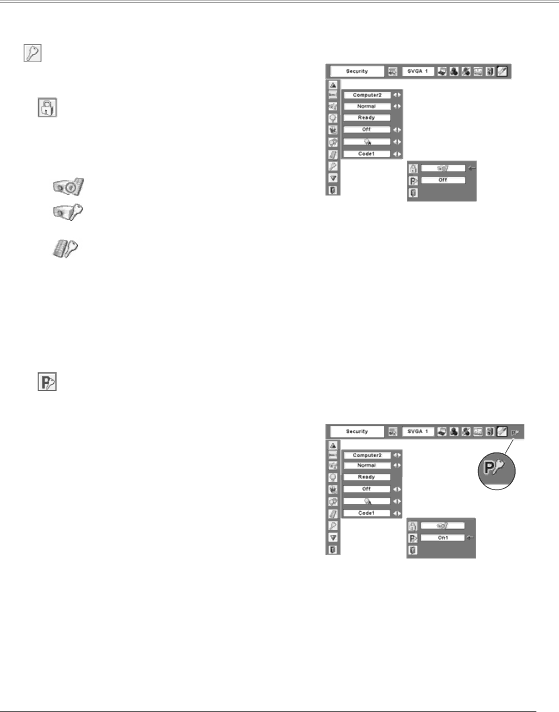
Key lock

This function locks operation of the top control or the remote control.

It is useful to prevent operation by an unauthorized person.

. . . . . . not locked.

. . . . . . lock the operation of the top control. To unlock, use the remote control.

. . . . . . lock the operation of the remote control. To unlock, use the top control.

If the top control accidentally becomes locked and you do not have the remote control or there is something wrong with your remote control, contact the dealer where you purchased the projector or the service center.

PIN code lock

This function prevents the projector from being operated by an unauthorized person and provides the following settings for security options.

Off . . . . . the projector is not locked with a PIN code. On1 . . . . require to enter a PIN code every time

turning on the projector.

On2 . . . . require to enter a PIN code to operate the projector once the power cord is disconnected; as long as the AC power cord is connected, the projector can be operated without a PIN code.

Whenever to change the PIN code lock setting or the PIN code (the four-digit number), you are required to enter the PIN code. The "1234" is set as the initial PIN code at the factory.

Setting

Key lock

Select Key lock. Choose one of the alternatives with the Point

54buttons and select [Yes] to activate it.

PIN code lock

When the projector is locked with the PIN code, the PIN code lock mark appears on the menu bar.

53

Image 53
Contents Model LC-XD25 Features and Design Table of Contents Risk of Electric Shock Do not Open To the OwnerSafety Instructions Moving the Projector Installing the Projector in Proper PositionAir Circulation Federal Communications Commission Notice ComplianceFront Part Names and FunctionsBack Bottom Air Intake Vent front and bottomRear Terminal Top Control Remote Control Two AA size batteries Remote Control Battery InstallationOperating Range Positioning the Projector InstallationAdjustable Foot Projector side Using the ferrite coreConnecting the AC Power Cord Cables used for connection Connecting to a ComputerConnecting to Video Equipment Connecting to Component Video and RGB Scart Equipment Video / PC selection window Input signal guidance window Selected Input Source and Lamp ModeBasic Operation Turning On the ProjectorPIN Code Input Dialog Box Basic OperationTurning Off the Projector Remote Control How to Operate the On-Screen MenuTop Control On-Screen MenuMenu Bar Keystone Correction Zoom and Focus AdjustmentAuto setup function Remote Control Operation Sound AdjustmentAuto PC button Timer buttonZoom buttons Keystone buttonInput Source Selection Computer InputDirect Operation Source Select MenuSelecting Computer System Manually Computer System SelectionPC System Menu Menu Operation Auto PC Adj Auto PC AdjustmentTo store adjustment parameters Manual PC Adjustment Mode free ResetTo clear adjusted data To store adjusted dataImage Level Selection Image Select Menu icon Image Level Adjustment True Screen Size AdjustmentNormal Custom WideFull Digital zoom + For zooming in and out the imagesDigital zoom Zoom buttonVideo button Video InputInput Source Selection Video Video Component RGB Scart Input Source Selection S-video, Component, RGB Scart 21-pinAuto Video System SelectionAV System Menu Video or S-video AV System Menu ComponentCinema User preset image in the Image Adjust Menu. p.43 Tint ColorProgressive Noise reductionProvide the image at a normal video aspect ratio Setting SettingSetting Menu Language LanguageAuto Keystone Auto setupInput search Display KeystoneBlue back Logo select Logo Logo and Logo PIN code lock settingsCapture Logo select CaptureLogo PIN code lock Logo PIN code lock Dialog Box Logo PIN code lockCeiling Standby modeRear TerminalOn start Remote control PIN code lock Security Key lock and PIN code lock settingsKey lock Change the PIN code Change the PIN code lock settingEnter a PIN code Fan control FanLamp counter Factory defaultClosed Caption Factory default Indicator emits a red light Maintenance and CleaningThen check the matters below Projector is shut down and the WarningAttaching the Lens Cover Cleaning the Air FilterCleaning the Projector Cabinet Cleaning the Projection LensLamp Replacement Reset the lamp replacement counter Order Replacement LampResetting the Lamp Counter Lamp Handling PrecautionsAppendix TroubleshootingShow function is running. see pages 24 Power management function can not work while Freeze or NoIndicator blinks or lights Remote Control does not workExclamation mark appears On the screen Top Control does not workMenu Tree PC AdjustInput SoundScreen Image Select Image AdjustSystem Image Select Setting Indicators Projector Condition Indicators and Projector ConditionFreq Compatible Computer SpecificationsTechnical Specifications Model No AccessoriesOptional Parts Dimensions Configurations of TerminalsService Port Connector Terminal Mini DIN 8-PIN SerialPIN Code Number Memo Logo PIN Code Lock NoEiki International, Inc