Eiki LC-XD25 owner manual Cleaning the Air Filter, Attaching the Lens Cover

Page 58

Maintenance and Cleaning

Cleaning the Air Filter

Air filter prevent dust from accumulating on the optical elements inside the projector. Should the air filter become clogged with dust particles, it will reduce cooling fans' effectiveness and may result in internal heat build up and adversely affect the life of the projector. Clean the air filter following the steps below.

1 Turn off the projector, and disconnect the AC power cord from the AC outlet.
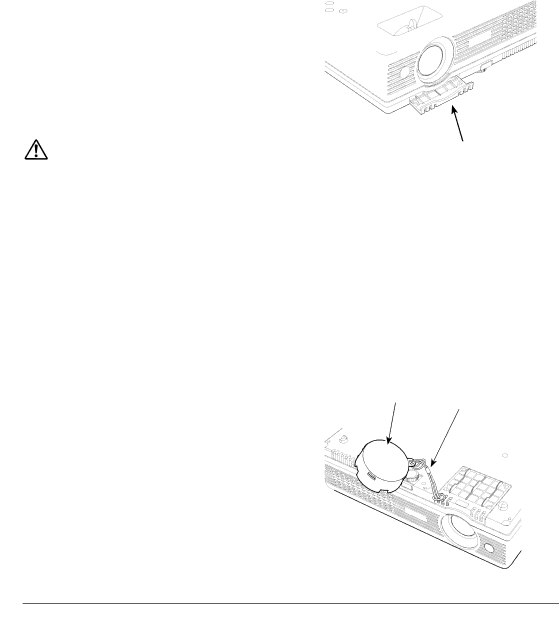
2

Remove the air filter by pulling the latch horizontally.

3

Clean the air filter with a brush or rinse it softly.

4 When cleaning the air filter by rinsing, dry it well. Replace the air filter properly. Make sure that the air filter is fully inserted.

CAUTION

Do not operate the projector with the air filter removed. Dust may accumulate on the optical elements degrading picture quality.

Do not put anything into the air intake vent. It may result in malfunction of the projector.

RECOMMENDATION

W e r e c o m m e n d a v o i d i n g d u s t y / s m o k y environments when operating the projector.. Usage in these environments may cause a poor image quality..

When using the projector under dusty or smoky conditions, dust may accumulate on a lens, LCD panels, or optical elements inside the projector. This condition may degrade the quality of a projected image. When the symptoms above are noticed, contact your authorized dealer or service station for proper cleaning.

Attaching the Lens Cover

When moving this projector or while not using it over an extended period of time, replace the lens cover.

Attach the lens cover according to the following procedures.

1

Pass the string through a hole of the lens cover.

2

Turn over the projector.

3

Attach the string with lens cover to the filter cover at


the bottom of the projector.

Air filter

Pull horizontally and remove.

Lens Cover

String for the lens cover.


58

Image 58
Contents Model LC-XD25 Features and Design Table of Contents To the Owner Risk of Electric Shock Do not OpenSafety Instructions Air Circulation Installing the Projector in Proper PositionMoving the Projector Compliance Federal Communications Commission NoticeBack Bottom Part Names and FunctionsFront Air Intake Vent front and bottomRear Terminal Top Control Remote Control Operating Range Remote Control Battery InstallationTwo AA size batteries Adjustable Foot InstallationPositioning the Projector Connecting the AC Power Cord Using the ferrite coreProjector side Connecting to a Computer Cables used for connectionConnecting to Video Equipment Connecting to Component Video and RGB Scart Equipment Basic Operation Selected Input Source and Lamp ModeVideo / PC selection window Input signal guidance window Turning On the ProjectorBasic Operation PIN Code Input Dialog BoxTurning Off the Projector Top Control How to Operate the On-Screen MenuRemote Control On-Screen MenuMenu Bar Auto setup function Zoom and Focus AdjustmentKeystone Correction Sound Adjustment Remote Control OperationZoom buttons Timer buttonAuto PC button Keystone buttonDirect Operation Computer InputInput Source Selection Source Select MenuPC System Menu Computer System SelectionSelecting Computer System Manually To store adjustment parameters Auto PC AdjustmentMenu Operation Auto PC Adj Manual PC Adjustment To clear adjusted data ResetMode free To store adjusted dataImage Level Selection Image Select Menu icon Image Level Adjustment Normal Screen Size AdjustmentTrue Full WideCustom Digital zoom For zooming in and out the imagesDigital zoom + Zoom buttonInput Source Selection Video Video InputVideo button Input Source Selection S-video, Component, RGB Scart 21-pin Video Component RGB ScartAV System Menu Video or S-video Video System SelectionAuto AV System Menu ComponentCinema User preset image in the Image Adjust Menu. p.43 Color TintNoise reduction ProgressiveProvide the image at a normal video aspect ratio Setting Menu Language SettingSetting LanguageInput search Auto setupAuto Keystone Blue back KeystoneDisplay Capture Logo Logo and Logo PIN code lock settingsLogo select Logo select CaptureLogo PIN code lock Logo PIN code lock Logo PIN code lock Dialog BoxRear Standby modeCeiling TerminalOn start Remote control Key lock Security Key lock and PIN code lock settingsPIN code lock Enter a PIN code Change the PIN code lock settingChange the PIN code Fan Fan controlClosed Caption Factory default Factory defaultLamp counter Then check the matters below Maintenance and CleaningIndicator emits a red light Projector is shut down and the WarningCleaning the Air Filter Attaching the Lens CoverCleaning the Projection Lens Cleaning the Projector CabinetLamp Replacement Order Replacement Lamp Reset the lamp replacement counterLamp Handling Precautions Resetting the Lamp CounterTroubleshooting AppendixPower management function can not work while Freeze or No Show function is running. see pages 24Exclamation mark appears Remote Control does not workIndicator blinks or lights On the screen Top Control does not workInput PC AdjustMenu Tree SoundSystem Image Select Image Select Image AdjustScreen Setting Indicators and Projector Condition Indicators Projector ConditionCompatible Computer Specifications FreqTechnical Specifications Optional Parts AccessoriesModel No Service Port Connector Terminal Mini DIN 8-PIN Configurations of TerminalsDimensions SerialLogo PIN Code Lock No PIN Code Number MemoEiki International, Inc