BenQ MX764 user manual Operation

Page 43

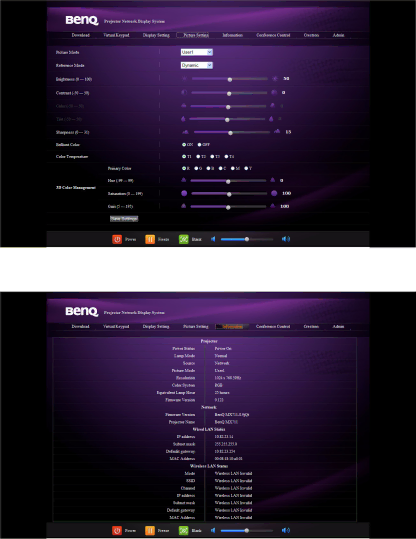
6.The Picture Setting page provides all the OSD menu items in the PICTURE menu for adjusting the projected pictures. See "2. PICTURE menu" on page 60 for how to use them.

7.The Information page displays the information about the projector status, network status.

Operation 43

Image 43
Contents MX763/MX764 Digital Projector WelcomeTable of contents Safety Instructions Important safety instructionsRefer servicing to qualified service personnel Safety Instructions Confined. Allow at least 50 cm clearance Ceiling mounting the projector Introduction Projector featuresShipping contents Front/upper side Projector exterior viewRear/lower side Controls and functions Keystone/Arrow buttons / Up Down Remote control22 12. Network AutoNumeric buttons VOLUME+/VOLUME- Adjusts the sound level MuteOperating the Laser pointer MIC/VOL +Replacing the remote control batteries Remote control effective rangeFront Ceiling Positioning your projectorChoosing a location Front TableObtaining a preferred projected image size Projection dimensionsShifting the projection lens When the projector position is fixedConnection ConnectionConnecting audio Connecting video source devicesPlaying sound through the projector Audio Settings Microphone Volume menuAbout the microphone input Connection Starting up the projector OperationFine-tuning the image size and clarity Adjusting the projected imageAdjusting the projection angle Auto-adjusting the imageCorrecting keystone Use / to highlight the System Setup Basic menu Using the menusSecuring the projector Using a security cable lockUtilizing the password function Setting a passwordEntering the password recall procedure If you forget the passwordChanging the password Disabling the password function Changing Color Space Switching input signalSelecting the aspect ratio Magnifying and searching for detailsAbout the aspect ratio Go to the Picture Picture Mode menu Using Wall ColorSelecting a picture mode Setting the User 1/User 2 modeFine-tuning the image quality in user modes RED To cancel the timer, perform the following steps Setting the presentation timerTop-Left Bottom-Left Top-Right Bottom-Right Freezing the image Remote paging operationsHiding the image Operating in a high altitude environment To activate the High Altitude ModeUsing the remote control Locking control keysTurning off the Power On/Off Ring Tone Adjusting the soundAdjusting the sound level Adjusting the microphone volumeIf you are in a non-DHCP environment Controlling the projector through a LAN environmentCable connection If you are in a Dhcp environmentSetting the Infrastructure mode Wireless connectionHighlight Wireless LAN and press MODE/ENTER Operation Controlling the projector remotely through a web browser Operation Operation Iii Press Exit to go back to the remote network operation Operation Operation Using the web control lock Using QPresenter Downloading and installing QPresenterDisplaying images through QPresenter Operation Operation Using the broadcasting function Using the USB cable to display computer contentUsing the Projection Login Code Presenting from a USB Reader Shutting down the projector Using the USB CameraDirect power off Basic Menu operationMenu system Main menu Sub-menu OptionsAdvanced System Setup BasicDhcp Main menu Sub-menu Options System Setup AdvancedDescription of each menu Display menu Picture menu Function Description Teaching Picture ModeTemperature Management Save SettingsColor Space TimerFunction Description Quick Auto SearchOperation SettingsPanel Key Advanced menu Security Settings DescriptionRemote ReceiverClosed System Setup Advanced menu Function DescriptionBaud Rate Test PatternCurrent Reset AllInformation menu Function Description NetworkCare of the projector MaintenanceExtending lamp life Setting Lamp Mode as EconomicLamp information Getting to know the lamp hourStatus Message Timing of replacing the lampReplacing the lamp Ensure the handle is fully laid flat and locked in place Tighten the screws that secure the lamp cover Resetting the lamp timerThermal events IndicatorsLight Status & Description Power events Lamp eventsCause Remedy TroubleshootingProjector specifications SpecificationsCeiling mount installation DimensionsSupported timing for PC input Timing chartSupported timing for Hdmi Hdcp input Supported timing for Video and S-Video inputs Supported timing for Component-YPbPrinputDisclaimer Warranty and Copyright informationLimited warranty Copyright