BenQ MX764 user manual Operation

Page 50

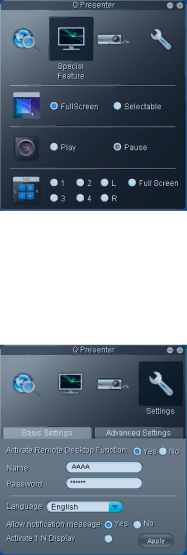
2.The Special Feature page provides some advanced functions to manage the projected images.

To display a full screen, click Full Screen.

To display a partial screen, click Selectable. A square appears on your screen. You can adjust its size and place it where you want to project.

To pause projection, click Pause.

If there are multiple computers connected to the projector, you can decide a display location by clicking 1, 2, 3, 4, L, R, or Full Screen.

3.The Basic Settings page allows you to configure QPresenter.

To activate Remote Desktop function, click Yes. Type the name and password for your computer. Go to the projector OSD menu SYSTEM SETUP: Advanced > Network Settings > Remote Desktop, and enter Account (the name for your computer) and Password, and highlight Connect, press MODE/ENTER.

50 Operation

Image 50
Contents Welcome MX763/MX764 Digital ProjectorTable of contents Refer servicing to qualified service personnel Important safety instructionsSafety Instructions Safety Instructions Confined. Allow at least 50 cm clearance Ceiling mounting the projector Projector features IntroductionShipping contents Rear/lower side Projector exterior viewFront/upper side Controls and functions Auto Remote control22 12. Network Keystone/Arrow buttons / Up DownMIC/VOL + VOLUME+/VOLUME- Adjusts the sound level MuteOperating the Laser pointer Numeric buttonsRemote control effective range Replacing the remote control batteriesFront Table Positioning your projectorChoosing a location Front CeilingProjection dimensions Obtaining a preferred projected image sizeWhen the projector position is fixed Shifting the projection lensConnection ConnectionConnecting video source devices Connecting audioAbout the microphone input Audio Settings Microphone Volume menuPlaying sound through the projector Connection Operation Starting up the projectorAuto-adjusting the image Adjusting the projected imageAdjusting the projection angle Fine-tuning the image size and clarityCorrecting keystone Using the menus Use / to highlight the System Setup Basic menuSetting a password Using a security cable lockUtilizing the password function Securing the projectorChanging the password If you forget the passwordEntering the password recall procedure Disabling the password function Switching input signal Changing Color SpaceMagnifying and searching for details Selecting the aspect ratioAbout the aspect ratio Setting the User 1/User 2 mode Using Wall ColorSelecting a picture mode Go to the Picture Picture Mode menuFine-tuning the image quality in user modes RED Top-Left Bottom-Left Top-Right Bottom-Right Setting the presentation timerTo cancel the timer, perform the following steps Hiding the image Remote paging operationsFreezing the image Locking control keys To activate the High Altitude ModeUsing the remote control Operating in a high altitude environmentAdjusting the microphone volume Adjusting the soundAdjusting the sound level Turning off the Power On/Off Ring ToneIf you are in a Dhcp environment Controlling the projector through a LAN environmentCable connection If you are in a non-DHCP environmentHighlight Wireless LAN and press MODE/ENTER Wireless connectionSetting the Infrastructure mode Operation Controlling the projector remotely through a web browser Operation Operation Iii Press Exit to go back to the remote network operation Operation Operation Using the web control lock Displaying images through QPresenter Downloading and installing QPresenterUsing QPresenter Operation Operation Using the Projection Login Code Using the USB cable to display computer contentUsing the broadcasting function Presenting from a USB Reader Using the USB Camera Shutting down the projectorDirect power off Main menu Sub-menu Options Menu operationMenu system BasicSystem Setup Basic AdvancedMain menu Sub-menu Options System Setup Advanced DhcpDescription of each menu Management Save Settings Picture ModeTemperature Display menu Picture menu Function Description TeachingSearch TimerFunction Description Quick Auto Color SpaceSettings OperationReceiver Advanced menu Security Settings DescriptionRemote Panel KeyTest Pattern System Setup Advanced menu Function DescriptionBaud Rate ClosedNetwork Reset AllInformation menu Function Description CurrentMaintenance Care of the projectorGetting to know the lamp hour Setting Lamp Mode as EconomicLamp information Extending lamp lifeTiming of replacing the lamp Status MessageReplacing the lamp Ensure the handle is fully laid flat and locked in place Resetting the lamp timer Tighten the screws that secure the lamp coverLamp events IndicatorsLight Status & Description Power events Thermal eventsTroubleshooting Cause RemedySpecifications Projector specificationsDimensions Ceiling mount installationTiming chart Supported timing for PC inputSupported timing for Hdmi Hdcp input Supported timing for Component-YPbPrinput Supported timing for Video and S-Video inputsCopyright Warranty and Copyright informationLimited warranty Disclaimer