Citizen Systems CBM-270 user manual Inserting the Paper

Page 24

CBM-270 User’s Manual

4.3Inserting the Paper

CAUTION:

1)Be sure to use the specified paper roll.

2)Use of non-specified paper may not guarantee the print quality, printing head life, and so on.

3)Do not use thermal paper when the printer has been set for label paper, and vice versa. It could cause malfunctioning of the printer or damage the printing head.

1.Hold the convexity on the rear of the printer cover, and raise it upward.

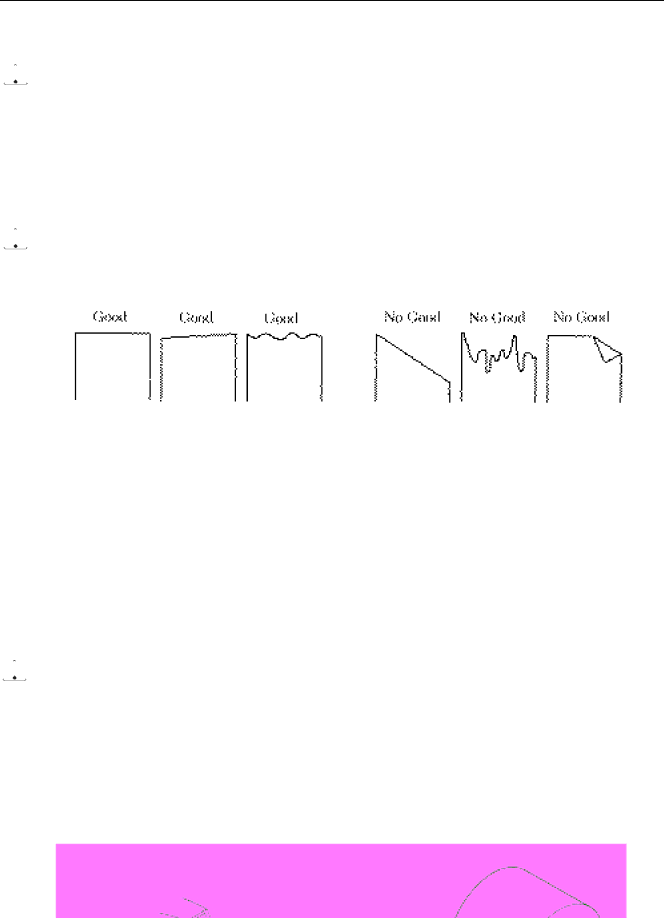
2.Cut the front end of the paper roll almost at a right angle.

CAUTION:

1)The printer cover is not stationary (Opening/Closing). After detaching it, be careful not to lose or break it.

2)Do not insert a ragged or dog-eared end of the paper roll, because it could result in a paper jam or insertion error.

3.Make sure that the power is turned on.

4.Pull the head-up lever to this side to raise up the printing head.

5.If there is still some paper remaining after a paper-out indication, eliminate the paper roll according to "4.4 How to Remove the Remaining Roll Paper."

6.Insert the front end of the paper roll straight into a paper insertion slot.

7.Set the paper roll firmly in the paper holder.

8.Put back the head-up lever. The paper roll is automatically pulled in by the platen roller to feed a constant amount of paper. (When auto-loading is enabled.) (For the label paper, it is fed to the print start position of the 2nd sheet.)

9.Put back the printer cover.

CAUTION:

1)If the paper roll is still slack, rewind the paper to remove the slack.

2)If the paper roll is tilted, raise the head-up lever to correct the paper roll position, or pull out the paper roll and set it again.

3)Do not open the printer cover while printing.

4)Do not hold or press the paper roll while printing, because it could cause a paper jam.

5)After the paper is set, the printer is made ready to start printing. Note that if data is remaining in the buffer, the printer will start printing after the paper is set.

6)Do not run the printer with its cover removed, because it could cause malfunctioning or an irregularity of the sensor.

Image 24
Contents Citizen LVD EMCWichtige Sicherheitsanweisungen Lärmemission kleiner 70dBA Sicherheitshinweis CBM-270 User’s Manual Safety Precautions Be Sure to Observe CBM-270 User’s Manual Precautions for Installation Precautions for Handling Daily Maintenance Contents German Appendix113 Basic Specifications FeaturesOutline UnpackingBasic Specifications EMI Paper Specifications Recommended PaperPrinting Position Head and Paper Cutter Layout Outer Appearance and Component Parts Connecting AC Adapter OperationCBM-270 User’s Manual Connecting Interface Cable Inserting the Paper How to Remove Remaining Paper Roll Eliminating the Paper Jam Feed Switch Function When Thermal Paper is UsedWhen Label Paper is Used When the Macro is ExecutedPaper Near End Function OFFAuto-Loading Function Self-Print FunctionOperation Panel and Display of Error Error Details12 Red/Black Print Precautions for Use OFFCBM-270 User’s Manual DIP Switch Setting Location of DIP SwitchDIP Switch Function Jumper Wire FunctionUSA Specifications Connectors Pin ConfigurationParallel Interface Input and Output Signals Input and Output SignalsElectrical Characteristics Timing Chart Data Receiving Control BufferingSerial Interface RXDDTR DSRData Configuration Error Detection Output TXD, DTR Printer Side Host SidePower Connector Maintenance and Service Command List Print Control FunctionsCommand Details Descriptions of Each ItemXxxx Command Details CBM-270 User’s Manual ESC SP n ESC ! n ESC % n ESC & s n m a p s×a m−n+1 ESC * m n1 n2 d k Print Results Dots single density Dots double density ESC − n ESC 3 nESC = n ESC D n k NUL ESC E nESC G n ESC J nESC !, ESC G See Sample Program and Print Results for ESC 2 on ESC R n Default Sample Program ESC V nESC a n ESC c 3 n Parallel Interface Only ESC c 4 nESC c 5 n ESC d nESC n n ESC t nESC Serial Interface Only Fixed to Not defined Sample ProgramESC n ESC $ n1 n2 ESC \ n1 n2 GS k n d k NUL UPC-A UPC-E JAN13 EAN JAN 8 EAN CodeCodabar NW-7 UPC-AJAN-8EAN CODE39ITF CodabarTest Code Btestcode A123UPC-E GS w n GS h nDefault See Also GS f Sample Program Print Results GS f n GS * n1 n2 d n1 × n2 × GS / mVertical Direction Horizontal Direction Normal mode CBM-270 User’s Manual GS n1 n2 n3 Only When Label Printer is Selected DC2 a nDC3 n GS FF GS FF, GSGS C0 m n GS C1 n1 n2 n3 n4 n5 n6 GS C2 n1 n2 GS C N1 N2 N3 N4 N5GS c GS a m n Only When Label Printer is Selected Character Codes TableInternational Domestic International Character Codes Table Appendix 1. Block Diagram Appendix 2. Outline Drawing Appendix 3. Wall Mounting Holes Layout Drawing German VorsichtPage ZU Beachtende Sicherheitsmassregeln Warnung VorsichtWarnung Vorsichtsmassregeln FÜR DIE Aufstellung Vorsichtsmassregeln FÜR DIE Handhabung Tägliche Wartung VorsichtBetrieb Anschließen des NetzteilsAnschließen des Schnittstellenkabels Einsetzen des Papiers Entnehmen der eingesetzten Papierrolle Beseitigen von Papierstau FEED-Schalterfunktion Papierende-FunktionBei Verwendung von Thermalpapier Bei Verwendung von EtikettenpapierBusy DTR/FAULT Paper Papiermangel-FunktionAutoladefunktion SelbstdruckfunktionBedienfeld und Fehleranzeigen 12 Rot/Schwarz-Druck Vorsichtsmaßregeln Fehler-EinzelheitenVorsicht DIP-SCHALTEREINSTELLUNG Lage der DIP-SchalterDIP-Schalterfunktion Jumperdraht-FunktionItalien Japan Wartung UND Dienst