S t y l i s t i c S T 4 0 0 0 S e r i e s T a b l e t P C U s e r ’ s G u i d e – S e c t i o n T w o
•If your system is equipped with a PC Card that allows you to connect to a wired or wireless network, you may be logged off the network after a period of inactivity while system operation is suspended. Contact your network administrator or help desk, or call Fujitsu Service and Support at
RESUMING SYSTEM OPERATION
To resume operation from either
•From Suspend-to-RAM mode
Status lights indicate that the system state is changing. It may take up to a minute before the system returns to the On state and system operation resumes. Note that the display turns on shortly before the pen becomes active due to the
•From Hibernate (Save-to-Disk) mode
Active data is read from the hard disk drive, and the system returns to the On state after a short time.
P O I N T
Note that power to several system components must be restored before system operation resumes. Allow sufficient time for system operation to resume before attempting to use the system. If your system uses Hibernate mode, it will take longer to resume operation as compared to using
•Use the system as you normally would once system operation resumes.
All programs resume at the point where execution stopped when system operation was suspended.
ADJUSTING THE DISPLAY BRIGHTNESS
There are two ways to adjust the brightness of your display:
P O I N T
Depending upon whether you are running your system on battery or AC power, the default screen brightness settings will be different. The screen brightness default for running on battery is lower than that on AC power in order to optimize battery life.
■Click the Tablet icon in the system tray at the bottom right of the screen. (When the cursor is on top of the icon, a message stating “Change tablet and pen set- tings” is displayed.) When the Tablet and Pen Settings
window appears, select the Display tab, and move the Screen Brightness slider to change the brightness.
■Click Start
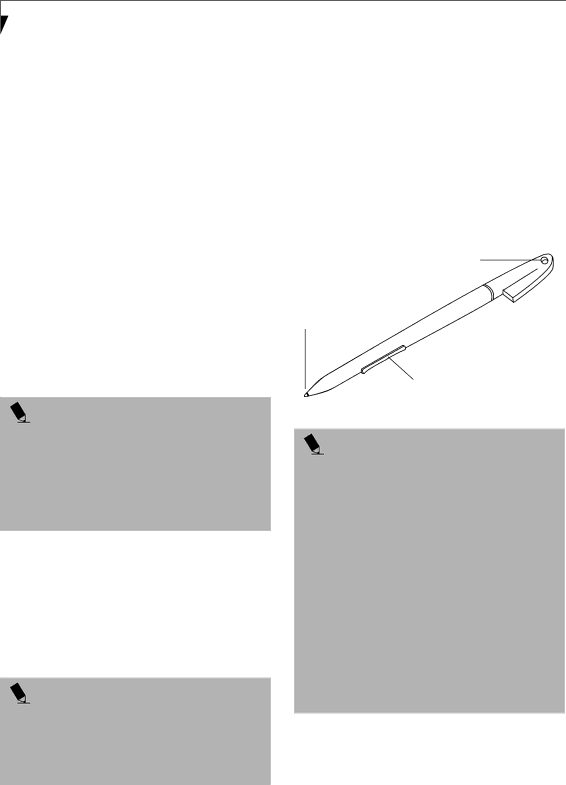
USING THE PEN
You can use the Stylistic ST4000 Series pen to generate and create electronic “ink”, to select items, and to navi- gate through programs on the Tablet PC. Programs that support handwriting recognition also allow you to write characters directly on the screen with the pen. You can also use the pen as a drawing tool.
Pen Tether Attachment Point
Tip Switch
Barrel Switch
Figure 2-1. Stylistic ST4000 Series Pen
P O I N T
The Stylistic ST4000 pen is a sophisticated,
•Do not gesture with the pen, use it as a pointer, or tap it on surfaces other than the Tablet PC screen.
•Do not try to turn the thumb grip on the pen; it is designed for inserting and removing the pen from the pen holder and for attaching a pen tether.
•Never store the pen with the tip bearing the weight of the pen (e.g., sitting tip down in a pencil cup). Storing the pen tip down could distort the internal mechanism over a period of time (especially in higher temperatures), causing the tip to act as if it is always depressed. To avoid damage, the pen should be stored in the pen holder when not in use.
The screen reacts when the pen tip is approximately 1/8 inch
22