Panasonic BT-LH2550P, BT-LH2550E manual Time Code display TC, Closed Caption CC display

Page 17

How to Use the On Screen Menu (continued)

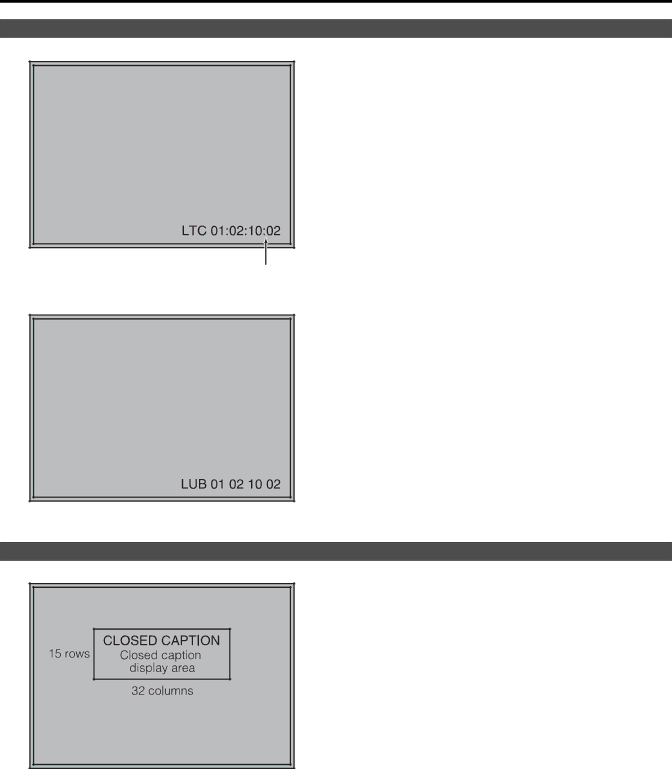
TIME CODE display (TC)

( : ) NDF ( . ) DF

Use the menu to display and set the time code for

HD-SDI signal input. It also allows you to switch display mode (VITC, LTC, VUB, LUB).

In VITC and LTC display mode:

Displays the time code in hours: minutes: seconds: or frames.

In drop-frame mode, a different delimiter between seconds and frames is used.

Note:

Read errors are displayed as “--:--:--:--”

In VUB and LUB display modes:

BG8, BG7, BG6, BG5, BG4, BG3, BG2, BG1 appear in the stated order. BG: binary group

The (:) delimiter does not appear.

Note:

Read errors are displayed as “--:--:--:--”

Display position and character size can be modified

( page 39, “POSITION” and “FONT SIZE” in the “DISPLAY SETUP” menu).

CLOSED CAPTION (CC) display

Use the menu to display and set closed caption display for VIDEO (NTSC) signals. It also allows you to select display mode (CC1 to CC4) ( page 39, “CLOSED CAPTION” and “MODE SELECT” in the “DISPLAY SETUP” menu.).

Note:

Closed captions are not available during HV DELAY.

In split-screen display, closed captions appear only when a VIDEO input line is displayed in the main window.

17

Image 17
Contents BT-LH2550P BT-LH2550E This Equipment Must be Grounded Read this first ! for BT-LH2550PDeclaration of Conformity Read this first ! for BT-LH2550PDo not Remove Panel Covers by Unscrewing Them Read this first ! for BT-LH2550EThis Equipment Must be Earthed Operating precaution Transportation precautionsApparatus is compliant with Read this firstContents Precautions for UseStandard accessories Optional unitsOutline AC Adaptor DimensionsVideo monitor unit Power LED Front panel controls Power switchControls and Their Functions Front view Rear view Tally lamp page 35Front panel controls Adjust buttonInput button Menu buttonRear panel terminals Power lamp Power switch on , OFFAC Adapter AC in AC inletConnecting the power cord Power SupplyInput signal status How to Use the On Screen MenuPicture/volume adjusting menu Sharpness displayMenu display Function displayAudio level meter display Closed Caption CC display Time Code display TCEnter Menu operationsBright Light Backlight Volume Picture/volume adjusting menu operationsPhase Chroma Saving user data Loading user data User DataMain Menu Menu configurationMarker Sub menu Setting DescriptionMarker BACK*2GPI PRESET2*5 GPI PRESET1*5Marker TYPE*4*6 Cross HatchVista marker, Cnsco marker Marker typesArea marker Center markerMain Menu Video Config ANAMO*2*8 MONO*2SD ASPECT*2 SCAN*2Color TEMP.*1 ResetGain RED Gain GreenSystem Config RXD TXD DTR DSR GND RTS CTS Equipment required for calibrationRESET*2 Performing Auto Calibration Reset operationAuto CALIBRATION*1Function FunctionAuto Setup HV DelayGamma Select SD AspectBlue only AutosetupSUB Input SEL Audio Level MeterEnable DisableGPI GPI ControlInput Select Phase AUTOSETUP*1Clock WXGA/XGAAudio Display Setup Normal screen TWO Window function 1920 1280 640 960 TWO Window sizeMain window HD and sub-window SD DVI-COMP NtscPAL Hourmeter ControlList of setting restrictions available, × not available Chroma Bright Operating conditions Remote SpecificationsGPI terminal RS-232C terminal RS-232C remote control methodSetting command Command Description Data Response This command returns the sub-window setting Query commandError Display Maintenance inspecionsMaintenance Specifications SDI1 SDI2 YP BP R SpecifictionsMemo Panasonic Canada Inc