Aiwa VX-S207U Outdoor Antenna, Lightning, Maintenance, Condensation, Damage Requiring Service

Page 3

Overloading - Do not allow anything to rest on the power cord. Do not overload wall outlets and extension cords because this can result in fire or electric shock. Do not place the unit in an area where people will walk on the cord.
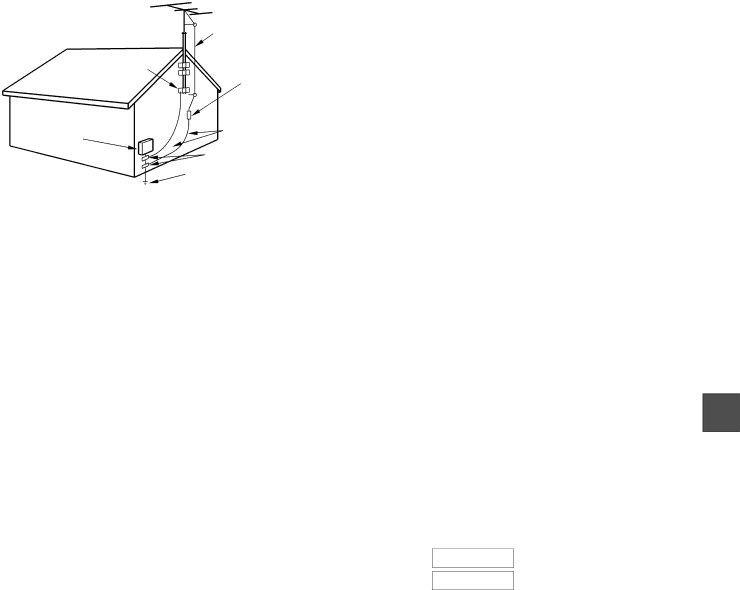
Outdoor Antenna

Power lines - An outside antenna system should not be located in the vicinity of overhead power lines or other electric light or power circuits, or where it can fall onto such power lines or circuits. When installing an outside antenna system, extreme care should be taken to avoid touching power lines or circuits because contact with them may be fatal.

Outdoor Antenna Grounding - If an outside antenna or cable system is connected to the unit, be sure the antenna or cable system is grounded so as to provide some protection against voltage surges and built-up static charges. Section 810 of the National Electrical Code, ANSI/ NFPA No.70, provides information with regard to proper grounding of the mast and supporting structure, grounding of the lead-in wire to an antenna discharge unit, size of grounding conductors, location of antenna-discharge unit, connection to grounding electrodes, and requirements for the grounding electrode. See the figure.

Antenna Grounding According to the National Electrical Cord


ANTENNA LEAD IN WIRE

GROUND CLAMP

ANTENNA DISCHARGE

UNIT


(NEC SECTION 810-20)

ELECTRIC

GROUNDING

SERVICE

CONDUCTORS

EQUIPMENT

(NEC SECTION 810-21)

GROUND CLAMPS

POWER SERVICE GROUNDING ELECTRODE SYSTEM

(NEC ART 250 PART H)

NEC-NATIONAL ELECTRICAL CODE

Lightning

For added protection during a lightning storm, or when left unattended and unused for long periods of time, unplug the unit from the wall outlet and disconnect the antenna or cable system. This will prevent damage to the unit due to lightning and powerline surges.

Maintenance

Cleaning - Unplug the unit from the wall outlet before cleaning. Do not use liquid cleaners or aerosol cleaners. Use a damp cloth for cleaning.

Condensation

If the unit is brought directly from a cold to a warm location, moisture may condense inside the unit and cause damage to the video heads and tapes played on it. When you first install the unit, or when you move it from a cold to a warm location, wait for about two hours before operating the unit.

Damage Requiring Service

Unplug the unit from the wall outlet and refer servicing to qualified service personnel under the following conditions:

1)When the power cord or plug is damaged or frayed.

2)If liquid has been spilled into the unit.

3)If the unit has been exposed to rain or water.

4)If the unit does not operate normally when following the operating instructions. Adjust only those controls that are covered by the operating instructions because improper adjustment of other controls may result in damage to the unit and will often require extensive work by a qualified technician to restore the unit to normal operation.

5)If the unit has been dropped or the cabinet has been damaged.

6)When the unit exhibits a distinct change in performance - this indicates a need for service.

Do not attempt to service the unit yourself because opening or removing covers may expose you to high voltage or other hazards. Refer all servicing to qualified service personnel.

Replacement Parts - When replacement parts are required, be sure the service technician has used replacement parts specified by the manufacturer or having the same characteristics as the original part. Unauthorized substitutions may result in fire, electric shock or other hazards.

Safety Check - After completion of any service or repairs to the unit, ask the service technician to perform a safety check to ensure that the unit is in proper operating condition.

Note to CATV system installer:

This reminder is provided to call the CATV system installer’s attention to Article 820-40 of the NEC that provides guidelines for proper grounding and, in particular, specifies that the cable ground should be connected to the grounding system of the building, as close to the point of cable entry as practical.

OWNER'S RECORD

For your convenience, record the model number and serial number (you will find them on the rear of your set) in the space provided below. Please refer to them when you contact your AIWA dealer in case of difficulty.

Model No.

Serial No.

ENGLISH 2

Image 3
Contents VX-S207U VX-S137U Electric Power InstallationLightning MaintenanceDamage Requiring Service Outdoor AntennaWelcome Connecting the antenna To use the security hook for safety VX-S207 onlyBasic connections Mount the supplied antenna in the antenna holder To connect the supplied telescopic antenna VX-S137 onlyTo connect a Catv system without using a Catv converter To connect a Catv system using a Catv converterCatv connections Controlling the TVs and CATVs Preparing the remote controlUsing the remote control Inserting the batteriesSet the TV VCR/CATV selector to TV VCR Setting the languagePress Power to turn on the unit Press Menu Before startingSetting the clock Setting the Auto ClockTo correct the digits while setting Setting the time by the daylight saving time Setting the standard time according to your areaNormally the Auto setting is sufficient Adding or erasing the channels manually Setting the channelsShowtime Sample Channel Line Up Chart TV Station VCR Plus+Checking the channel set-up to use VCR Plus+ system For exampleWatching a TV program Setting the sleep timerFull Screen Text Selecting the closed captions modePress Caption repeatedly to select the caption mode CaptionsAdjusting the picture Press SET/TRACKING + or to adjust the settingIncreasing Decreasing Numbers Adjusting the sound Makes the bass Sound stronger Sound weakerMakes the treble Sound stronger Sound weaker Press SET/TRACKING + or to select on TIMER, then press Enter Setting the On-TimerSetting the Off-Timer To correct the data while settingPress SET/TRACKING + or to display SET, then press Enter Press d Play to start playback Playing back a tapeTo stop playback Insert a cassetteAdditional functions If you cannot get a clear playback picturePress Menu To cancel repeat playbackVarious search functions Playing back a tape repeatedlyTo stop End Search To search the next index signalSearching with the index function Index Search Searching the end of the recorded program End SearchTo prevent an accidental recording Recording a TV programTo stop recording To pause recordingPress w REC/OTR When you set the timer for more than two timer programsStop recording when recording without timer Recording with One-Touch RecordingTo extend the recording duration while recording Setting the timer withChanging the setting Example Setting the timer manuallyTo set the daily/weekly timer Press SET/TRACKING + or to set the date, then press EnterSelect the tape speed Connecting with another VCRDubbing OperationPress SET/TRACKING + or to display the desired setting Setting the V-chipSetting the V-chip Registering the passwordAppears instead of the number Chip SET menu appears Changing the passwordWhen TV-MA is selected, the items below appear To use the TV after the TV is protectedRecording the sound of the SAP Broadcast Multichannel TV Sound MTS and Hi-Fi audio sound systemOn-screen display Playing back a MTS-program recorded tapeIdentifying the on-screen display items Care and maintenance Troubleshooting+1 to W+84 Specifications14 to Catv 5A, A-1 to A-5, a to WParts and controls Front panel VX-S207Front panel VX-S137 Rear panel Remote controlAlimentation AvertissementFoudre Remarque pour l’installateur du systè me CatvAntenne externe En cas de panneSous-titres Systè me VCR Plus+ et lecture monotoucheDiffusion MTS son té lé visé multicanal PuceRaccordement de l’antenne Raccordements de baseUtilisation du crochet de sé curité VX-S207 uniquement Remarque Placez l’antenne fournie dans le porte-antennePour raccorder un systè me Catv avec un convertisseur Catv Raccordements CatvIntroduction des piles Préparation de la télécommandeCommander un téléviseur et un convertisseur Catv Utilisation de la télécommandeRéglez le sélecteur TV VCR/CATV sur TV VCR Sélection de la langue d’affichageAppuyez deux fois sur Menu pour revenir à ’é cran normal Avant de commencerAppuyez sur SET/TRACKING + ou pour ré gler les minutes Réglage de l’horlogeRéglage automatique de l’horloge Pour corriger des chiffres en cours de ré glageAppuyez deux fois sur Menu pour revenir à l’é cran normal Réglage de l’heure d’étéRéglage de l’heure de votre zone géographique Appuyez sur Enter pour sé lectionner onAppuyez deux fois sur Menu pour revenir à l’é cran normal Sélection des chaînesAjout ou suppression manuel de chaînes Appuyez sur Enter pour sé lectionner TV ou CatvUSA Network Par exempleExemple tableau de concordance des canaux Station de Té lé vision VCR Plus+Réglage du programmateur d’extinction Regarder une émission de télévisionSous-titres Sélection du mode de sous- titres’affichage change selon la séquence suivante Pas d’affichage Texte CNL2 Texte CNL1 Sous-titres désactivéRéglage de l’image Rend les couleurs Claires plus vertes Claires plus rougesRend l’image plus Nette Douce Droit Gauche Réglage du sonRenforce les graves Atténue les graves Renforce les aiguës Atténue les aiguësRéglage du programmateur de mise sous tension ’indicateur ON-TIMER de l’appareil s’allume Réglage du programmateur de mise hors tensionPour corriger les donné es en cours de ré glage Appuyez sur d Play pour dé marrer la lecture Lecture d’une cassettePour arrê ter la lecture Introduisez une cassetteFonctions complémentaires Appuyez sur Call pour afficher le compteur de bande Différentes fonctions de rechercheLecture répétée d’une cassette Pour annuler la lecture ré pé té ePour arrê ter la recherche rapide Pour rechercher le signal d’index suivantAppuyez sur REC. END Search en mode d’arrê t Recherche avec la fonction ’indexation Recherche d’indexPour é viter un enregistrement accidentel Enregistrement d’une émission téléviséePour arrê ter l’enregistrement Pour activer une pause d’enregistrementEnregistrement avec la fonction monotouche Si vous avez programmé plus de deux enregistrementsAppuyez sur w REC/OTR Program dans ce menu correspond au bouton VCR PLUS+ Si vous faites une erreur, appuyez sur CancelRéglage du programmateur avec le système VCR Plus+ Vous pouvez programmer jusqu’à 8 émissionsPour programmer un enregistrement journalier Changement des réglagesPour annuler un enregistrement programmé Si des enregistrements programmé s se chevauchentExemple Pour programmer un enregistrement journalier/hebdomadairePour annuler un programme Avant de ré gler le programmateurSélectionnez la vitesse de la bande CopieRaccordement d’un autre magnétoscope FonctionnementRéglage de la puce Enregistrement du mot de passeActivation de la puce Modification du mot de passe Appuyez sur SET/TRACKING + ou pour sé lectionner V-CHIPAppuyez sur Enter pour afficher on Enregistrement du son d’une émission SAP Son télévisé multicanal MTS et système de son Hi-FiAffichage des indicateurs Lecture d’une émission MTS enregistrée sur une cassetteIdentification des indicateurs affichés Soin et entretien DépannageSpécifications Composants et commandes Panneau frontal VX-S207Panneau frontal VX-S137 Panneau arrière Télécommande8A-JTD-901-31 000620DTN-YX