Britax Diplomat manual Restraint Functions, Switching the Latch Harness

Page 29

Restraint Functions

Switching the LATCH Harness

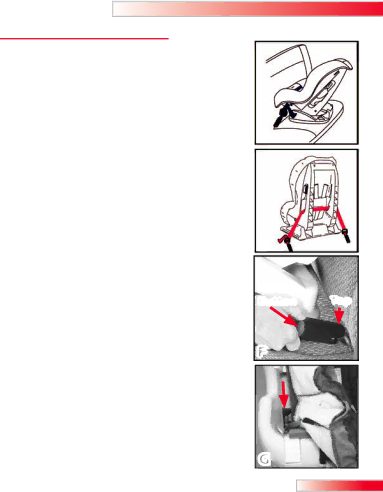
The LATCH harness must be switched for proper alignment in rear facing (Fig.

D)or forward facing (Fig. E) installations. Complete the following procedure to switch the connectors.

NOTE: LATCH connectors must be in an upright position (as shown in figure G) and strap should be tight and not twisted to ensure proper installation.

1 Pull the LATCH harness and connectors out of the current belt path OR from the storage slots (Fig. F).

2 Align the LATCH harness in the appropriate belt path.

Refer to figure D for rear-facing installation OR figure E for forward-facing installation.

• Verify that the harness is not twisted.

3Follow instructions for restraint installation with LATCH.

D

E

Release

Button Top

F

G

27

Image 29
Contents Diplomat Page Table of Contents Death or Serious Injury can occur Page Important Notes Safety InformationRegistration CertificationMaximum Height Rear-Facing Weight Range Rear-FacingForward-Facing Aircraft Installation Installation AircraftRear-Facing Installation Forward-Facing InstallationFeatures Do not discard foam inserts found under the cover FeaturesVehicle Compatibility Vehicle Safety BeltsVehicle Seating Positions Vehicle Buckle Position Latch Installation Installation Rear FacingLatch connector Under cover seeRemoval Installation methodEach Latch strap tight fig. E Verify vehicle belt is not twisted, then buckle fig. C Lap/Shoulder Belt InstallationInstallation Rear Facing Do not install with non-locking ELR, 2-point vehicle belt Lap-Belt InstallationInstallation Rear Facing Installation Forward Facing Installation Forward Facing 1Place child restraint forward facing on vehicle seat Removal Lap-Belt Installation Safety Information Installation Versa-TetherTether strap into a V shape Using the Versa-TetherTether to an approved anchor point Pull Versa-Tether strap to remove all SlackRear-Facing Tether Connector Strap Energy-Absorbing Tether Restraint Functions Switching the Latch HarnessFollow instructions for restraint installation with Latch Recline Adjustment Storing the Latch ConnectorsInfant Body Pillow Adjusting the Chest ClipChest Clip Fastening the Chest Clip Releasing the Chest Clip1Hold harness buckle with one hand Harness Buckle Fastening the Harness BuckleReleasing the Harness Buckle Harness HeightSecuring Your Child Securing Your ChildSliding pieces apart fig. B Unfasten harness buckle by pressingHarness Height Adjustment Cover Removal Care and Maintenance1Remove infant body pillow Refitting the CoverCleaning the Shell Cleaning the Cover and PillowsSponge Clean using warm water and mild soap Cleaning the HarnessRethreading the Harness Buckle Harness Buckle RemovalCleaning the Harness Buckle Limited ONE-YEAR Warranty WarrantyPage