York YKSMU2x0-0 Logging On the Remote User Interface, Logging Off the Remote User Interface

Page 24

428516-YUM-B-0908

Logging On the Remote User Interface

To log on the remote user interface:

1.Open your Internet browser and type the IP address of the System Manager/ Coordinator in the address bar. Example:

http://192.254.12.3

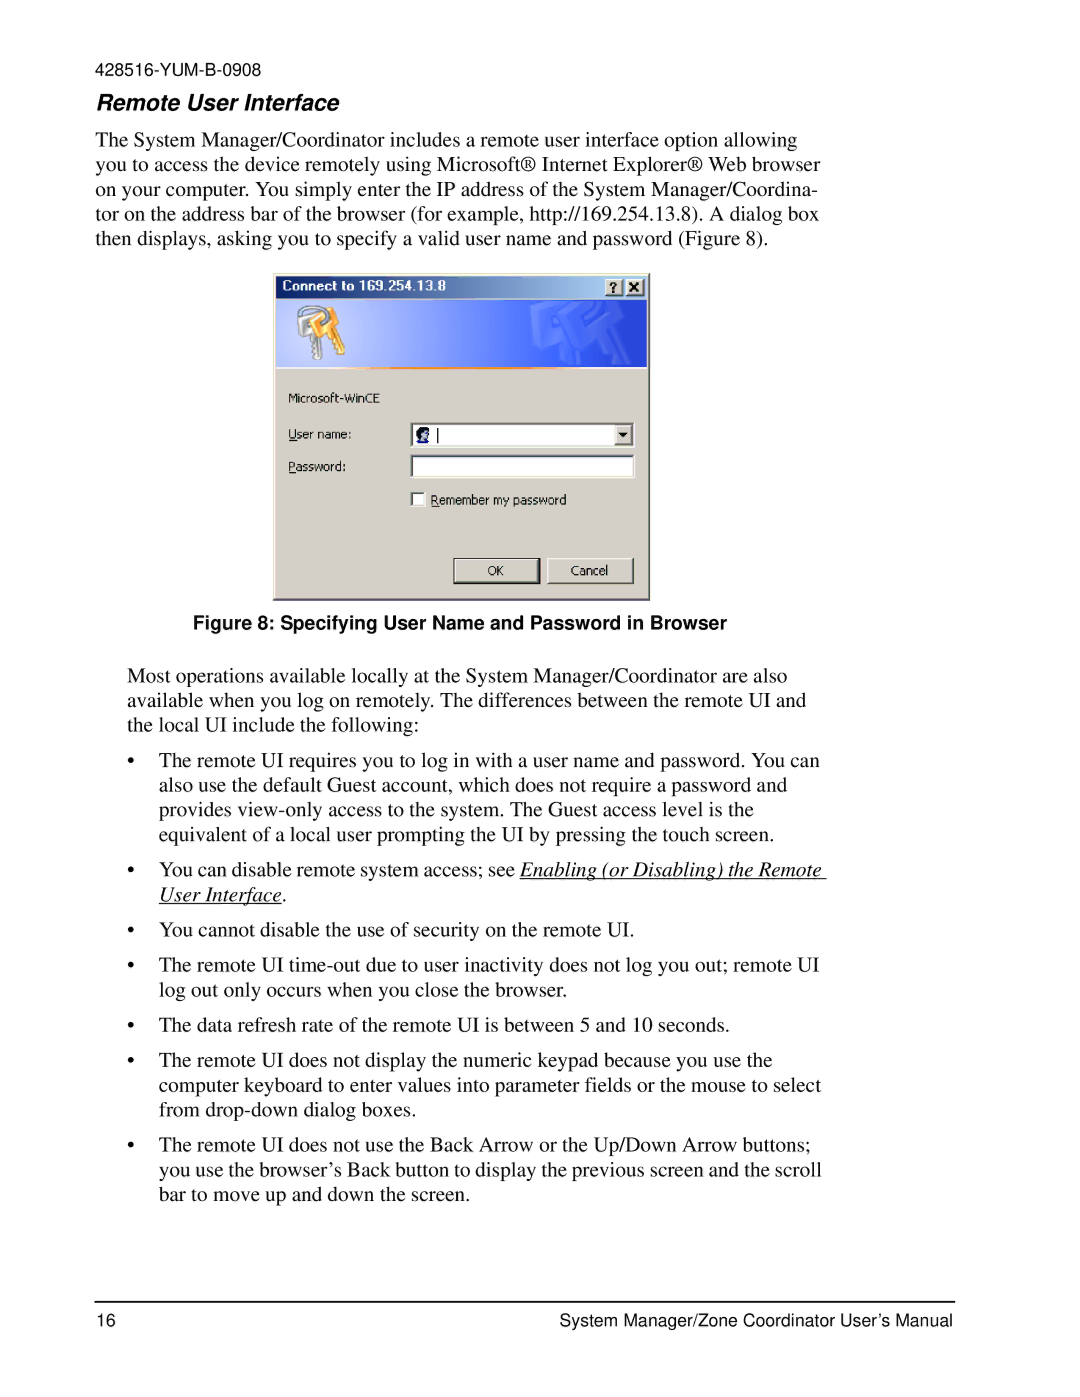
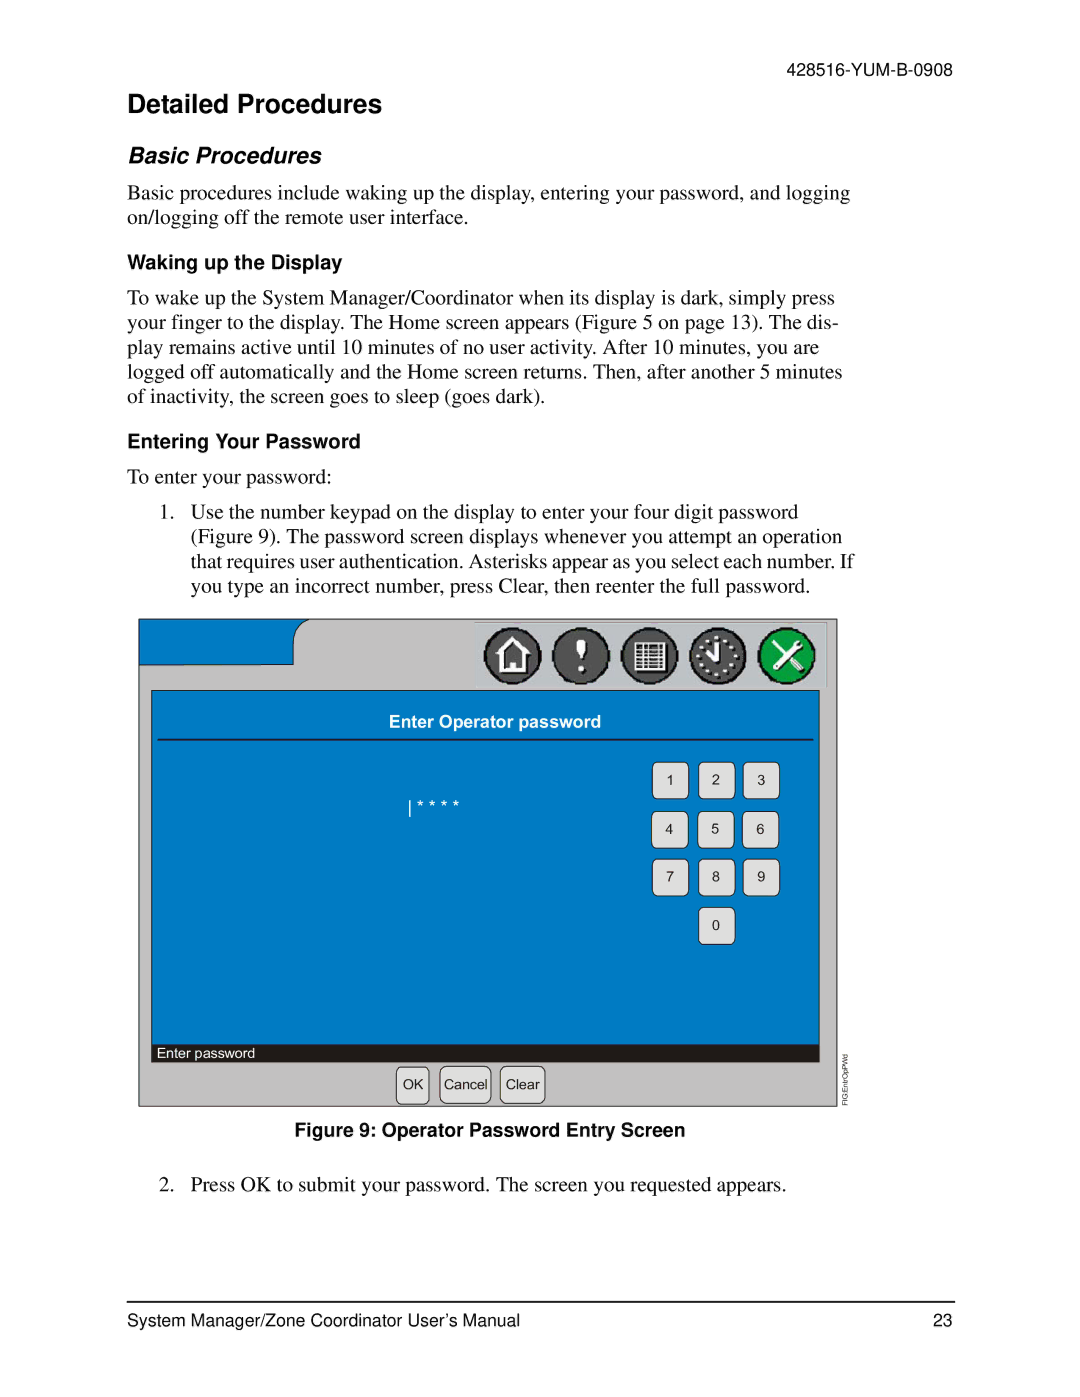
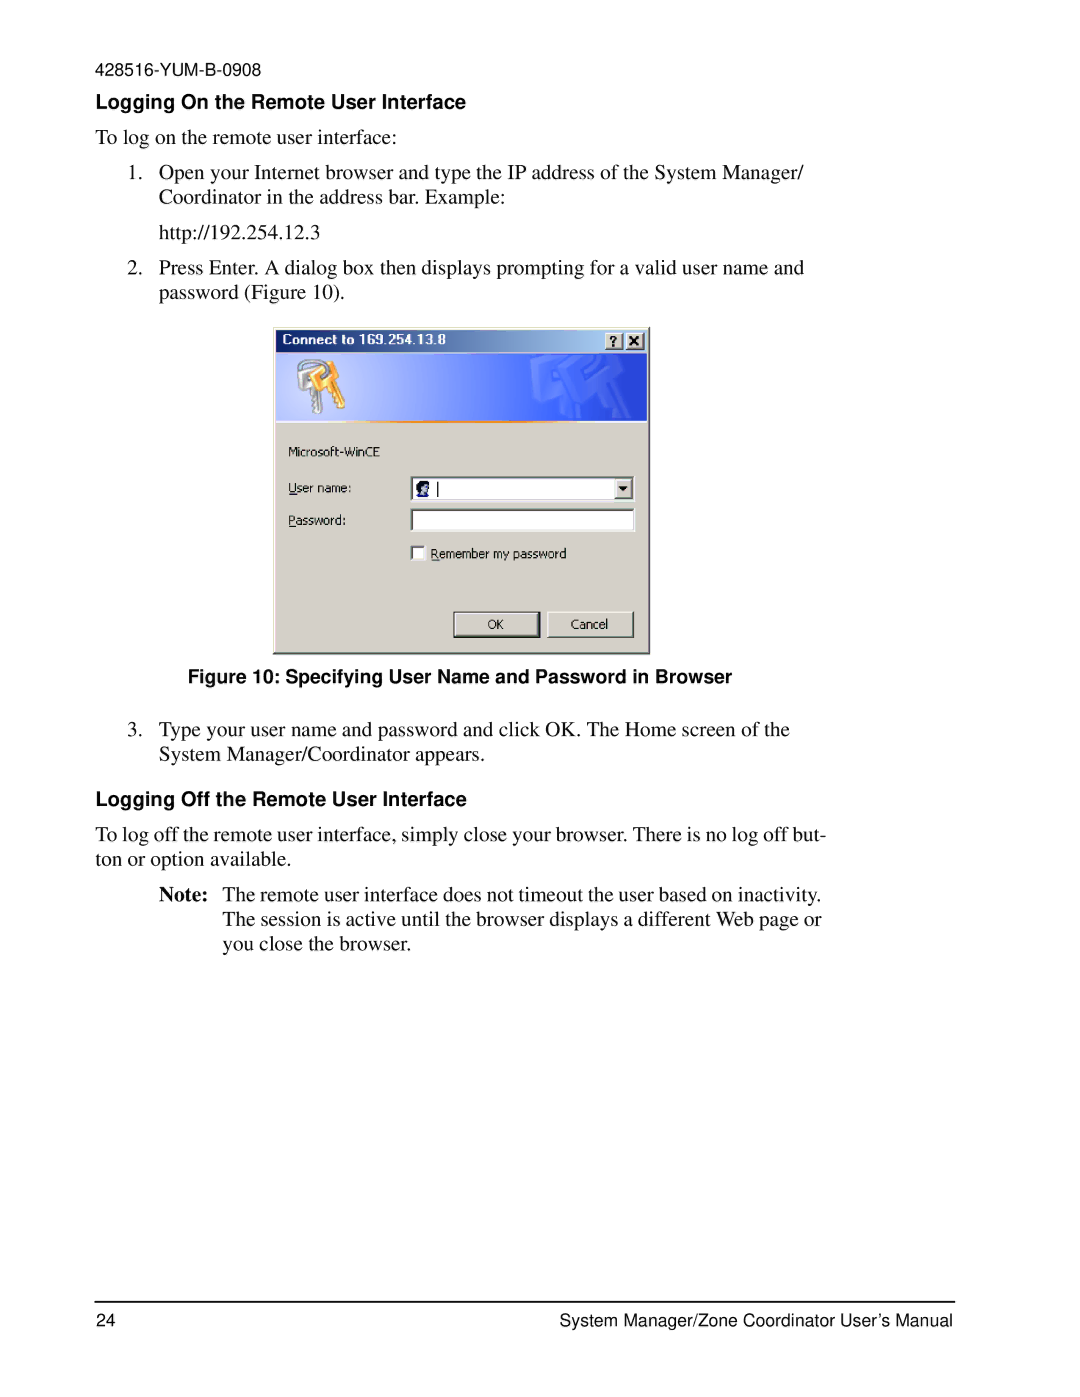
2.Press Enter. A dialog box then displays prompting for a valid user name and password (Figure 10).

Figure 10: Specifying User Name and Password in Browser

3.Type your user name and password and click OK. The Home screen of the System Manager/Coordinator appears.

Logging Off the Remote User Interface

To log off the remote user interface, simply close your browser. There is no log off but- ton or option available.

Note: The remote user interface does not timeout the user based on inactivity. The session is active until the browser displays a different Web page or you close the browser.

24

System Manager/Zone Coordinator User’s Manual

Image 24
Contents User’s Manual System Manager/Zone Coordinator Basic Procedures Setup ProceduresScheduling Procedures Zones, Groups, and Members Event SchedulingAlarm Procedures Summary ProceduresZone Setup Procedures Zoning System Setup ProceduresAuxiliary Points Setup Procedures Dial-up Communication ProceduresDocument Introduction System Manager/Zone Coordinator on the Network System Configuration System StartupSystem Manager/Coordinator Menu Structure Local Controller Display Menu StructureScreen Layout ZC6 DetailsIcons on Main Selection Bar Title Area Main Display AreaHelp Text/Paging Information Area Navigation AreaEnter Password Screen Three User Password LevelsEnter Operator password Default Passwords Provided List of Default PasswordsContents of Home Screen Display Home ScreensYK-SMU-0 Setup Display and Navigation ScreensData Entry Screens Schedule 1 Mon Occupancy TimeSpecifying User Name and Password in Browser Remote User InterfaceAlarms and Alarm Priorities Types of AlarmsAlarm Destinations Alarm DetectionBuffer Limitation PagersZones, Groups, and Members Event SchedulingText Messages Temporary Occupancy OverrideGlobal and Instant Shutdown Trend Data CollectionAll Schedules Temporary Occupancy Exception Schedules Display Units Display Units on User InterfaceMaintenance Procedures Basic Procedures Entering Your PasswordWaking up the Display Logging On the Remote User Interface Logging Off the Remote User InterfaceSetup Procedures Setup Options Menu StructureSetting Date and Time Parameters Time ManagementTime Management Parameters Changing the Administrator or Operator Password Change Operator PasswordEnabling or Disabling Password Security Security PasswordEnabling or Disabling the Remote User Interface Remote User InterfaceModem Setup Setting up a ModemSpecifying Ethernet Settings Modem ParametersEthernet Setup Ethernet ParametersYK-SMU-0 Display Setup Selecting Display UnitsCalibrating the Display Calibrate Screen Specifying System Manager/Zone Coordinator Name System Manager NameEntering Job Name Job NameScheduling Procedures Schedule Options Menu Structures Schedule 1 Daily Schedules Adding a ScheduleSchedule 1 Schedule Mon Example Schedules Screen for MondayDeleting a Schedule Delete Schedule ScreenSelect New Member for Schedule Adding a Member to a ScheduleSchedule 1 Member List Deleting a Member from a ScheduleAdding an Exception Schedule Properties for Exception May 15, 2008 through May 15Setting up Temporary Occupancy Time Properties for Exception Definition ScreenBeginning Temporary Occupancy of a Schedule Temporary Occupancy TimeEnding Temporary Occupancy of a Schedule Beginning or Ending Temporary Occupancy to All SchedulesAlarm Procedures Alarm Options Menu StructurePager Setup Configuring Pager as Alarm DestinationPager Setup Parameters Part 1 Email Setup Pager Setup Parameters Part 2Configuring E-mail Account as Alarm Destination Mail Destination Setup Parameters Configuring Text Message as Alarm DestinationText Message Setup Text Message Setup Parameters Part 1Text Message Setup Parameters Part 2 Setting Alarm IndicatorsAlarm Priorities That Activate Alarm Indicators Screen Alarm Priorities that Activate Alarm IndicatorsYK-SMU-10 Alarms Viewing an Alarm SummaryDeleting One or All Alarms Alarms Detail ScreenSummary Procedures Summary Options Menu StructureYK-SMU-10 Summary Viewing System SummariesZC6 Zone Temperature Trend Viewing Trend DataZone Setup Procedures Zone Setup Options Menu StructureZC6 Zone Setup Setting Up a Changeover Bypass ZoneZone Setup Parameters Setting Up a CV RTU ZoneCV RTU 24 Zone Setup CV RTU Zone Setup ParametersVAV 24 Zone Setup Setting up a VAV RTU ZoneVAV RTU Zone Setup Parameters Editing a Zone Name Zone NameZC6 Zone Status Viewing Zone StatusCopying Zone Setup to All Zones Requesting Global Shutdown of all Zones in all Systems Instant Shutdown of All SystemsCV RTU1 Diagnostic Viewing Device DiagnosticsZoning System Setup Procedures Zoning System Setup Options Menu StructureYK-ZCU Zoning System Setup Setting Up a Zoning SystemZoning System Setup Parameters Zoning System Setup Parameters VAV RTUYK-ZCU Zoning System Status Viewing Zoning System StatusRequesting Instant Shutdown of a Zoning System Instant Shutdown of CV RTU24Balance Mode Balancing a Zoning SystemAuxiliary Points Setup Procedures Auxiliary Points Setup Options Menu StructureSetting up Auxiliary Points IOM Points Setup Selections Part 1IOM-1 Auxiliary Points Selection IOM Points Setup Selections Part 2 BO4Editing an IOM Controller Name IOM NameIOM-1 Auxiliary Points Details Viewing Auxiliary Points StatusAI1 Trend Viewing IOM Controller Point Trend DataDial-up Communication Procedures Creating a Dial-up ConnectionGetting Ready Window Connection Name Window Connection Availability Window Completing the New Connection Wizard New Connection Window Dialing up a System Manager or Coordinator Connection WindowMaintenance Options Menu Structure Backing up Current Configuration YK-SMU-0 Backup to USB Flash DriveRestoring Configuration Information YK-SMU-0 Restore from USB Flash DriveRestore Confirmation Screen System Manager Restoring Factory Settings YK-SMU-0 Restore Factory DefaultsRelearning Connected Devices YK-SMU-0 Relearn Connected DevicesRestarting the System Manager/Zone Coordinator