Optimus 745 owner manual Fm Page 25 Wednesday, July 14, 1999 649 PM

Page 25

13-1293.fm Page 25 Wednesday, July 14, 1999 6:49 PM

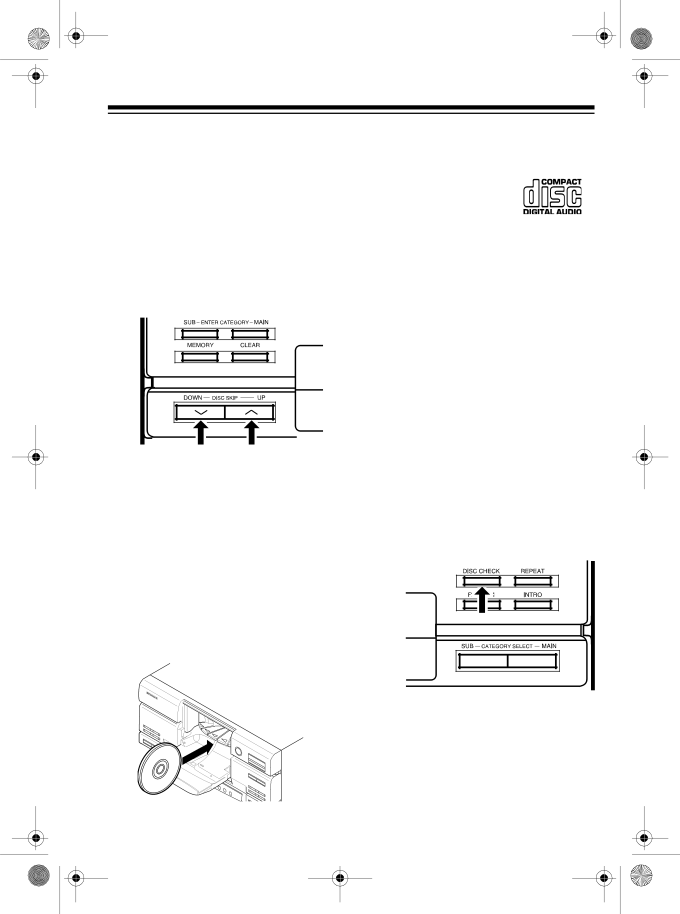
3.Repeatedly press DISC SKIP DOWN or UP on the CD changer (or DISC SELECT – or + on the remote control) until DISC and the disc number you want to select appear on the display’s upper line, and the disc number flashes on the display’s lower line. The platform inside the CD changer rotates the slot for that disc number to the front.

Cautions: To prevent damage to the CD changer:

Do not manually rotate or stop the platform while it is rotating.

Do not load or unload a CD while the platform is rotating.

4.To load a CD, hold it vertically by the edges with the label side to the right, then gently insert it into the slot in the center of the CD changer.

Cautions: To prevent damage to the CD:

• Load only CDs that are marked with:

Do not load anything other than 5-inch CDs into the CD changer. Do not load single 3- inch CDs with any type of adapter device.

Do not load more than one CD into the same slot.

Do not force a CD into the load- ing slot. (While loading a CD, always gently insert the CD into the loading slot, then release it.)

5.Repeat Steps 3–4 to load up to 24 CDs.

6.Push the CD changer’s door up until it clicks to close it.

7.Press DISC CHECK. CHECKING DISCS scrolls once and flashes three times on the display.

The CD changer selects each slot on the platform and checks only for the presence of a CD in each slot on the platform, not if the CD is defective or loaded incorrectly.

25

Image 25
Contents System Stereo Rack System Fm Page 2 Wednesday, July 14, 1999 649 PM Stereo Tuner FeaturesDual Cassette Deck FCC Wants YOU To Know Contents Repeat Play Random Play Unpacking System PreparationPlacing Speakers Connecting Speakers Center Speaker Front SpeakersSurround Speakers Connecting an FM Antenna Connecting AntennasConnecting the AM Loop Antenna Connecting Other Audio SourcesConnecting a Turntable Connecting Video EquipmentPutting Batteries in the Remote Control Connecting HeadphonesResetting System Connecting PowerListening Safely Basic Operation OperationUsing the Remote Control Dolby PRO Logic Surround Selecting the Dolby Surround ModeDolby Surround Encoded Material Press Test Tone to turn off the test tone Adjusting the Sound Manual Tuning Seek Tuning Using the TunerAutomatically Storing Stations Memory TuningManually Storing Stations Selecting Preset StationsChanging the Tuning Increment Loading CDS Using the CD ChangerFm Page 25 Wednesday, July 14, 1999 649 PM Removing CDS Selecting a CDAgain Playing CDSAudible Search Skipping TracksRandom Play Repeat PlayIntro Scan Assigning Category and Subcategory Names to Loaded CDS Assigning Preset Category NamesCreating and Assigning New Category Names Creating and Assigning Subcategory Names Changing/Erasing Category and Subcategory Names Category/Subcategory Play Programming and Playing a Programmed PlaySequence Adding Selections to the Programmed Sequence Reviewing the Programmed SequenceChanging a Programmed Sequence Clearing the Programmed Sequence CD Care TipsLoading a Cassette Tape Using the Cassette DeckPlaying a Cassette Tape Using Dolby Noise Reduction Using Consecutive Play Deck 2 to DeckDubbing Copying Cassette Tapes RecordingDubbing Copying CDs Recording from the Tuner or an Audio Source Storing Cassettes Tape TipsPreventing Accidental Erasure Erasing a Cassette TapeDisc Error scrolls TroubleshootingRepeatedly press FM Care and Maintenance Cleaning the TAPE- Handling Parts General SpecificationsAmplifier CD Changer Infrared Remote ControlDual Cassette Deck RadioShack