Multiquip J-SERIES Seriestrowel Assembly and Installation, HandleTube Installation All Models

Page 19

J-SERIESTROWEL — ASSEMBLY AND INSTALLATION

Assembly and Installation

Before the trowel can be put into operation there are some components that must be installed before the trowel can be used. This section explains how to install those components.

HandleTube Installation (All Models)

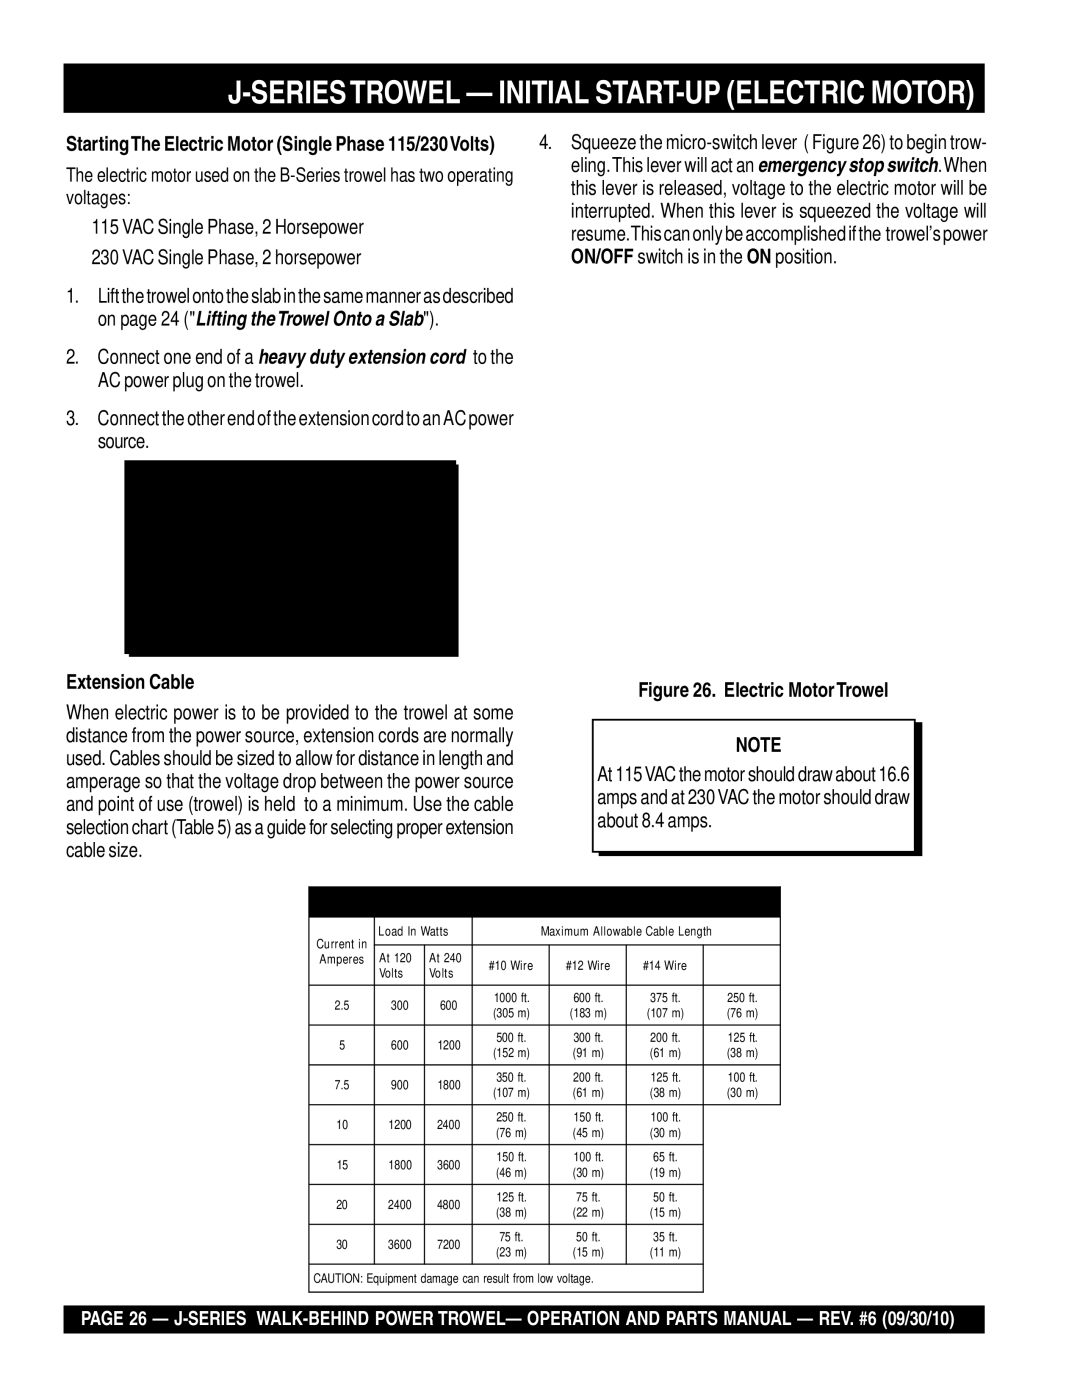
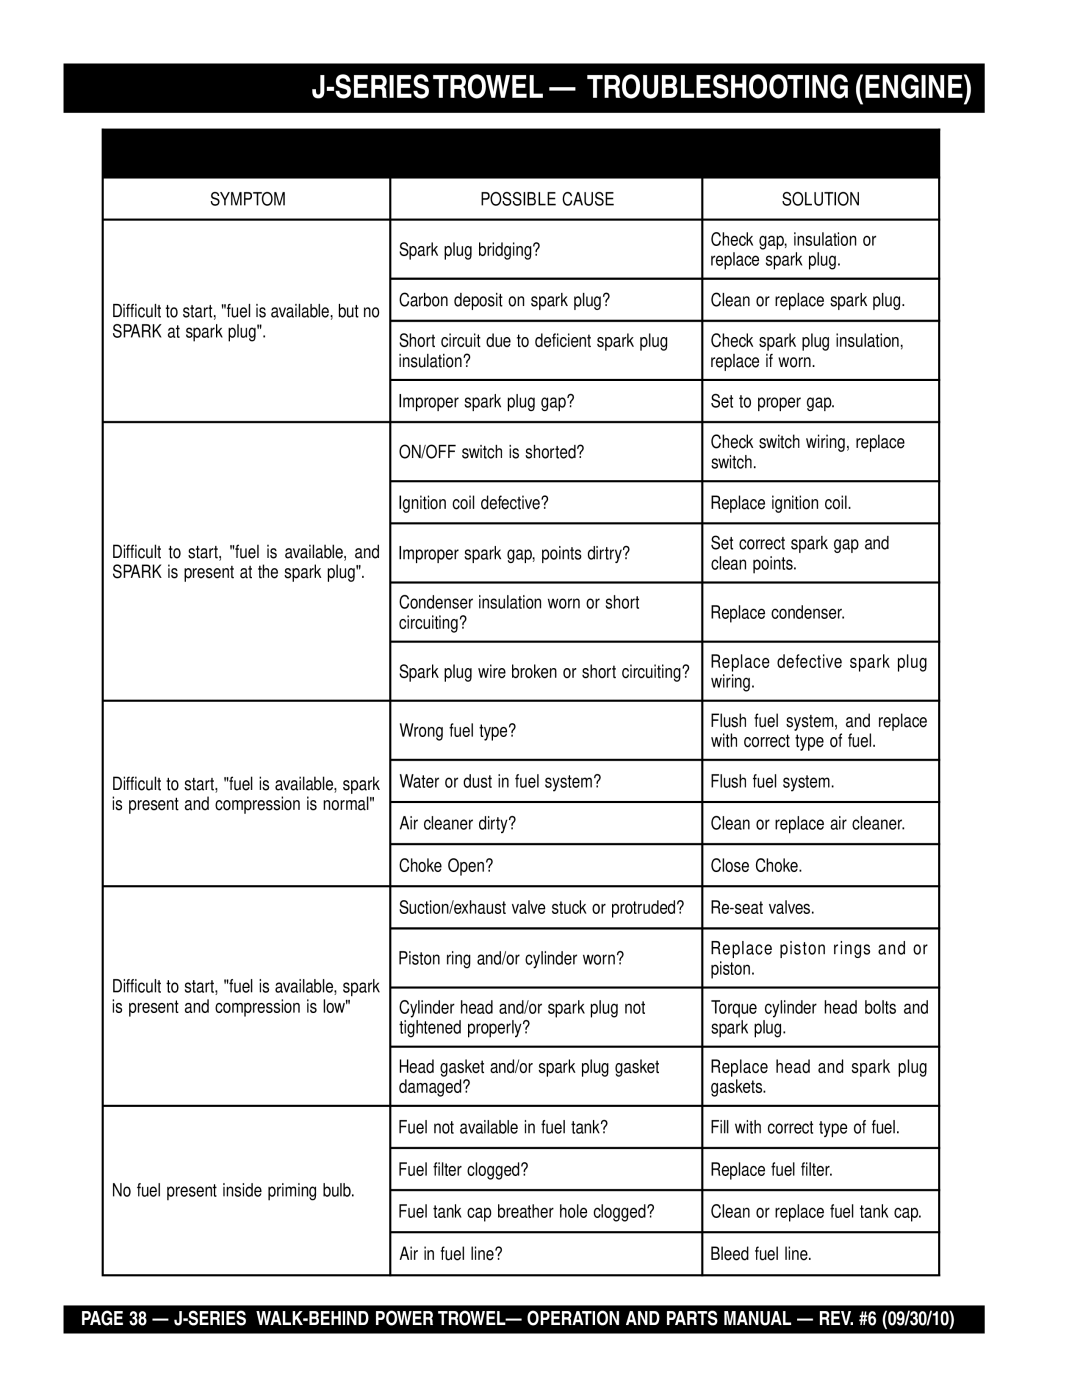
1.Install the handle tube to the gearbox as shown in Figure 5. The mounting hardware should be contained in the shipping container.

Quick PitchHandle Installation (Quick Pitch Models Only)

CAUTION

The Quick Pitch™ handle is spring loaded, personal injury or damage could result from improper handling or installation. Be careful when installing this component.

NOTE

Considerable force may be required when moving the Quick PitchT-handleforward or backward.

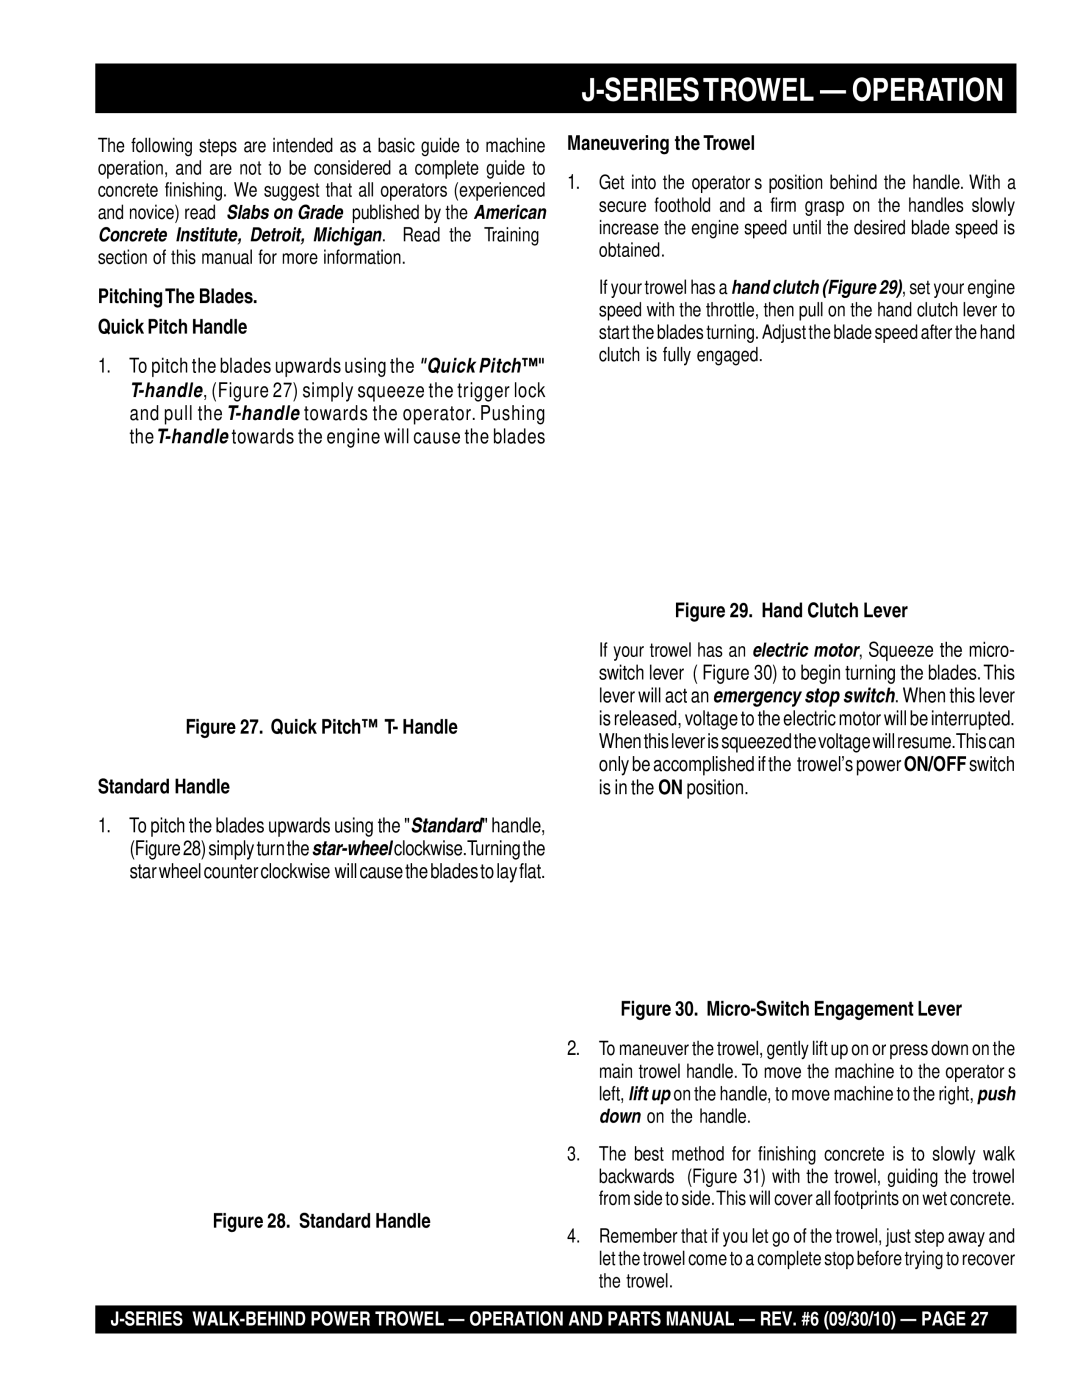
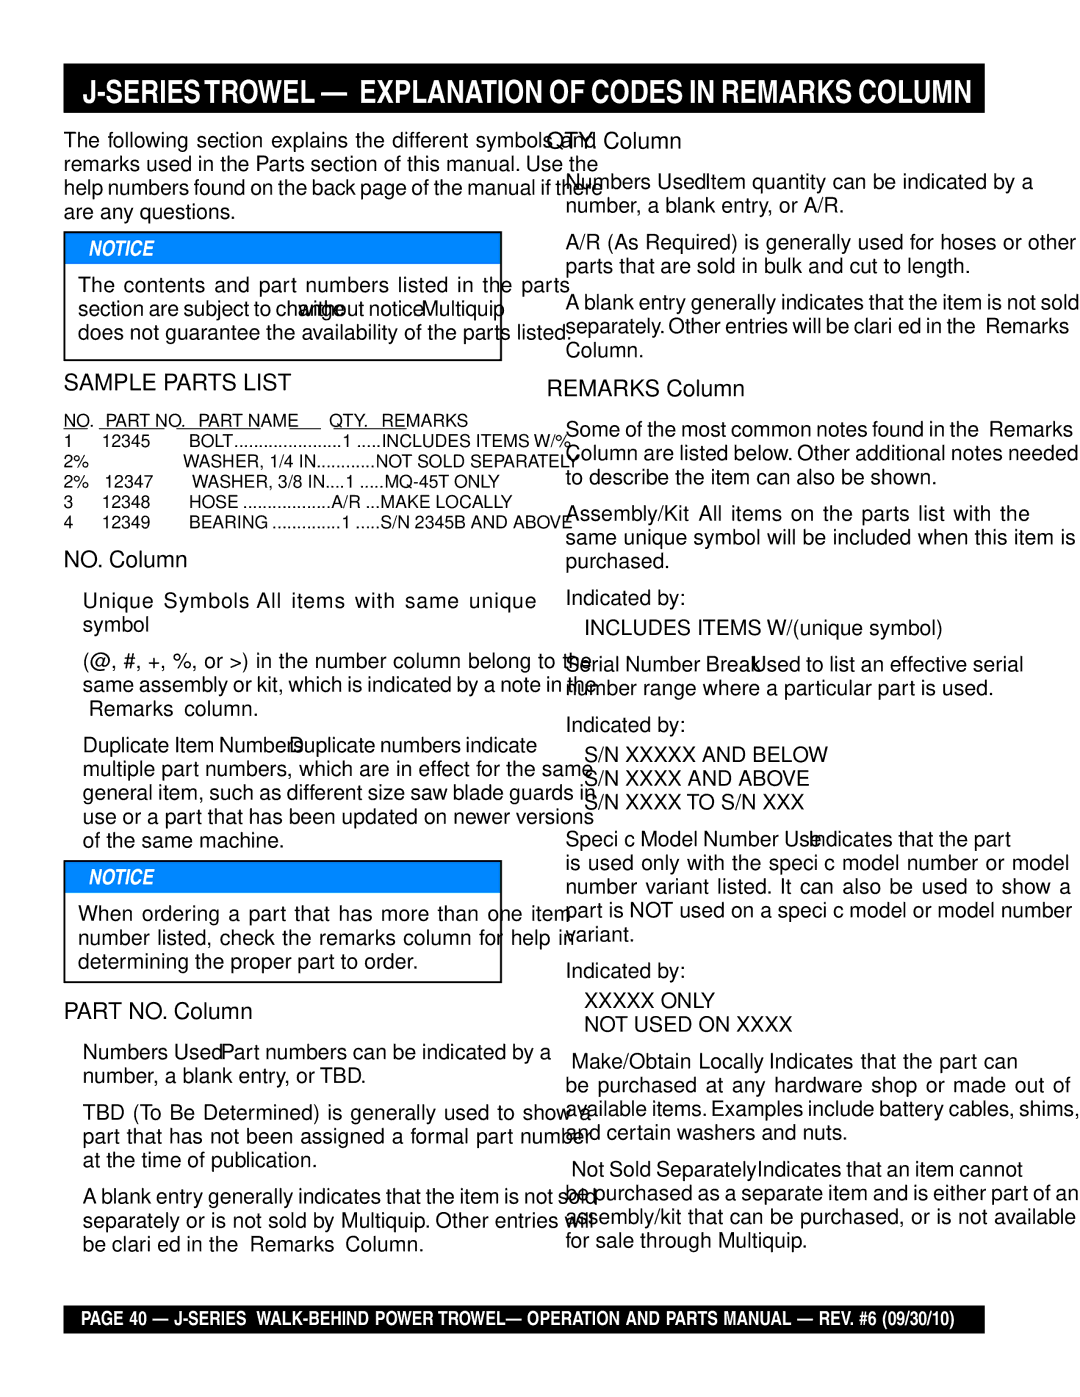
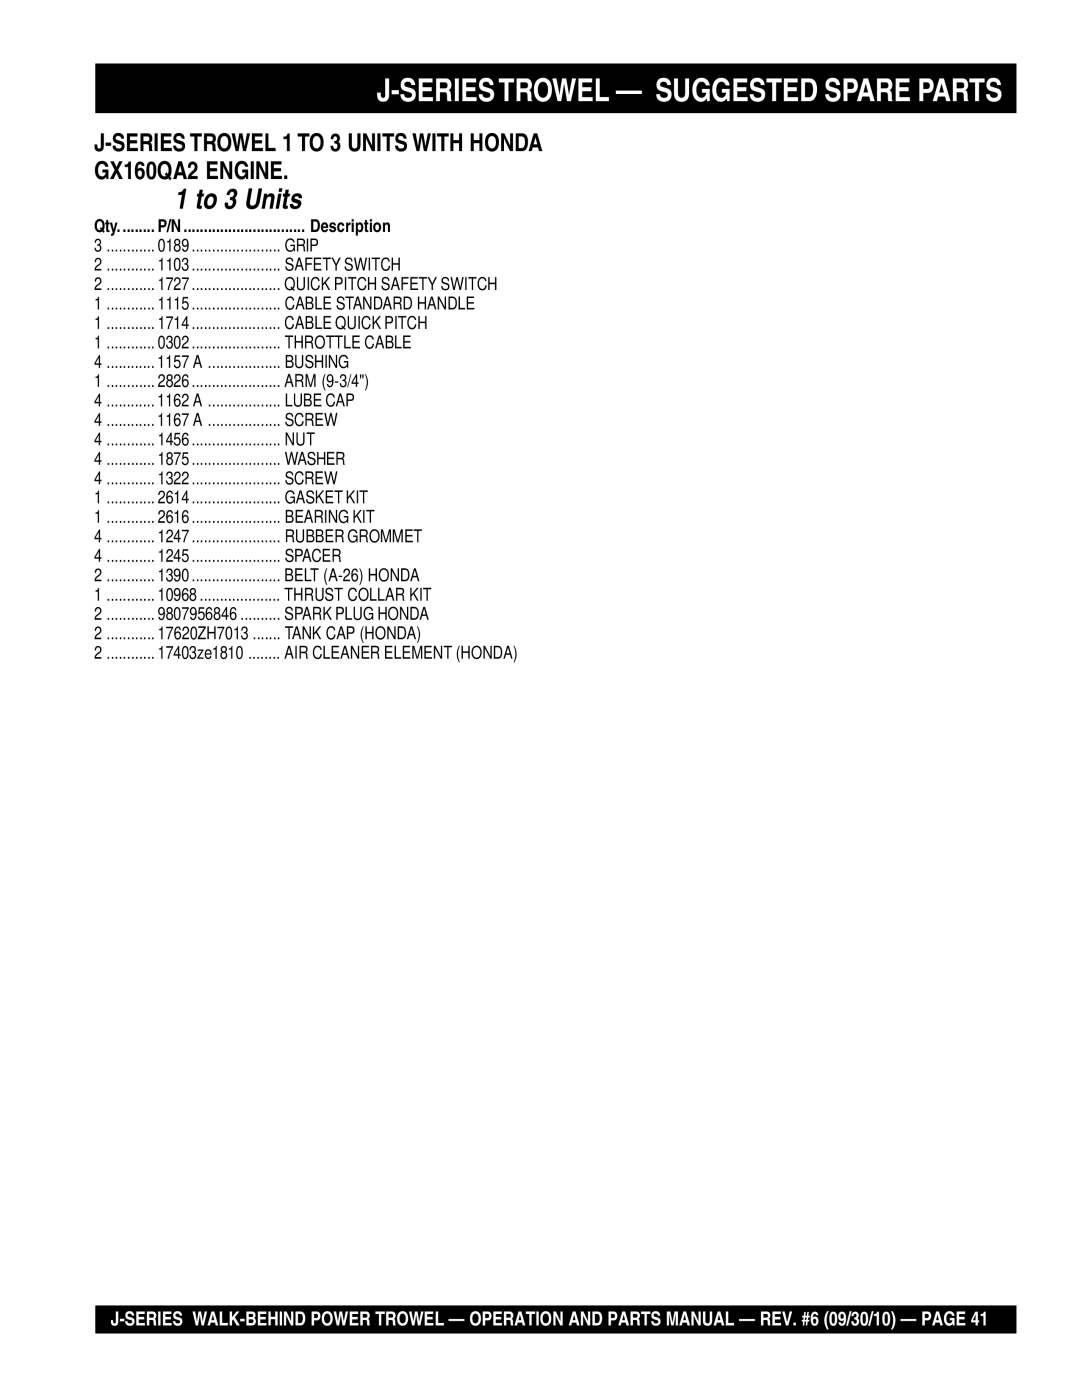
1.Grasp the Quick Pitch™ T-handlefrom the operator's position and squeeze the blade pitch adjustment trigger. Move the T-handletowards the engine as far as possible (Figure 6).This will compress the spring inside the handle tube. Allowing maximum exposure of the pitch cable.

Figure 5. Handle Tube Installation

Figure 6. Blade Pitch T-Handle

2.Lock the spring in the compressed position, by releasing the blade pitch adjustment trigger.
J-SERIES WALK-BEHIND POWER TROWEL — OPERATION AND PARTS MANUAL — REV. #6 (09/30/10) — PAGE 19

Image 19
Contents Series Page Page SERIESTROWEL-TABLE of Contents Best Deal! Order via Internet Dealers Only SERIESTROWEL- Parts Ordering ProceduresOrder via Fax Dealers Only SERIESTROWEL-TRAINING Checklist Daily PRE-OPERATION Checklist SERIESTROWEL- Daily PRE-OPERATION ChecklistForyour Safety and the Safety of Others Series TROWEL- Safety Message Alert SymbolsOver Speed Conditions Sight and Hearing hazard Series TROWEL- Safety Message Alert SymbolsSERIESTROWEL- Rules for Safe Operation SafetySERIESTROWEL- Rules for Safe Operation Maintenance SafetyEmergencies Machine Safety Decals SERIESTROWEL- Operation and Safety DecalsSideView SERIESTROWEL- Specifications TrowelSpecifications Engines & Electric Motor SERIESTROWEL- Specifications Engines & Electric MotorSERIESTROWEL- General Information Series Walk-Behind Trowels SERIESTROWEL- Controls and ComponentsGuard Ring- NEVER! put hands or feet inside guard ring SERIESTROWEL- Controls and ComponentsEngine Controls and Components SERIESTROWEL- Basic EngineAssembly and Installation Seriestrowel Assembly and InstallationHandleTube Installation All Models Pre-load Adjustment Quick Pitch Models Only Seriestrowel Assembly and InstallationThrottle Cable Installation Honda Engine Safety KillWire Throttle Wire HookBefore Starting SERIESTROWEL- PRE-INSPECTIONEngine Oil Check SERIESTROWEL- PRE-INSPECTION Starting the Engine Honda engine Seriestrowel Initial START-UP Gasoline EngineLifting theTrowel Onto a Slab Auxiliary Lifting Tube Lifting Bale OptionSeriestrowel Initial START-UP Gasoline Engine Centrifugal Kill SwitchExtension Cable Seriestrowel Initial START-UP Electric MotorQuick Pitch T- Handle Standard Handle PitchingThe Blades Quick Pitch HandleManeuvering The Trowel Seriestrowel OperationCombo Blades Clip-On Float Blades OptionalSeriestrowel Options Trowel Arm Adjustment ToolGrinding Attachments Monthly 200-300 Hours Seriestrowel MaintenanceTrowel Arm adjustment Procedure Daily 8-10 HoursSpider Removal Seriestrowel MaintenanceTrowel Arm Removal Trowel Arm Flatness Test Bronze Bushings Trowel Blade RemovalRe-Assembly Trowel Arm AdjustmentHand Clutch Adjustment TestingChanging a Blade Troubleshooting Seriestrowel Troubleshooting TrowelSeriestrowel Troubleshooting Trowel Troubleshooting Engine Seriestrowel Troubleshooting EnginePage QTY. Column Seriestrowel Explanation of Codes in Remarks ColumnTo 3 Units Series Trowel Suggested Spare PartsSeriestrowel Nameplate and Decals Part Name QTY Remarks Seriestrowel Nameplate and DecalsSeriestrowel Standard Handle Assy Handle Grip Seriestrowel Quick Pitch Handle Assy Quick Pitch Trigger Seriestrowel -THRUST Bearing KIT Assy Wear Ring Seriestrowel 3 and 4-BLADE Spider Assy Part NO. Part Name Seriestrowel Gearbox and Engine Mounts Assy Gear Case Seriestrowel ENGINES, 5.0 HP HONDA,4.6 HP ROBIN, 3&5 HPB&S Part Name Seriestrowel Hand Clutch ASSY. S/N LJ42036 and below Hand Clutch ASSY.-S/N LJ42036 and below Series Trowel Hand Clutch ASSY. S/N LJ42037 and Above Part Name QTY Seriestrowel Electric Motor Assy Electric Motor 2HP Seriestrowel Guard Ring Assy Guard Ring Assy Seriestrowel Blades & Adjustment Fixture Assy Guard Ring Seriestrowel Lifting Bale ASSY. Option Lock Washer 3/8 Honda GX160K1QA2 Engine Cylinder Head Assy GUIDE, IN. Valve Over Size Honda GX160K1QA2 Engine Cylinder Barrel Assy WEIGHT, Governor Honda GX160K1QA2 Engine Crankcase Cover Assy Gasket Case Cover Honda GX160K1QA2 Engine Crankshaft Assy 13310ZE1601 Honda GX160K1QA2 Engine Piston Rings Assy Piston Rings Assy Honda GX160K1QA2 Engine Camshaft Assy ROD, Push Honda GX160K1QA2 Engine Recoil Starter Assy REEL, Recoil Starter Honda GX160K1QA2 Engine FAN Cover Assy PLATE, Sidestd Honda GX160K1QA2 Engine Carburetor Assy Gasket SET Honda GX160K1QA2 Engine AIR Cleaner OIL Bath Assy Gasket Elbow Honda GX160K1 Engine Muffler Assy Muffler Comp Honda GX160K1QA2 Engine Fueltank Assy RUBBER, Supporter Honda GX160K1QA2 Engine Flywheel Assy FAN, Cooling Honda GX160K1QA2 Engine Ignition Coil Assy Coil ASSY., Ignition Honda GX160K1QA2 Engine Control Assy ARM, Governor Honda GX160K1QA2 Engine Label Assy EMBLEM, Internal Page Gasket KIT Assy Honda GX160K1QA2 Engine Gasket KIT AssyTerms and Conditions of Sale Parts Page HERE’S HOW to GET Help