JVC HM-HDS1U manual To Recall Indication

Page 29

To Recall Indication

Press OSD. The indication appears on the top of the screen as follows.

To clear the indication, press OSD again.

EN 29

ON AIR

PRESENT TIME 9:47 PM

LP

8:00 PM

9:00 PM

10:00 PM

STEREO


1CH

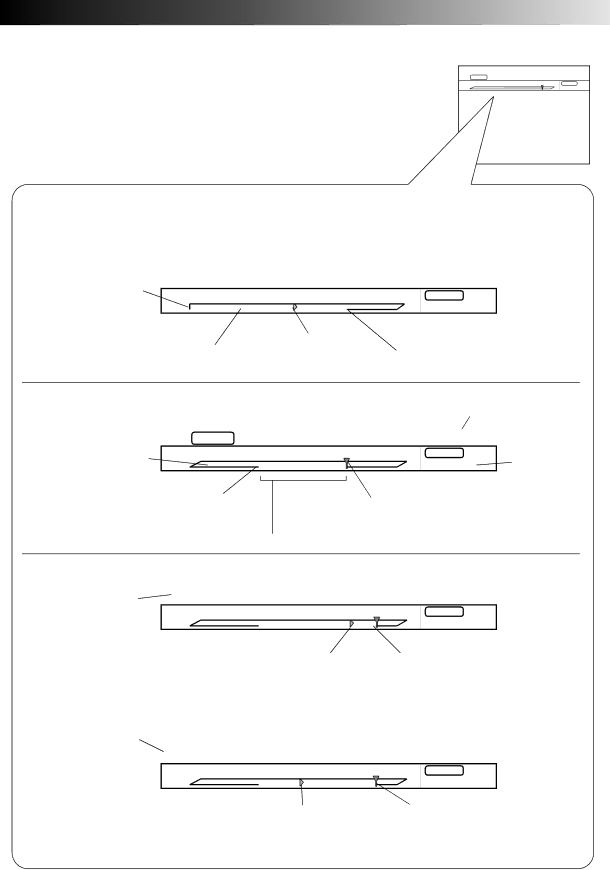
When playing back a recorded program

Playback mode and

Recording information : date, start time,

time counter

channel and recording speed


The beginning of

PLAY 3 0:59:24


06/12 TUE


the program


0:00


1:00


Time scale of the current program :

Current playback point


This program has an hour and a half


contents.


10:07 AM

1CH

LP


2:00


STEREO


Audio mode


Time scale

The end of the program

When watching a program on air


Current time


Current recording speed


LP


ON AIR


PRESENT TIME9:32:15 PM


Time scale around

8:00 PM

9:00 PM

10:00 PM STEREO

Current

the current time


1CH


channel


The beginning point of this program : The recorder starts receiving this program at about 8:30 PM.

Pointer for current time : The recorder has been receiving this program for an hour.

You can enjoy Live Memory Playback in this field.

When pressing PAUSE

PAUSE is pressed at


PAUSE 8 9:33 PM


PRESENT TIME 9:45 PM

LP

9:33 PM.


8:00 PM

9:00 PM

10:00 PM

STEREO


1CH


Pointer for current picture

The end of this program : The


recorder is now capturing new


pictures in this point.


When using Live Memory playback


The time counter


using actual time


LP


LIVE MEMORY 3 9:03 PM


PRESENT TIME 9:46 PM


8:00 PM

9:00 PM

10:00 PM

STEREO


1CH


Pointer for current picture

The end of this program :


The recorder is now


capturing new pictures


in this point.

Image 29
Contents HM-HDS1U Do not place the recorder Dear CustomerInstallation USE Antenna Installation InstructionsServicing Before YOU Install Your NEW RecorderWhile using the recorder Before installing the recorderBefore using the recorder Contents Power Source Check ContentsConnections Situate RecorderPlug & Play Plug & Play SetupAuto Clock Set/Auto Tuner Set Auto blinks Channel numbers are displayedAccess Initial SET Screen Access Main MenuAccess Clock SET ClockSET Auto Clock to on Select D.S.T. ModeSelect Host Channel Select Time ZoneSET Date SET TimeSET Year ManualTuner Access Tuner SET ScreenTurn on the Recorder Set Receivable ChannelsAccess Tuner SET Screen Access Main Menu ScreenAccess Manual Channel SET Screen ADD or Skip DesiredSituate Controller Cable Box ControlAttach Controller Connect Cable BOX to RecorderSelect Cable BOX Output Channel Access Cable BOX SET ScreenTurn on Cable BOX Enter Cable BOX Brand Access Cable BOX Brand SET ScreenDBS Receiver Control Fasten securely using the supplied adhesive stripsController DBS receiverAt the Initial Set Up Access DBS Receiver SET ScreenTurn on DBS Receiver Set DBS Receiver Output Channel & DBS Receiver BrandSET DBS Receiver Brand Access DBS ReceiverSelect Blue Back Mode Setting Blue BackAccess Function Access Video Inputs Screen Setting Video Inputs ModeSelect Video Inputs ModeSimple Recording Start Playback Simple PlaybackPause Playback Stop PlaybackIcons and their meanings Playback with HDD NavigationScan for Beginnings of Programs Access Scan ScreenSelect Programs Live Memory Playback Setting Time for Live Memory PlaybackStart Live Memory Playback About Live Memory PlaybackSuperimpose Access Function ScreenArrow to Superim Pose by pressingTo Recall Indication Playback Features Activate Quick Skip Change SpeedVariable-Speed Search/ Reverse Motion Playback Quick Rewind a littleSelect The Soundtrack Start RewindRepeat Playback Normal Playback Only Engage TV Mode Recording FeaturesSelect Channel for ViewingSelect VHS Deck Load a CassetteFind Program Start PointRecording SET Tape SpeedPAUSE/RESUME Playback with VHS Navigation Set VHS Navigation Access VHS SET UPSelect VHS Navigation Mode Scan for Beginning of Pro- gram with VHS Navigation Tered ProgramSelect Program Change SLOW-MOTION Speed Activate HIGH-SPEED SearchActivate FRAME-BY Index Search Access Distant CodeStart Search Operation mode Tuned-in channel or AUXiliary modeSwitchable to the tape remaining time display Press OSDAdjust Manual Tracking ModeEngage Manual TrackingTape Position Indicator Counter ResetPress C.RESET Beginning or E End shows you Where you are on the tapePicture Control Access VHS SET UP 1 ScreenSelect Picture Control Mode Video Stabilizer Access VHS SET UP ScreenSelect Video Stabilizer Mode TBC by Select TBC ModePressing Arrow to %fi ∞, then press OKAt the top of the HDD/VHS SET UP Calibration ModeActive Video Calibration Calibration byRecording Display Tape Remaining Time Display Counter InformationExit the Display Display Elapsed Recording TimeVHS Super VHS, S-VHS ET and VHS Super VHS ET Engage S-VHS ET ModeResume Recording Engage RECORD-PAUSE ModeLocate Start Point To Listen To Stereo Soundtrack During Recording Stereo And SAP Second Audio ProgramTo Record Stereo Programs VCR Plus+ Timer Programming Check Program Data Access Initial SET Changing VCR Plus+ SettingInitial SET UP by VCR Plus+ Guide Channel MatchingInput Receiving Channel Access Guide Channel SET ScreenRecorded on Express Timer ProgrammingSET Program Date SET Program Stop TimeSET Category SET Channel NumberSET Weekly or Daily Return to the Normal Check Overlap ProgramSTOP+/-,DATE+ CH+CH+ Check, Cancel And Revise ProgramsVHS Deck only Auto SP→EP Timer Select Auto SP=EP Timer ModePrepare the External Equipment for Timer Recording Timer RecordingEngage REC Link Mode To cancel REC Link mode, press REC Link againEngage ITR Mode Instant Timer Recording ITRSET Recording DurationAbout Registration of Information About Hybrid NavigationAbout Editing of Programs Limitations of RegistrationModify Information Access Modify ScreenSelect Deck Register NEW IndexEnter NEW Title Access Navigation ScreenRegister NEW Title Modify Program TitleRegister NEW Category Select NEW CategoryModify Category Press @%#fi or 253∞ to move the arrow toConfirm Deletion Access Delete ScreenDelete Information For HDD NavigationDubbing Access Easy DubbingNavigation Screen Select Dubbing OptionStart Dubbing Select REC SpeedEND Dubbing Normal DubbingDubbing Remote control Press Pause on the remote control. To resumeDard at the VHS SET UP 1 of the main Menu Press VHS or S-VHS and select the program to beProgram Editing Memory 1 program x 8 scenes Random Assemble EditingPrepare VHS Deck for Select the Other EDIT-IN and EDIT-OUT PointsRecording Start EditingCamcorder Edit From aStart Player Return to Normal ScreenStart Recorder For HDD deckLoad Cassettes Edit To Or From AnotherMake Connections Select Edit for PIC SET RECORDER’S Input ModeStart Player Start RecorderAudio Dubbing SET Input ModeEngage Audio Dubbing VHS Audio DubbingEND Audio Dubbing When monitoring the sound during Audio Dubbing,TV Multi-Brand Remote Control SET Remote ControlTurn on the TV SET TV Brand CodeHDD or VHS or S-VHS Cable Box Multi-Brand Remote ControlOperate Cable BOX Turn on the DBS DBS Receiver Multi-Brand Remote ControlReceiver Enter DBS Receiver BrandEnter Remote Control Code SET Remote Control CodeConfirm the Setting Ex. When pressingPlayback won’t start Cassette gets stuck partwayHDD deck Recording won’t startRemove the cassette and cover Protection switch to RECTimer again Plus+ system doesn’t work properly Re-perform the VCR Plus+ setupProcedure  pg What happens if the tape runs out during recording? Can the VCR indefinitely remain in the still mode?Can the VCR indefinitely remain in the Record-Pause mode? #1 and ¡ Buttons  pg $S-VHS ET Button  pg # $REAR1VIEW 12ANTENNA in Connector  pgDisplay Panel Control 8Space Button  pg Cancel Button  pgList Of Terms 20C to 60C -4F to 140F NTSC-type colour signal and EIAMonochrome signal, 525 lines EN for Servicing Only in U.S.A Warranty Only in U.S.A EN Memo Memo HM-HDS1U
Related manuals
Manual 100 pages 29.12 Kb