BACKLASH ADJUSTMENTS FOR BLADE RAISING AND BLADE TILTING MECHANISMS
If any play is detected in the blade raising or blade tilting mechanisms, the following adjustments should be made.
DISCONNECT MACHINE FROM POWER
SOURCE.
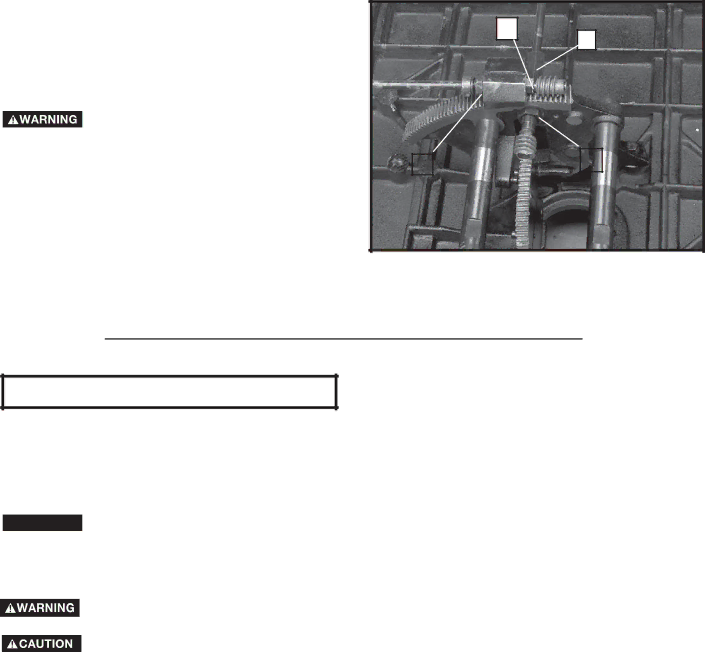
NOTE: The machine has been turned upside down and the blade removed for clarity and safety.
1.Adjusting blade raising mechanism - Loosen locknut (A) Fig. 71, and turn eccentric sleeve (B) until all play is removed in mechanism, then tighten locknut (A).
2.Adjusting blade tilting mechanism - Loosen locknut (C) Fig. 71, and turn eccentric (D) until all play is removed in mechanism, then tighten locknut
(C).
D
B
|
| A |
C | ||
|
|
|
Fig. 71
MACHINE USE
Common sawing operations include ripping and crosscutting plus a few other standard operations of a fundamental nature. As with all power machines, there is a certain amount of hazard involved with the operation and use of the machine. Using the machine with the respect and caution demanded will considerably lessen the possibility of personal injury. However, if normal safety precautions are overlooked or completely ignored, personal injury to the operator can result. The following information describes the safe and proper method for performing the most common sawing operations.
![]()
![]()
![]()
![]()
![]() THIS INSTRUCTION MANUAL DOES NOT PROVIDE INFORMATION REGARDING THE INSTALLATION OF A FENCE SYSTEM. A FENCE SYSTEM MUST BE INSTALLED BEFORE USE OF THE SAW. PLEASE REFER TO THE FENCE INSTRUCTION MANUAL REGARDING THE PROPER INSTALLATION,
THIS INSTRUCTION MANUAL DOES NOT PROVIDE INFORMATION REGARDING THE INSTALLATION OF A FENCE SYSTEM. A FENCE SYSTEM MUST BE INSTALLED BEFORE USE OF THE SAW. PLEASE REFER TO THE FENCE INSTRUCTION MANUAL REGARDING THE PROPER INSTALLATION,
ALIGNMENT AND OPERATION OF THE FENCE SYSTEM. SEE THE SECTION “ACCESSORIES” FOR AVAILABLE FENCE SYSTEMS.
THE USE OF ATTACHMENTS AND ACCESSORIES NOT RECOMMENDED BY DELTA MAY RESULT IN INJURY.
NEVER OPERATE THE SAW WITHOUT THE PROPER TABLE INSERT FOR THE SAW BLADE OR CUTTER INSTALLED.
QUICK OPERATIONS CHECKLIST
![]() BEFORE USING THE SAW EACH AND EVERY TIME, VERIFY THE FOLLOWING:
BEFORE USING THE SAW EACH AND EVERY TIME, VERIFY THE FOLLOWING:
1.Blade is tight.
2.Bevel angle and height lock knobs are tight.
3.If ripping, ensure fence lock lever is tight and fence is parallel to the blade.
4.If crosscutting, miter gauge knob is tight.
5.Proper eye, hearing and respiratory equipment is being used.
6.The blade guard is properly attached and the
FAILURE TO ADHERE TO THESE COMMON SAFETY RULES CAN GREATLY INCREASE THE LIKELIHOOD OF INJURY.
25