Maytag MTB2254EEW Refrigerator Care, Crisper Humidity Control, Ice Maker, Cleaning

Page 10

Crisper Humidity Control

(on some models)

You can control the amount of humidity in the moisture-sealed crisper. Adjust the control to any setting between LOW and HIGH.

LOW (open) for best storage of fruits and vegetables with skins.

HIGH (closed) for best storage of fresh, leafy vegetables.

Ice Maker

Style 1

To Turn the Ice Maker On/Off:

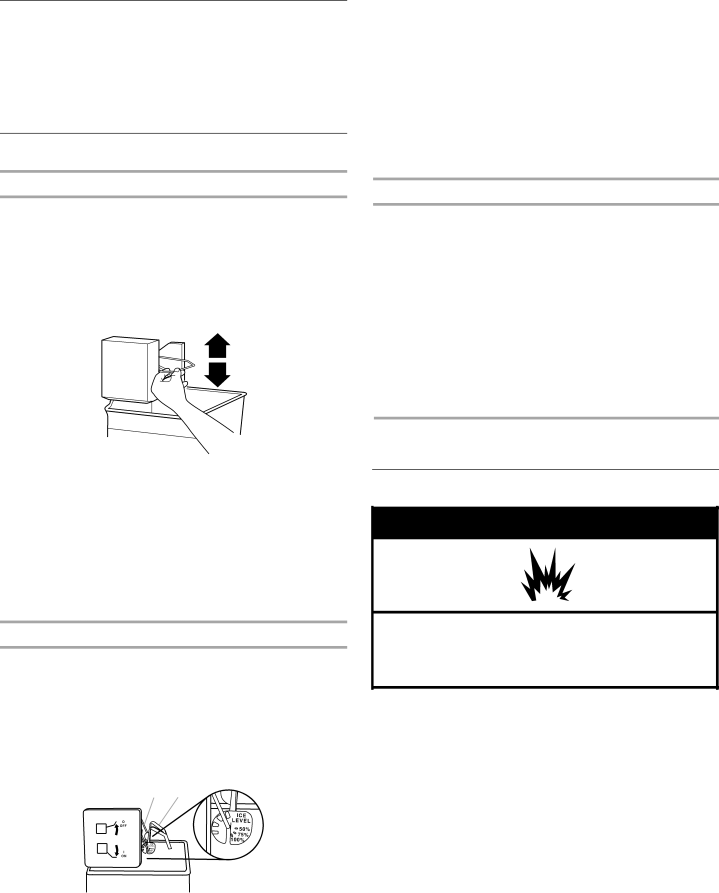
To turn the ice maker ON, simply lower the wire shutoff arm.

To manually turn the ice maker OFF, lift the wire shutoff arm to the OFF (arm up) position and listen for the click.

NOTE: Your ice maker has an automatic shutoff. As ice is made, the ice cubes will fill the ice storage bin and the ice cubes will raise the wire shutoff arm to the OFF (arm up) position. Do not force the wire shutoff arm up or down.

Ice Production Rate:

The ice maker should produce approximately 8 to 12 batches of ice in a 24-hour period.

To increase ice production, lower the freezer and refrigerator temperature. See “Using the Controls.” Wait 24 hours between adjustments.

For maximum ice production (on some models), push the switch to ICE PLUS. The ice maker should produce 16 to 20 batches of ice in a 24-hour period in the Ice Plus mode.

Style 2

To Turn the Ice Maker On/Off:

To turn the ice maker ON, simply lower the wire shutoff arm.

To manually turn the ice maker OFF, lift the wire shutoff arm to the OFF (arm up) position and listen for the click.

NOTE: Your ice maker has an automatic shutoff. As ice is made, the ice cubes will fill the ice storage bin and the ice cubes will raise the wire shutoff arm to the OFF (arm up) position. Do not force the wire shutoff arm up or down.

A B

A. Wire shutoff arm

B. Ice level adjustment arm

Ice Production Rate:

The ice maker should produce approximately 8 to 12 batches of ice in a 24-hour period with the ice level adjustment arm in the factory set 100% position.

NOTE: Adjust the ice level by slightly pressing in on the ice level adjustment arm, to release it from the wire shutoff arm, and then moving it up or down to the desired setting.

To decrease the amount of ice produced, move the ice level adjustment arm to the 75% or 50% position.

For maximum ice production move the ice level adjustment arm to the 100% position.

Remember

Allow 24 hours to produce the first batch of ice. Discard the first three batches of ice produced.

The quality of your ice will be only as good as the quality of the water supplied to your ice maker. Avoid connecting the ice maker to a softened water supply. Water softener chemicals (such as salt) can damage parts of the ice maker and lead to poor quality ice. If a softened water supply cannot be avoided, make sure the water softener is operating properly and is well maintained.

Do not use anything sharp to break up the ice in the bin. This can cause damage to the ice container and the dispenser mechanism.

Do not store anything on top of or in the ice maker or ice bin.

REFRIGERATOR CARE

Cleaning

WARNING

Explosion Hazard

Use nonflammable cleaner.

Failure to do so can result in death, explosion, or fire.

Both the refrigerator and freezer sections defrost automatically. However, clean both sections about once a month to avoid buildup of odors. Wipe up spills immediately.

IMPORTANT:

Because air circulates between both sections, any odors formed in one section will transfer to the other. You must thoroughly clean both sections to eliminate odors. To avoid odor transfer and drying out of food, wrap or cover foods tightly.

For stainless steel models, stainless steel is corrosion- resistant and not corrosion-proof. To help avoid corrosion of your stainless steel, keep your surfaces clean by using the following cleaning instructions.

10

Image 10
Contents Refrigerator Safety Refrigerator User InstructionsUnpack the Refrigerator Installation InstructionsClean Before Using Before You Throw Away Your Old Refrigerator or FreezerElectrical Requirements Location RequirementsRecommended Grounding Method Water Pressure Water Supply RequirementsConnect the Water Supply Reverse Osmosis Water SupplyConnect to Refrigerator Complete the InstallationRefrigerator Doors Remove Doors and HingesContour Doors Reverse Doors optionalStandard Doors CabinetDoor Removal Replacement Base Grille Top HingeDoor Swing Reversal optional Base GrilleUsing the Controls Adjust the DoorsRefrigerator USE Crisper Humidity Control CleaningRefrigerator Care Ice MakerChanging the Light Bulbs TroubleshootingRefrigerator Operation Temperature and Moisture AccessoriesIce and Water Items Excluded from Warranty Maytag Major Appliance WarrantyLimited Warranty This limited warranty does not coverInstrucciones Para EL Usuario DEL Refrigerador Seguridad DEL RefrigeradorRequisitos de ubicación Instrucciones DE InstalaciónDesempaque el refrigerador Quite los materiales de empaqueMétodo de conexión a tierra recomendado Requisitos eléctricosRequisitos del suministro de agua Presión del aguaConexión al refrigerador Conexión del suministro de aguaConexión a la línea de agua Cómo terminar la instalaciónPuertas del refrigerador Puertas Puerta del refrigeradorPuertas contorneadas Vuelva a poner las puertas y las bisagras en su lugarRejilla de la base Bisagra superior Bisagra inferiorRejilla de la base Cómo quitar los retenes de las puertasCómo volver a instalar los retenes de la puerta Ajuste las puertas USO DE SU RefrigeradorUso de los controles Ritmo de la producción de hielo Fábrica de hieloEstilo Para encender y apagar la fábrica de hielo Ritmo de producción de hieloCómo cambiar los focos Cuidado DE SU RefrigeradorLimpieza Para limpiar su refrigeradorSolución DE Problemas Funcionamiento del refrigeradorTemperatura y humedad AccesoriosHielo y agua Exclusiones DE LA Garantía MaytagGarantía Limitada Esta garantía limitada no cubreInstructions Dutilisation DU Réfrigérateur Sécurité DU RéfrigérateurDéballage du réfrigérateur Instructions DinstallationExigences demplacement Retirer les matériaux d’emballageSpécifications de l’alimentation en eau Méthode recommandée de mise à la terreSpécifications électriques Pression de leauRaccordement à une canalisation d’eau Achever l’installationRaccordement de la canalisation deau Raccordement au réfrigérateurInversion de la porte facultatif Portes du réfrigérateurDémontage Portes et charnières Portes standardÉtapes finales Portes à contour Réinstallation Portes et charnièresPorte du compartiment de réfrigération CaisseGrille de la base Charnière supérieure Charnière centraleGrille de la base Portes à contourCharnière supérieure Utilisation DU Réfrigérateur Utilisation des commandesAjustement des portes Taux de production des glaçons Machine à glaçonsStyle Mise en marche/arrêt de la machine à glaçons CONDITION/RAISON AjustementNettoyage Remplacement des ampoules d’éclairageEntretien DU Réfrigérateur Nettoyage de votre réfrigérateurDépannage Fonctionnement du réfrigérateurTempérature et humidité AccessoiresGlaçons et eau Éléments Exclus DE LA Garantie Garantie DE Gros Appareil Ménager MaytagGarantie Limitée La présente garantie limitée ne couvre pasW10208845A EN/FR PN W10208846A