Maintenance
need more often under severe conditions. See the Engine Owner’s manual for additional information.)
Every 200 hours/Yearly (whichever comes
1.Stop engine, wait for all moving parts to stop, and remove key or spark plug wire(s). Engage parking brake.
2.See the Engine Owner’s Manual for maintenance instructions.
Change Engine Oil
Service Interval: After the first 5 hours
Every 100 hours (May need more often under severe conditions.)
1.Stop engine, wait for all moving parts to stop, and remove key. Engage parking brake.
2.Drain oil while engine is warm from operation.
3.The oil drain hose assembly is located on the left side of the engine.
Place pan under machine to catch oil. Remove oil drain plug. Allow oil to drain and replace oil drain plug. Torque plug to
4.Replace the oil filter per the Engine Owner’s Manual. Clean around oil filter and unscrew filter to remove. Before the new filter is installed, apply a thin coating of oil on the surface of the rubber seal. Turn filter clockwise until rubber seal contacts the filter adapter, then tighten filter an additional 2/3 to 3/4 turn.
5.Clean around oil fill cap and remove cap. Fill to specified capacity and replace cap.
6.Use oil recommended in engine owner’s manual. Do Not overfill. Start the engine and check for leaks. Stop engine and recheck oil level.
Check Hydraulic Oil Level
Service Interval: Every 40 hours
1.Stop engine and wait for all moving parts to stop, and remove key. Engage parking brake.
2.Clean area around hydraulic reservoir cap and remove cap. Oil level should be to the top of the
baffle inside the tank. If not, add oil. Use Exmark Premium Hydro oil. Replace hydraulic reservoir cap and tighten until snug. Do Not overtighten.
Note: The baffle is labeled “HOT” and “COLD”. The oil level varies with the temperature of the oil. The “HOT” level shows the level of oil when it is at 225°F (107°C). The “COLD” level shows the level of the oil when it is at 75°F (24°C). Fill to the appropriate level depending upon the temperature of the oil. For example: If the oil is about 150°F (65°C), fill to halfway between the “HOT” and “COLD” levels. If the oil is at room temperature (about 75°F (24°C)), fill only to the “COLD” level.
Check Tire Pressures
Service Interval: Every 40 hours
1.Stop engine, wait for all moving parts to stop, and remove key. Engage parking brake.
2.Check tire pressure in drive tires.
3.Inflate drive tires to
4.Inflate tires to pressures stated above. Measure the circumference of each drive tire. Adjust tire pressures within the above range to try to make tire circumferences match as closely as possible.
5.
Check Condition Of Belts
Service Interval: Every 40 hours
1.Stop engine, wait for all moving parts to stop, and remove key. Engage parking brake.
2.Remove the mower deck belt shield to check mower blade drive belt condition.
3.Look under engine deck to check the pump drive belt condition.
4.Check all idler arms to be sure they pivot freely. Disassemble, clean and grease pivot bushings if necessary.
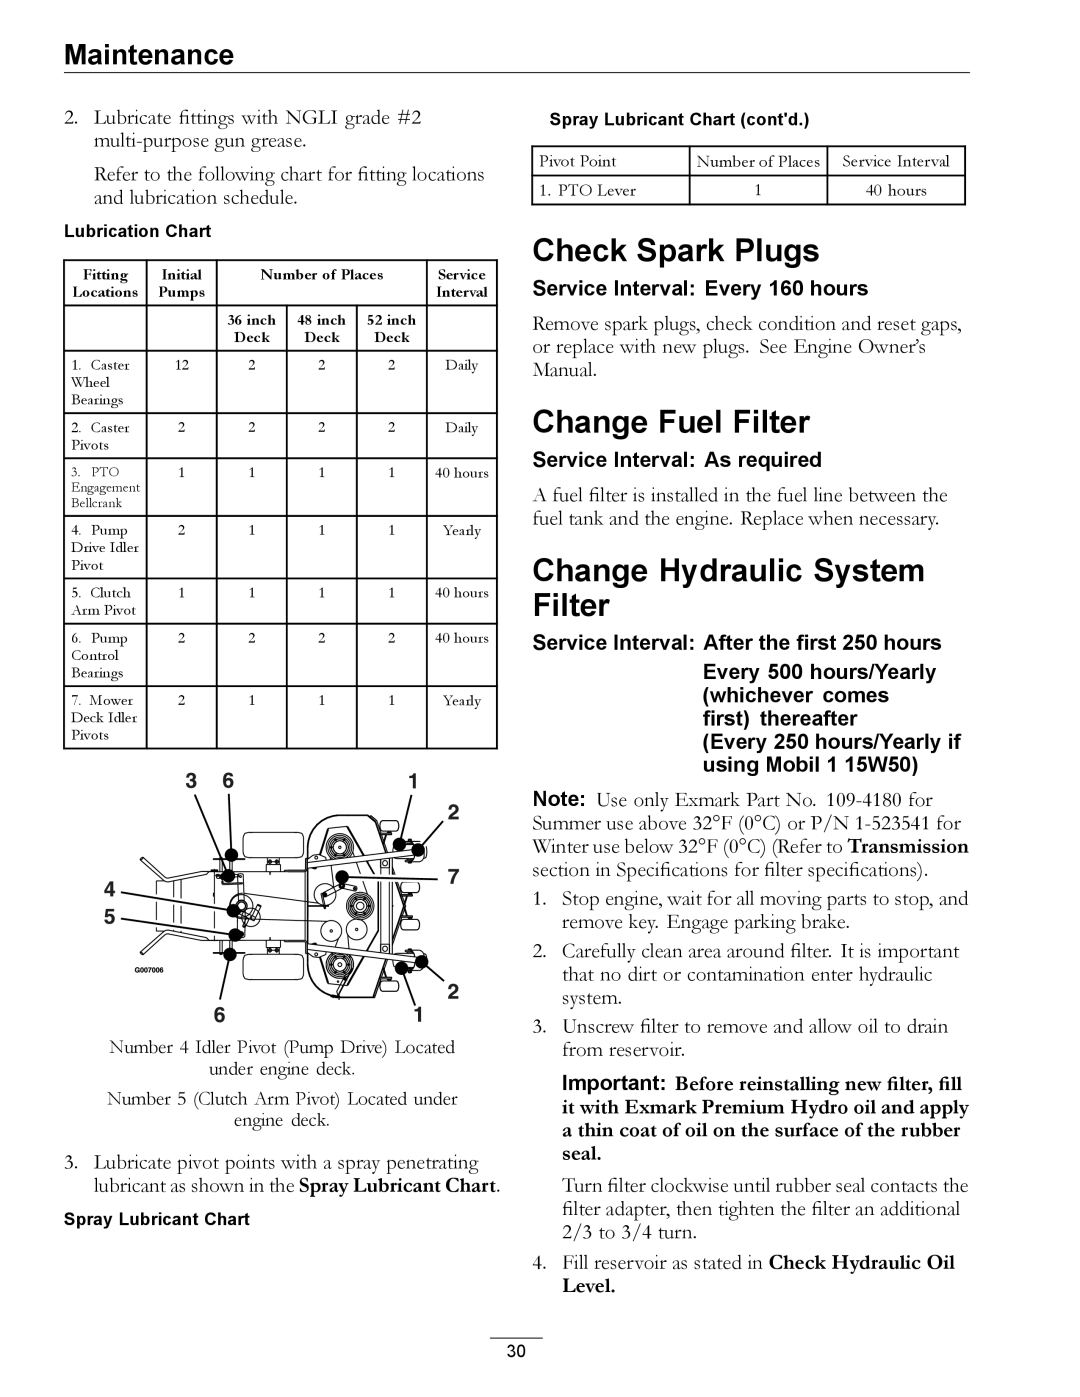
Lubricate Grease Fittings
Note: See chart for service intervals.
1.Stop engine, wait for all moving parts to stop, and remove key. Engage parking brake.
29
