Agilent 85225F
Manual Part Number
Safety and Regulatory Information
Understood and met
Table a Safety Symbols
SymbolsDefinition
Table B Instrument Markings
Marking Definition
Do not Operate in AN Explosive ATMOSPHERE. Do not operate
Must not remove instrument covers. Component replacement
Do not Remove the Instrument COVER. Operating personnel
Mains power
Fuses and breakers
For protection against fire hazard, use only fuses with
Compliance with German Noise Requirements
Acoustic Noise Emission/Geraeuschemission
This Guide
Introducing the Agilent 85225F Performance Modeling System
CV Subsystem Functional Verification Tests
Interface
Interface Examples in Body Text
Tables
Click Enter
Contents
Electrical Requirements
To prepare the installation site Environmental Requirements
To unpack the shipment crate containing the rack cabinet
101
If you encounter a problem
Bias Network Schematic
CV, RF, and DC Measurement System Configuration
Performance Modeling System Configuration Overview
RF and DC Measurement System Configuration
Performance Characteristics and Specifications
Performance Modeling System Configuration Overview
RF and DC Measurement System Configuration
System Block Diagram
RF Subsystem
DC Subsystem
Bias Networks
Component Integration
System Components
Front Panel System Connections, with Agilent 4156C
Number Type Instrument Labeled
Front Panel Connections with Agilent 4156C
16493L Triaxial Triax BNC E5260A/70B
16494A Triaxial cable Triax BNC E5260A/70B
Option Gndu cable
Front Panel Wiring Diagram with Agilent E5260A or E5270B
10833C Gpib cable
Rear Panel System Connections with Agilent 4156C
10833D Gpib cable
Controller
Rear Panel Wiring Diagram with Agilent 4156C
Rear Panel System Connections with Agilent E5260A or E5270B
10833A Gpib cable
Rear Panel Wiring with Agilent E5260A or E5270B
Introducing the Agilent 85225F Performance Modeling System
CV, RF, and DC Measurement System Configuration
CV Subsystem
System Components
Front Panel System Connections
Front Panel Wiring Diagram
Rear Panel System Connections
Rear Panel Wiring Diagram
DC/RF Cabling Diagram DC and RF Configuration
DC/RF Cabling Diagram Parametric Configuration
Low Leakage Switch Mainframe
Installation and User’s Guide
Introducing the Agilent 85225F Performance Modeling System
Noise, CV, RF, and DC Measurement System Configuration
1/f Noise Subsystem
F Noise Measurement Block Diagram
Customer supplied, not included with system
System Components
Option Gndu cable 85133F Flexible test E8364B
16494A Triaxial cable Triax BNC 41501B
16493L Triaxial Triax BNC 41501B
Test cable Or probe Station 8120-1839 Coaxial cable
Front Panel Wiring Diagram
16493L Gndu cable Triax BNC 41501B
Option 10833A Gpib cable
Rear Panel Wiring Diagram
DC/RF Cabling Diagram DC and RF Configuration
DC/RF Cabling Diagram Parametric Configuration
Gpib Addresses
Instrument Control Interface
Component Gpib Address
LAN/GPIB Gateway
Rear Panel Wiring Diagram for LAN/GPIB Gateway
Unix Workstation Requirements
System Controller
Personal Computer Requirements
Parameter Requirement
Rack Cabinet
Supplemental System Characteristics
Performance Characteristics and Specifications
Performance Modeling System Performance Specifications
Characteristic Value
Bias Network Characteristics
RF Subsystem Performance Specifications
DC Subsystem Specifications
Station or test fixture characteristics
To switch on power to the system
To ensure your safety while using the system
Precautions for Avoiding Electrostatic Discharge
Starting on page 91
Pollution Degree 2 per IEC 61010-1 and 664 respectively
To prepare the installation site
To prepare the installation site
Environmental Requirements
To receive the system
To receive the system
Step Action
To unpack the shipment crate containing the rack cabinet
To unpack the shipment crate containing the rack cabinet
Folded position
Hinged slat
Step Action Unload the system
Wood screws through the ramp
Into the ramp ledge
To verify the shipment
To verify the shipment
Replaceable Parts
Part or Model Number Description
Option AY6 Four-input channel configuration
Dynamic signal analyzer
Option AY2 Two-input channel configuration
Option Triaxial cable, 1.5 meter
User’s Guide
Replaceable Parts
Replaceable Parts
Prepare to install the work
To install the work surface
To install the work surface
Lock feet prevent the cabinet from
To install the work surface
To ensure your safety while using the system
Ground
Measurements Measurement is in progress
Following section Precautions for
Floating-ground Disconnected and a floating-ground
Fuses with incorrect
To connect an external ground to the circuit common
Precautions for Performing Floating-Ground Measurements
To perform floating-ground measurements
Circuit common is not connected through the bias networks
Precautions for Avoiding Electrostatic Discharge
To take precautions against electrostatic discharge
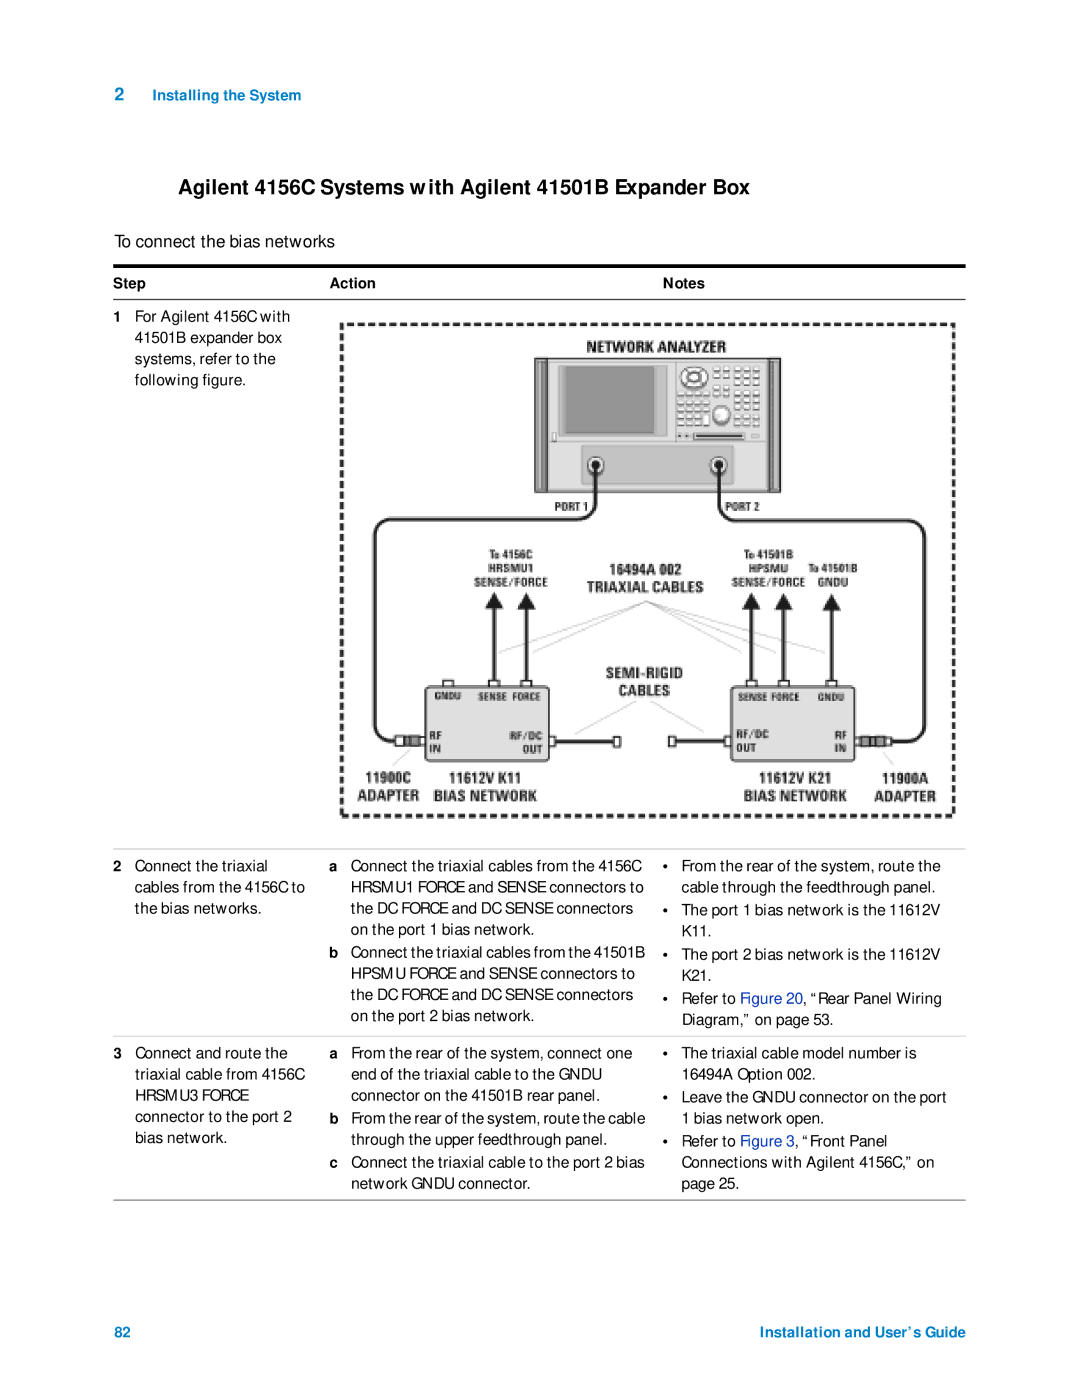
To connect the bias networks
To connect the bias networks
Agilent 4156C Systems
For Agilent 4156C systems, refer to the following figure
Bias network Through the upper feedthrough panel
Connector to the port
Bias network open
Connect the bias networks to the device under test
HRSMU3 Force connector to the port 2 bias network
Agilent 4156C Systems with Agilent 41501B Expander Box
2.4 mm female-to-male adapter
Port cable to the 2.4 mm female-to-male
Agilent E5260A/70B Systems
Connect the triaxial Connect the triaxial cable from
Cables from E5260A/70B medium power SMU to E5281A
High power SMU is the Agilent
Port 2 bias network is
Connect the bias
Networks to the device
To switch on power to the system
Switch on the computer line power
Vector network analyzer line power
Line power
To set the address to 19 and press Enter
Choose Tools Hardware Setup... .†
To configure the LAN/GPIB gateway
Add Interface
Installing the System
Understanding the System Functional Verification Test
To choose a verification process
Performing the System Functional Verification Test
To choose a system verification process
Performance specifications
To choose a verification process
Situation Action
Verifying System Functionality
Understanding the System Functional Verification Test
Required Tools
Performing the System Functional Verification Test
To perform the system functional verification test
PC version
Examples/modelfiles
Choose File Examples
Modelfiles/misc
Select Calibration Wizard
Macros tab
Select Calibrate
If you encounter a problem
102
Servicing the System
To troubleshoot the system
Remove the four screws 2 screws
To remove or replace a system component
To remove a system component
Frame nuts
To order replacement parts
To receive additional assistance
Contacting Agilent Technologies
To package the system for transport
To package the system for transport
Installation and User’s Guide 109
110
Performing a Coaxial System Measurement Calibration
To enhance measurement accuracy
Understanding System Measurement Calibration
Periodic System Component Calibration
To enhance measurement accuracy
On the network analyzer
Always perform a Prior to making device measurements
Measurement calibration
For more information
Understanding System Measurement Calibration
To perform the system measurement calibration
Connector types Connectors dialog box, select
Performing a Coaxial System Measurement Calibration
Networks
Networks RF/DC OUTPUT. connectors Click Measure
Adapters using Click Measure Standard open, short
Load, and through Short to the Port 1 bias network RF/DC
Periodic System Component Calibration
118
Performing the DC Subsystem Functional Verification Test
Understanding the DC Subsystem Functional Verification Test
Understanding the DC Subsystem Functional Verification Test
For Agilent E5260A/70B DC subsystems
Performing the DC Subsystem Functional Verification Test
122
Understanding the RF Subsystem Functional Verification Test
Understanding the RF Subsystem Functional Verification Test
To perform the RF subsystem functional verification test
Operator’s Check Click Configure
Performing the RF Subsystem Functional Verification Test
Automatic
126
Installation and User’s Guide 127
128
CV Subsystem Functional Verification
Understanding the CV Subsystem Functional Verification Test
Performing the CV Subsystem Functional Verification Test
Manual
132
Noise Subsystem Functional
F Noise Subsystem Functional Verification Test
If the instrument self test fails, consult Chapter
136
Features
Understanding the Bias Networks
Features
11612V Option K11/K21 Bias Network Characteristics
Characteristics
Parameter 11612V Option K11 11612V Option K21
Operation
Dynamic Range
Network Analyzer System Performance
Measurement Uncertainty
Network Analyzer System Performance
Maximum Output Power
Dynamic Range
Measurement Port Characteristics
Measurement Uncertainty
Transmission Measurements
Index
Procedure
Index
Procedure, manual
Description
148