Page
Electric Power
Installation
AC power cord
Owner’s record
Preparations
Clock and Timer
Sound
Radio Reception
Before connecting the AC cord
Check your system and accessories
Speakers
Connect the right speaker to the main unit
Connect the AC cord to an AC outlet
Connect the supplied antennas
Antenna
Antennas To connect other optional ecfuiprnent + FM feeder
Using the remote control
When to replace the batteries
To turn the power off
LLmm&-.=
Super T-BASS System
Press Rhythm
To change the volume level of the selected rhythm pattern
To change the tempo of the selected rhythm pattern
Turn Multi JOG to select the desired rhythm pattern
Selecting the Programmed Equalization Curve
Setting a NEW Equalization Curve Manually
Press GEQ LOW
Within 4 seconds, press Enter
Set a new equalization curve with HIGH, LOW, and Multi JOG
To select the stored equalization curve
Setting a NEW DSP Surround Sound Manually
When an FM stereo broadcast contains noise
To change the AM tuning interval
Press TUNER/BAND repeatedly to select the desired band
To search for a station quickly Auto Search
To clear a preset station
Selecting a preset number on the main unit
Repea’lt steps 1
‘~,~j~ g
To select a reverse mode deck 2 only
When tapes are loaded in both decks
Cassette holder
Press 4 to start play
About cassette tapes
HilUSIIC Sensor
Loading Discs
Selecting a track with the remote control
To Dlav one disc only. press Disc Direct Play
Replacing discs during play
Press Numbered buttons +1 O to program Track
Press Prgm twice in stop mode
Inserting Blank Spaces
Press REV Mode to select the reverse mode
Insert the tape to be recorded on into deck
Press Dolby NR to turn Dolby NR on or off
Pre!ss Tape Deck 1/2 to select deck
Press Dolby NR to turn off the Dolby NR
Press O REC/REC Mute to start recording
Press Sync DUB once or twice to start recording
Press CD and load the discs Press CD EDIT/CHECK once
Press REC/REC Mute to start recording on First Side
To clear the edit program
To add tracks from other discs to the edit program
Repeat for the rest of the tracks for side a
Remote control to program a track
Press Disc Direct Play 1-3 to select a disc
To check the order of the programmed track numbers
Connect your microphones to MIC 1 and MIC 2 jacks
Repeat to reserve other tracks Press -4 F to start play
To check the time remaining until the power is turned off
To switch to the 24-hour standard
To cancel the sleep timer
To disdav the current time
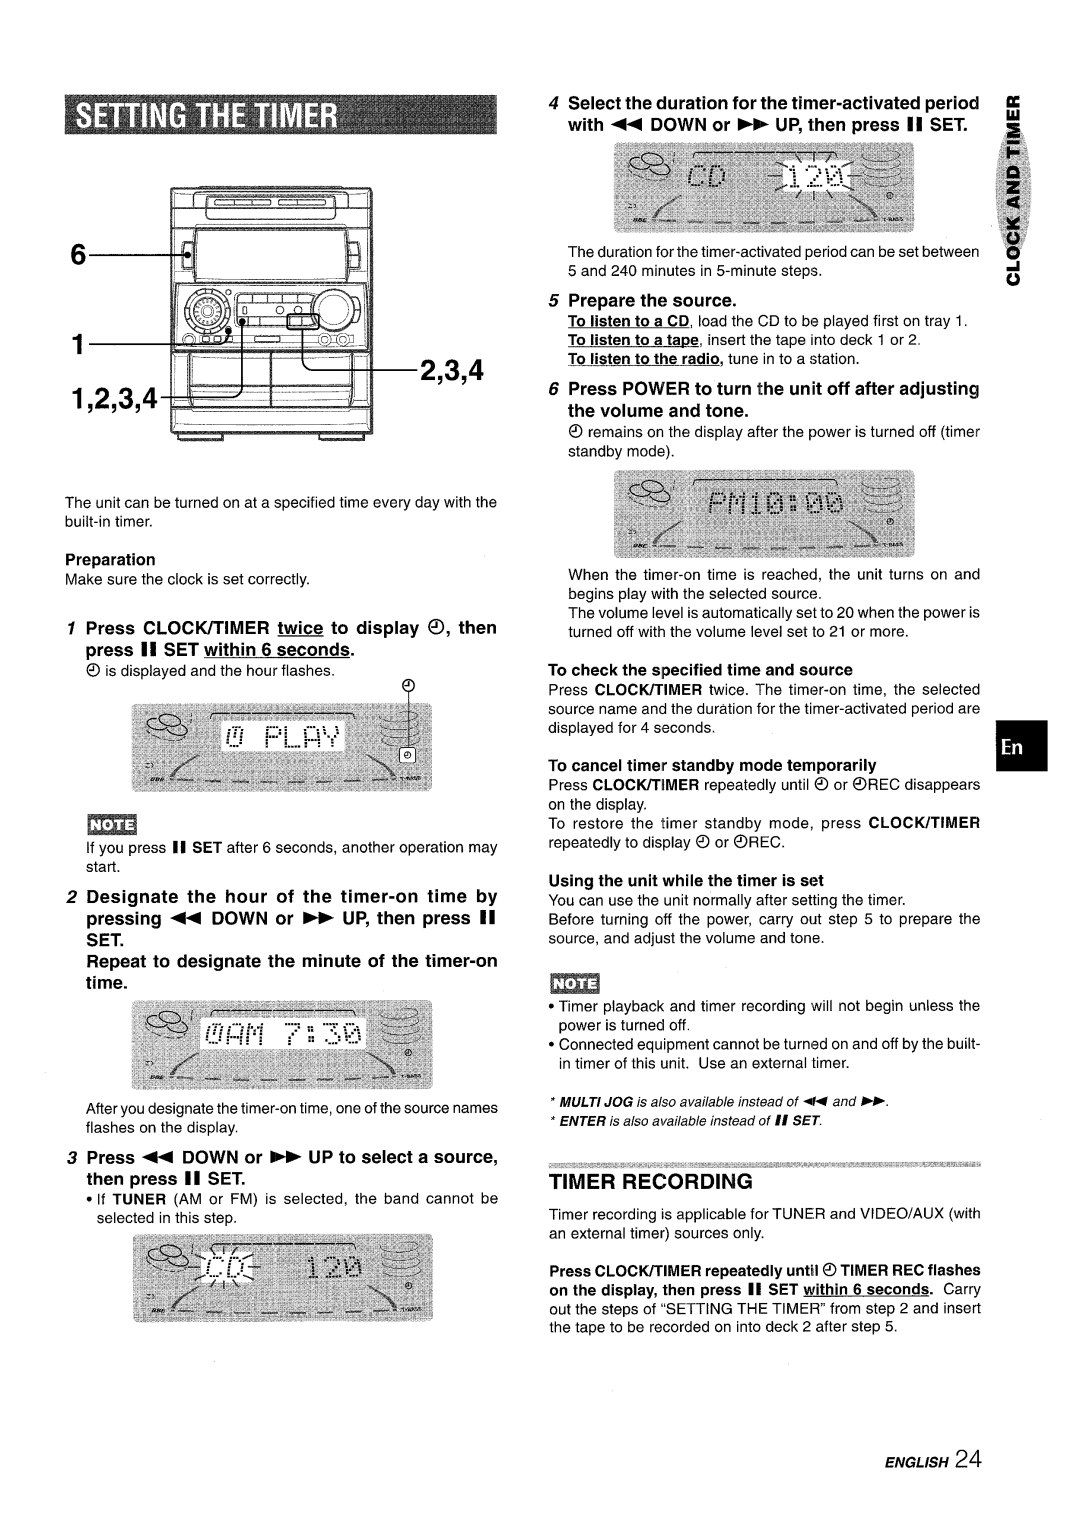
Press + Down or * UP to select a source, then press 1I SET
To cancel timelr standby mode temporarily
Prepare the source
MD Jacks
VIDEO/AUX Jacks
Press VIDEO/AUX or MD
Play the connected equipment
To clean the heads and tape paths
To clean the cabinet
To reset
There is no sound
Weight
Output sound pressure level 87 dB/W/m Dimensions W x H x D
Signal-to-noise ratio
General Power Requirements
Page
Enerctia electrica
Condensation
No Trate DE Reparar LA Unidad Usted Mismo
Periodos de no utilization Desenchufe el cable de
OPERAClONES
Antes de conectar el cable de alimentacion de CA
Compruebe su sistema y Ios accesorios
Conecte el altavoz izquierdo a la unidad principal
Cable de altavoz negro/blanco
+4%
Lnsercion de Ias pilas
Hi==
LPara cancelar la demostracion del juego
Control DE!‘VOLUMEN
Sistema Super T-BASS
Demoetracion del juego
Pulse Rhythm
Para Seleccionar UN Patron DE Ritmo
Gire Multi JOG para seleccionar el patron de ritmo deseado
Para cambiar el tempo del patron de ritmo seleccionado
Ajuste del sonido durante la grabacion
Ecualizacion Programada
+ ROCK- POP~JAZZ~CLASSI C+-+ Latin
HIGH, LOW y Multi JOG
Memorization DE Curvas DE Ecualizacion Nuevas
Pulse Enter antes de aue pasen 4 sequndos
Ajuste una curva de ecualizacion nueva con
DSP Sijrround Surround
Ajjste Manualde UN Nuevo
Fihlivel de realimentacion
Para ajustar el nivel de la realimentacion
Pulse + Down o + UP para seleccionar una emisora
FM AM
Para cambiar el intervalo de sintonizacion de AM
Para buscar rapidamente una emisora busqueda automatic
Repita Ios pasos 1 y
Sintonizacion Mediante Numero DE PREAJUSTE~
Seleccionar Un numero De preajuste
~~@
Pulse Tape y a Eject para abrir el portacasete
Insercion DE Cintas
Pulse E para iniciar la reproduction
Las cintas de 120 minutes o mas son extremadamente
Inserte cintas en Ias platinas 1 y
Sistema Dolby NR
Para retxoducir Todos Ios Discos Del ComDartimiento Pulse b
Para rewoducir uno o dos discos, ponga Ios discos en Ias
Para rerxoducir un disco solamente, pulse Disc Direct Play
Para reproducer con el control remoto
Disc Direct
DE Reproduction
Insercion DE Espacios SIN Grabar
Pulse una o dos veces Sync DUB para iniciar la
Pulse Tape Deck 1/2 para seleccionar la platina
Para detener el copiado
Para ajustar Dolby NR cuando reproduzca la cinta Copiada
Para borrar el programa de edition
Para detener la grabacion
Tiempo de Ias cintas de casete y tiempo de edition
Disc Andomi Epeat
Para cambiar el programa de cada cara
Pulse Recirec Mute para iniciar la grabacion
Pulse CD EDIT/CHECK para seleccionar la cara a o B, y pulse
Para borrar el programa de edition
Para cambiar el tiempo de retardo del eco
Conecte sus microfonos a las tomas MIC 1 y MIC
Cuando no utilice Ios microfonos
Microfonos recomendados
Para Comprobar as canciones reservadas
Para Ailadir una reserva durante la reproduction
Para detener la reproduction
Para saltar una cancith
Para cancelar el temporizador para dormir
Pulse una vez CLOCK/TIMER y Iuego pulse
Para cambiar al modo de 24 horas
Si parpadea la visualization del reloj
Haber ajustado el volumen y el tono
Pulse Power para apagar la unidad despues de
SET
Prepare la fuente de sonido
Toma CD Digital OUT Optical
Tomas VIDEO/AUX
Tomas Line OUT
Pulse VIDEO/AUX o MD
Seccion DE LA Platina
Sistema de altavoces SX-WNA909
Page
Eneraie electriaue
Releve du proprietaire
Reception Radio
SON
Lecture DE Cassettes
Lecture DE Disqijes Compacts
Connecter I’enceinte droite a I’appareil principal
Enceintes Contr61er la chaine et Ies accessoires
Avant de brancher Ie cordon secteur
Brancher Ie cordon secteur a une prise de Courant
Connecter Ies antennes fournies
Mise en place des piles
Utilisation de la telecommande
Quand remplacer Ies piles
Pour mettre I’appareil sous tension
Pour annuler la demonstration de jeu
Demonstration de jeu
Utilisation de la demonstration de jeu
Pour reinitialiser la demonstration de jeu
Pour annuler la fonction generation de rythme
Appuyer sur Rythm
Pour redemarrer la fonction generation de rythme
Pour changer Ie tempo du type de rythme selectionne
Coljrbe Iyegalisation
Selection D’UNE Courbe ’EGALISATION Programmed
Appuyer sur 3EQ LOW
Dans Ies auatre secondes, appuyer sur Enter
Regler une nouvelle courbe d’egalisation avec
HIGH, LOW et Multi JOG
Quand la source musicale est monophonique
Polur regler Ie niveau de retraction
L+FI mode d’entree
Pour selectionner Ie son Surround DSP memoris6
Surround DSP
Appuyer sur +4 Down ou UP pour selectionner une station
Quand une emission FM stereo presente des parasites
Appuyer sur 1II SET pour memoriser la station
Ensuite, appuyer sur + DIRECTION/PRESET a plusieurs
Rep6%er Ies etapes 1 et
Pouw selectionner une station
Appuyer sur 4 pour demarrer la lecture
$- --- ----J
Ruban magnetique des cassettes de 120 minutes
Au sujet des cassettes
Fi~ce a
Selection d’une plage avec la telecommande
Pour commander la lecture avec la telecommande
Pour Iire un ou deux disaues, mettre Ies disques sur Ies
Changement de disques pendant la lecture
Appuyer Sur
Appuyer deux fois sur Prgm clans Ie mode arr6t
Disc Direct Play
Appuyer sur REC/REC Mute pour demarrer ’enregistrement
Appuyer sur REV Mode pour selectionner e mode d’inversion
Pour effacer un enregistrement
Appuyer sur REC/REC Mute pour demarrer I’effacement
Appuyer sur 0 REC/REC Mute pour demarrer l’enregistrernent
Appuyer sur Tape Deck 1/2 pour selectionner la platine
Appuyer sur Tape
Du montage
Pour arr&er I’enregistrement
Duree des cassettes et temps du montage
Appuyer sw @ REC/REC Mute pour demarrer I’enregistrement
R6peter l’6tape 5 pour Ie reste des plages de la face a
Pour controller I’ordre des numeros des plages programmers
Pour changer Ile programme de chaque face
Source sonore
Brancher les microphones aux prises MIC 1 et
@ Annulation
Pour annuler la lecture programmed, appuyer sur Clear
Pour arr&er la lecture Appuyersur
Pour passer au format de 24 heures
Pour afficher I’heure courante
Si I’affichage de I’horloge clignote
Pour controller Ie temps restant jusqu’a la mise hors
Preparer la source
Pour annuler provisoirement Ie mode attente de minuterile
Pour contrder l’heure et la source specifiers
Pour connecter un tourne-disque
Appuyer sur VIDEO/AUX ou MD
Pour regler Ie niveau sonore de la source externe
Quand la prise CD Digital OUT Optical n’est pas utilisee
Nettoyage des t~tes et des chemins de bande
Nt?ttoyage du coffret
II n’y a pas de son
Le son ne sort que par une enceinte
Reducteur DE Bruit Dolby
Partie lecteur de disques compacts
Droits D’AUTEUR
Page
Page
Page
OPEN/CLOSE
~ Disc Direct PLAY1-3
CD EDIT/CHECK
Clear