Vxsl35LJ
Electric Power
Installation
Portable Cart Warning
Lightning
Damaae Reauirirwt Service
Qildoor Antenna
~&ntenancx3
Welcome
Connecting the antenna
To use the security hook for safety VX-S205 only
@y&g
Connecting the antenna
To Connect the supplied telescopic antenna VX-SI 35 only
Mount the supplied antenna in the antenna holder
Catv system Catv converter not supplied 75-ohm
To connect a Catv system without using a Catv converter
To Connect a Catv system using a Catv converter
Coaxial cable Not supplied ~AC cord hook
Preset
Preparing the remote control
TV Vcricatv Power
Number buttons
Before starting
Setting the language
Press Power to turn on the unit Press Menu
Press Menu twice to return to the normal screen
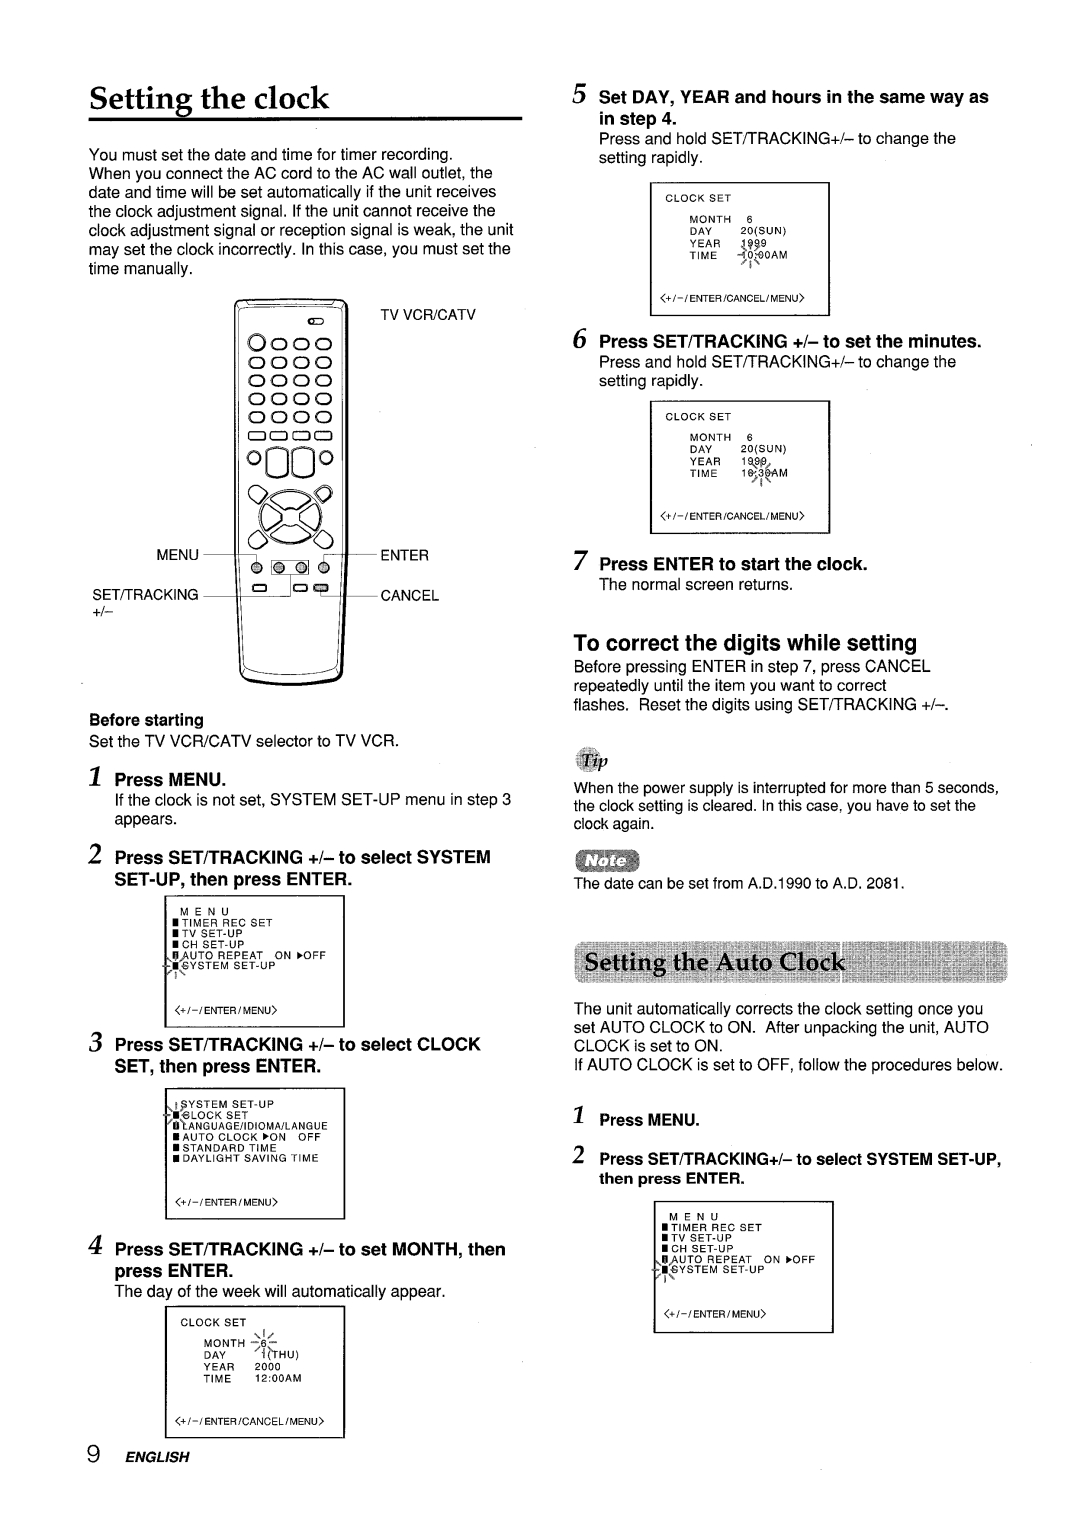
Setting the clock
To correct the digits while setting
5Press Menu 3 times to return to the normal screen
Press Menu twice to return to the nomal screen
Setting the channels
Press Enter to select TV or Catv
If you want to add or erase another channel, repeat steps 4
Code
Sample Channel Line Up Chart ‘TV !Staticm
Checking the channel set-up To use VCR Plus+ svstem
For example
Watchirw a TV txo~ram
Caption
Lectimz the closed cantions Mode
Pres Caption repeatedly to select the caption modem
Captions
Press SET/TRACKING +/-to adjust the setting
Adjusting the picture
Press Enter repeatedly to select the item to adjust
Press SET/TRACKING +/- to select PICTURE, then press Enter
Fres~ sET/lrRAcl~~NG+/ to select AUDIO, then press Enter
Adjusting tlhe sound
Press SET/TRACKING +/- to adjust the setting
T3efore starting
Press SET/TRACKING +/- to set the hours, then press Enter
Setting the On-Timer
Press SET/TRACKING +/- to select on TIMER, then press Enter
Press SET/TRACKING +/- to set the minutes, then press Enter
Press SET/TRACKING +/- to display SET, then press Enter
Setting the Off-Timer
To correct the data while setting
~~P’ress Menu 3 times to return to the normal screen
Plavimz back a ta~e
To stop playback
FiEwl@
‘To adjust the tracking manually
OCcci?
OEqlo
To skip an advertisement
To cancel repeat playback
To monitor a TV program
Press Call to display the tape counter ===l
To search the next index signal
Various search functions
After playback or recording, press STOP, then ~ER.RETURN
To stop recording
Recording a TV txomam
00100
To pause recording
~ Press O REC/CITR
When you set the timer for more than two timer programs
Recording with One-Touch
~ Press O RECK3TR repeatedly to set the recording duration
If you make a mistake, press Cancel
Setting the timer with VCR
REC Menu Enter Cancel SET/TRACKING +1
To extend the recording duration while recording
To set the daily program
To cancel a program
If the program overlaps another
To extend the recording time
To set the daily/weekly
Setting the timer manuallv
Timer
~+-w
Dubbing
Press TV/LINfE repeatedly to display
Menu Enter Cancel SET/TRACKING +
Press SET/TRACKING +/-to display the desired setting
Settimz the V-chi~
Press Enter to disidav on
To use the TV after the TV is protected
Press SET/TRACKING +/- to select V-CHIP
~ Press Menu
Multichannel TV Sound MTS and Hi-Fi audio sound System
On-screen displav
Recorded and output signals of the MTS broadcast
Tape operation mode indicators
0000
Troubleshooting
SIN
Specifications
VHF UHF
VHF/UHF
Parts and controls
REC, ON-TIMER, REC/OTR
Line in 2 Audio Lmono
Line in 1 Audiclmono
PREV. Cl-lPrevious channel button
Instalacion
Advertencia
Eneraia electrica
Danos aue reauieren servicio
Antena exterior
Mantenimiento
~ MBR controlador Remoto ~multifabricante
~Sistema VCR Plus+ y ~reproduction Con una sola ~pulsation
~ Emision MTS Sonido de TV ~ Multicanal~
Subtitulos
No suministrado
Ccmexion de la antena
Para utilizar e! i~tlcht de seguridad solo VX-S205
Gancho Daraelcablede CA Un tomacorriente de CA
Soporte de antena
Monte la antena suministrada en el soporte de antena
Adaptador de antena suministrado
MF’’’’=-’--’H’-’l’l
Sistema de cablevision Cable coaxial de ‘= no suministrado
Gancho para el cable de CA
Altomacorriente de CA
Remote Sensor
Preset Channel
Preparaci6n del controlador Remoto
\ \
Fabricate del convertidor
Selecci6n del idioms
Presione Menu dos veces para volver a la pantalla normal
De cablevision
Ajuste del reloj
Para corregir Ios digitos mientras realiza el ajuste
Presione Menu 3 veces para volver a la pantalla normal
Plresione Enter para seleccionar S1
Generalmente, el ajuste Auto es suficiente
Presione Enter para seleccionar TV o Catv
Sintonizacion de 10Scanales
Presione Menu dos veces para volver’ a la pantalla normal
Presione Menu Antes de comenzar
Tabla de coincidencia de canales de ejemplo Ernisora de
~.fIJAR
Por ejemplo
Showtime
Visualizaci6n de programas De televisih
Selecci6n del modo de Subtitulos
00CD 0000
Elemento Al incremental Ios Al reducir
Aiuste de la ima~en
Presione SETiTRACKING +/- para ajustar el elemento
Numeros
~ F’resione Menu
Ajuste del sonido
Presione SETflRACKING +/- para ajustar el valor
’resione Enter repetidamente para
LUN-VIE
Ajuste del temporizador de Conexitk autom6tica
Menuenter SET/TRACKING
LUN-SAB
Correction de Ios dates durante el ajuste
Se ilumina el indicador ON-TIMER de la unidad
Ajuste del tempcwizador de Desconexion autorniitico
~OPresione Menu 3 veces para volver a la pantalla normal
~ Inserte un videocassette
Reimoducci6n de cintas
Para detener la reproduction
Presione ~ Play para iniciar la reproduction
Para Para volver Modo oriainal
Para ajustar el seguimiento de forma
Par’a volver al ajuste automatic del seguirniento
PAUSE~
Para controlar un programa de TV
Para cancelar la reproduction repetida
Para omitir un anuncio publicitario
Presione Menu Presione SET/TRACKING +/- para seleccionar
Zero Retur
Distintas funciones de Miscmeda
Para buscar la siguiente serial de indite
Presione Call para mostrar el contador de cinta
Para interrumpir la grabacion
Grabaci6n de tmomamas de TV
Para detener la grabacion
Para evitar el borrado accidental
Detenga la grabacion al grabar sin temporizador
Mlsacih
Ajustar la duration de la grabacion
~ P’resione OREC/OTR
Para ampliar la duration de la grabacion mientras graba
Si comete un error, presione Cancel
Ajuste del temporizador con El sistema VCR Plus+
TV VCR/CATV VCR PLUS+
Pari~ definir el programa diario
Para cancelar un programa
Si ell programa se solapa con otro
Para ampliar el tiempo de grabach
Para ajustar el temporizador diario/ semanal
TV VCR/CATV REC Enter Cancel
Ajuste manual del temporizador
Ejemplo
Bien
CoPiia de cintas
0bien
Aiuste del V-chip
En el menu Fijar V-CHIP, presione SET/TRACKING
Presia,ne Enter para mostrar S1
Aparece *en Iugar del ntimero
0Cuando se selecciona TV-MA, aparecen Ios siguientes items
Lntroduzca, la contrasefia y, a continuation, ~resione
Sistema de pistas de audio
Sonido de TV multicanal MTS
Segundo programa de audio SAP
Grabacion del audio de alta fidelidad
Para cambiar la visualization en Ipantalla
Visualizaci6n en ~antalla
Senaks grabadas y de salida de la emisih Nits
Monc
Soluci6n de problemas
Nota sobre la condensation de humedad
Precauci6n
Especificaciones
VX-S135
Boton 44 REW rebobinado Boton@
Sensor de control remoto J Indicadores POWER, Timer J’
Fndice de ~artes v controles
Playback
Kdice de partes y controles
Selector TV VCR/CATV
Avertissement
Installation
Lieu d’installation Placez I’appareil sur une surface plane
Alimentation
=oudre
Antenne externe
WM de ~anne
Entrelien
Diffusion MTS son televise multicanal
MBR telecommande multimarque
Systeme VCR Plus+ et lecture monotouche
Puce
Raccordez Ie cordon d’alimentation sur une prise murale
Raccordement de l’antenne
Utilisation du crochet de securite VX-S205 uniquement
Crochet pour Ie cordon d’alimentation
Montez I’antenne fournie sur Ie support d’antenne
Adaptateur d’antenne fourni
Lx------s~
Pour raccorder un systeme Catv avec un convertisseur Catv
Systeme Catv
Catv
Preparation de la t616commande
Ensuite sur Enter
S6kcticm de ha.Iangue ’af’fichage
Appuyez sur Menu
Appuyez sur SET/TRACKiNG +/- pour
Appuyez sur SET/TRACKING +/- pour regler Ies minutes
R6glage de l’horloge
Pour corriger des chiffres en tours de reglage
Appuyez sur Enter pour faire demarrer ’horloge
Simplementvotre nouvelle zone geographique
Appuyez sw Enter pour selectionner
Appu!fez deux fois sur Menu 3 pour revenir a I’ecranrrormal
En principe, Ie reglage Auto est suffisant
Appuyez sur Enter pour selectionner TV ou
S61ection des chatnes
Sur Menu
Appuyez deux fois sur Menu pour revenir a I’ecran normal
Cablelocal
Par exemple
Extempl~tableau& concordance des canaux Station Code
Wcbs
Regarder une 6mission de T616vision
CNL2+TEXTE Cnli
Wection du mode de sous
SS.TITRE CNL2
Scms-titres
Parametre
R6glage de l’image
Une augmentation Une diminution Du reglage Reglage
Une diminution du
Une augmentation
Parametre
Du reglage Reglage
R6glage du programmateur Demise sous tension
Indicateur ON-TIMER
Tvivcricatv Menu Enter SET/TRACKING +1
Pour corriger Ies donnees en tours de re!glagw
’indicateur ON-TIMER de I’appareil s’allume
R6glage du programmateur Demise hors tension
~~lAppuyez trois fois sur Menu pour revenir a l’ecrannormal
Pour corriger Ies donnees en tours de reglage
Lecture d’une cassette
Pour arreter la lecture
Pour Appuyez sur
Pour rwstaurer I’alignement automatique
SLP EP
Original
Pour annuler la lecture repetee
Pour eviter une publicite
Pour suivre une emission de television
Appuyez sur Enter pour selectionner on
~iff~rentes fonctions de Rechwche
Pour rechercher Ie signal d’index suivant Balayagedes index
Appuyez sur Index en mode d’arr& ou de lecture
Appuyez sur Call pour afficher Ie compteur de bande
Pour activer une pause d’enregistrement
Enregistrement d’une 6mission t61&is6e
Pour arreter I’enregistrement
Pour eviter un enregistrement accidental
Appuyezplusieursfois de suitesur @ FEC
Enregistrement avecla Fonction monotouche
Si ‘vous avez programme plus de deux erwegistrements
Appuyez sur @ FiEC/OTFL
R6glage du programmateur Avec le svstkme VCR Plus+
Si vous faites une erreur, appuyez sur Cancel
REC Menu
Pour programmer un enreglistrement journalier
Pour annuler un enregistrernent programme
Si des enregistrements programrnes sIe chevauchent
Pour allonger la duree d’enregistrement
Pour annuler un programme
R6glage manuel du Programmateur
Pour programmer un enregistrement journalier/hebdomadaire
Avant de regler Ie programmateur
REclo-rR
Co-pie
VX-S135 Avant Non fourni
VX-S135 Arriere Rouge Jaune Blanc
Et appuyez ensuite sur Enter
Activation de la puce
Dans Ie menu Reglage Puce V, appuyez sur SET
Appuyez sur SET/TRACKING +/- pour afficher Ie reglage voulu
Appuyez ‘sur Enter pour afficher on
INC-17 Films interdits aux enfants de moins de 17 ans
Appuyez sur SET/TRACKING +/- pour selectionner ICHlp
Appuyez trois fois sur Menu pour revenir a ’ecrannormal
Emission audio secondaire SAP
Son t61&is6 multicanal MTS Et syst?me de son Hi-Fi
Son televise multicanal MTS
Systeme de piste audio
Ecrans de menu
Emwgistre et signal transmis de l’~missi~n MTS
Indicateurs du mode de fcmctionnenwmt du magnetoscope
Pour changer I’affichage de la fonction d’ecran
D6pannage
Remarque sur la condensation d’humidite
Systeme de balayage helicoidal a
Rapport signal/bruit53dB nominal
Syntoniseur a frequence synthetisee
Vitesse de defilement de la bande 33,35 mm/s 16,67 mm/s
Composants et commandes
‘EC, ON-TIMER, REC/OTR
LMONO/R/VIDEO
Prises Line in 1 Audio ~-=-~-’=-3 Cordon
’alimentation