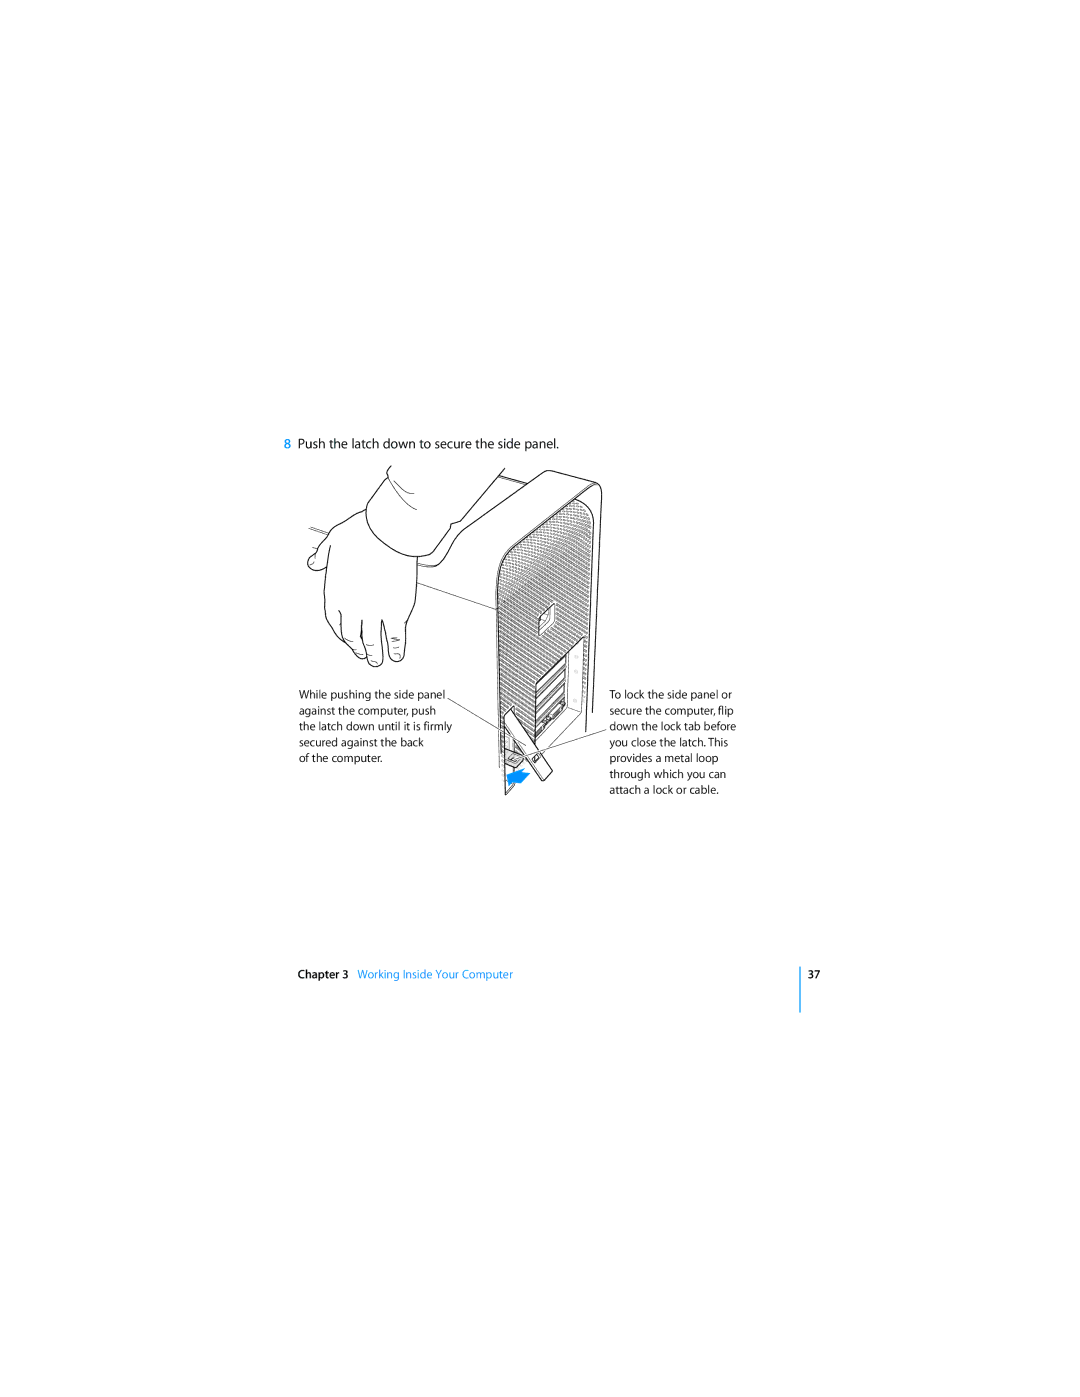
Mac Pro
Includes setup, expansion, and troubleshooting information for your
User’s Guide
Mac Pro computer
Apple Computer, Inc 2006 Apple Computer, Inc. All rights reserved
53 Chapter 4 Troubleshooting
Contents
5 Chapter 1 Getting Started
15 Chapter 2 Getting to Know Your Mac Pro
77 Appendix B Safety, Maintenance, and Ergonomics
69 Appendix A Specifications
87 Index
Getting Started
Setting Up Your Mac Pro
Step 1 Position your computer and display
Chapter 1 Getting Started
Step 2 Plug in the power cord
8 Chapter 1 Getting Started
Step 3 Connect the display
port
VGA connector on display cable
Display
Adapter
Step 5 Connect the keyboard and mouse
Step 4 Connect an Ethernet cable
10 Chapter 1 Getting Started
Apple keyboard extension cable
Plug the mouse into a USB port on the keyboard KeyboardMouse
Chapter 1 Getting Started
Using a Wireless Keyboard and Mouse
Need Help Setting Up?
Step 7 Use Setup Assistant
Step 6 Turn on your Mac Pro
Putting Your Mac Pro to Sleep
Putting Your Mac Pro to Sleep or Shutting It Down
To wake your computer from sleep, do one of the following
Shutting Down Your Mac Pro
Getting the Latest Information
Getting to Know Your Mac Pro
¨ Power button
Basic Features on the Front of Your Mac Pro
FireWire 800 port
FireWire 400 port
H FireWire 400 and 800 ports
¨ Power button
Optical drive
USB 2.0 ports
Power socket ´ Locking latch d USB 2.0 ports H FireWire 400 port
Ports and Connectors on the Back of Your Mac Pro
H FireWire 800 port
Chapter 2 Getting to Know Your Mac Pro
H FireWire 400 and 800 ports
Power socket
Locking latch
USB 2.0 ports
£ DVI display port £ DVI display port
More Ports and Connectors on the Back
Audio line-in port Audio line-out port
Chapter 2 Getting to Know Your Mac Pro
£ DVI display ports
PCI Express expansion slots
Optical digital audio in and out ports
Analog audio line-in port
Slots 2-4 PCI Express Battery
Internal Expansion Options
Slot 1 Double-wide PCI Express graphics graphics card installed
Optical drive carrier
Optical drives
Battery
Hard disk drive
PCI Express slots
More Information
Getting Answers
To open Mac Help
To learn about
Using your mouse or keyboard
Chapter 2 Getting to Know Your Mac Pro
Changing System Preferences
Page
å ÒInstalling Internal Storage DevicesÓ on page
å ÒOpening the ComputerÓ on page å ÒInstalling MemoryÓ on page
å ÒReplacing the Internal Backup BatteryÓ on page
Working Inside Your Computer
Opening the Computer
Touch the metal on top of the computer
4 Unplug all the cables and the power cord from the computer
Chapter 3 Working Inside Your Computer
5 Hold the side panel and lift the latch on the back of the computer
Lift the latch while holding the side panel
6 Remove the side panel
Important When you remove the side panel, hold it securely
Chapter 3 Working Inside Your Computer
Pull the top of the side panel out and lift it up
Installing Memory
2 Remove the memory card and place it on a soft clean cloth
To install memory
Chapter 3 Working Inside Your Computer
3 Open the ejectors on the DIMM slot by pushing them out to the sides
5 Lay your Mac Pro down on a soft, clean cloth on the desk or work surface to avoid scratching the work surface or your Mac Pro
Place the side panel in the slot and then push to close
7 Stand your Mac Pro up and replace the side panel
Chapter 3 Working Inside Your Computer
of the computer
8 Push the latch down to secure the side panel
Chapter 3 Working Inside Your Computer
Installing SATA 3 Gbps Hard Disk Drives
Installing Internal Storage Devices
å Height 1.0 inch
To install a hard disk drive
Position the connectors towards the rear
Make sure the latch is up
6 Replace the side panel and push the latch down to secure it
Chapter 3 Working Inside Your Computer
To replace the optical drive
Replacing the Optical Drive
Chapter 3 Working Inside Your Computer
Four extra screws
Middle connectors
8 Attach the power and ribbon cables to the back of the drive
Chapter 3 Working Inside Your Computer
46 Chapter 3 Working Inside Your Computer
10 Replace the side panel and push the latch down to secure it
Adding PCI Express Cards
To install a PCI Express card
About PCI Express Cards
Chapter 3 Working Inside Your Computer
3 Unscrew the captive screw in the PCI bracket and remove the bracket
Chapter 3 Working Inside Your Computer
Did You Know?-Installing a Full-Length PCI Card
To replace the battery
Replacing the Internal Backup Battery
Remove the card in slot 1. Push on the tab to release the catch
Slide the old battery out. Insert the new battery positive + side up
Page
Problems with Your Mac Pro
Troubleshooting4
The computer won’t respond or the pointer won’t move
The computer won’t turn on or start up
If that doesn’t work
You are unable to eject a disc
The status light flashes and the computer won’t start up
å One short flash followed by a longer off period No valid memory
You have a problem with a software program
Problems with Software
You have a problem using your computer or working with Mac OS
To force an application to quit
To check for updated software
Problems with AirPort Wireless Communication
Keeping Your Software Up to Date
No image appears on the screen
Problems with Your Display
The screen image appears dim or flickers
After you change the screen resolution, desktop icons move
No colors appear on the screen or the colors don’t look right
To use Network Diagnostics
Problems with Your Internet Connection
The screen freezes
The light on the front of the display is flashing
Check System Preferences settings
Turn the modem on and off to reset the modem hardware
Cable Modem, DSL, and LAN Internet Connections
PPPoE Connections
Network Connections
To use Apple Hardware Test
Using Apple Hardware Test
Installing Mac OS
Reinstalling the Software that Came with Your Computer
Installing Applications
To install Mac OS
Maximizing Ethernet Performance
Online Resources
Learning More, Service, and Support
Onscreen Help
System Profiler
Country
AppleCare Service and Support Information
Phone
Website
68 Chapter 4 Troubleshooting
Locating Your Serial Number
Processor and Memory Specifications
SpecificationsA
Random-access memory RAM
Processor
Graphics Card
SuperDrive DVD+R DL/DVD±RW/CD-RW Specifications
Video Display Modes
å Disc diameters supported 12 cm and 8 cm
FireWire Specifications
USB Specifications
å Data transfer speed
Bluetooth 2.0+EDR Specifications Optional
Ethernet Specifications
AirPort Extreme Specifications Optional
Power
å Signal-to-noise ratio Greater than130 dB
Optical Digital Audio Specifications
Compatibility
å Bits per sample 16-bit or 24-bit
Analog audio out using the headphone jack typical values
Analog Audio Specifications
å Signal-to-noise ratio Greater than 90 dB
å Jack type 1/8Ó mini å Bits per sample 16-bit or 24-bit
Power Requirements for Expansion Cards and Peripherals
Power Supply
FireWire devices
Analog audio line out typical values
Dimensions and Operating Environment
System Clock and Battery
Battery
Dimensions
Safety, Maintenance, and Ergonomics
Important Safety Information
Appendix
Apple and the Environment
General Maintenance
Maintaining Your Display
Protecting Your Optical Drive
To keep your optical drive working properly
To maintain your display and ensure its long life
Important Ergonomic and Health-Related Information
Forearms and hands in a straight line
å Avoid turning up the volume to block out noisy surroundings
Avoid Hearing Damage
å Turn the volume down if you canÕt hear people speaking to you
Compliance Statement
Communications Regulation Information
Radio and Television Interference
FCC Bluetooth Wireless Compliance
Wireless Radio Use
Bluetooth Industry Canada Statement
Bluetooth Europe-EU Declaration of Conformity
VCCI Class B Statement Singapore Wireless Certification
Taiwan Wireless Statements Korea Keyboard Statement Taiwan Statement
It also complies with the Canadian ICES-003 Class B Specification
Korea Statements Taiwan Class B Statement
Battery Disposal
Using an External USB Modem
ENERGY STAR Compliance
Disposal and Recycling Information
Index
Index