UTILIZZO DELLO SWITCH

Accensione dei sistemi

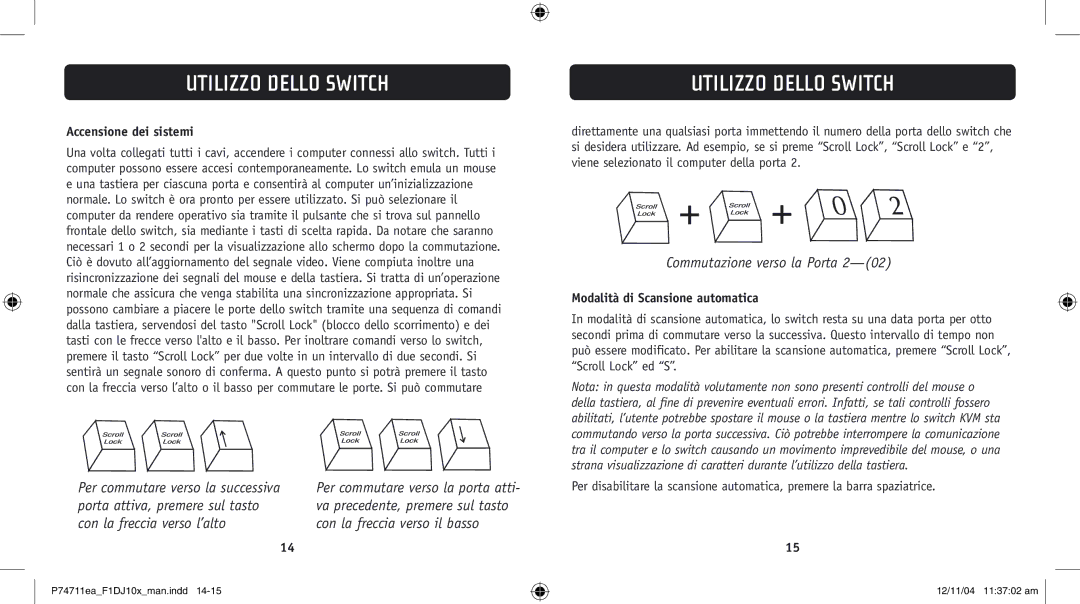
Una volta collegati tutti i cavi, accendere i computer connessi allo switch. Tutti i computer possono essere accesi contemporaneamente. Lo switch emula un mouse e una tastiera per ciascuna porta e consentirà al computer un’inizializzazione normale. Lo switch è ora pronto per essere utilizzato. Si può selezionare il computer da rendere operativo sia tramite il pulsante che si trova sul pannello frontale dello switch, sia mediante i tasti di scelta rapida. Da notare che saranno necessari 1 o 2 secondi per la visualizzazione allo schermo dopo la commutazione. Ciò è dovuto all’aggiornamento del segnale video. Viene compiuta inoltre una risincronizzazione dei segnali del mouse e della tastiera. Si tratta di un’operazione normale che assicura che venga stabilita una sincronizzazione appropriata. Si possono cambiare a piacere le porte dello switch tramite una sequenza di comandi dalla tastiera, servendosi del tasto "Scroll Lock" (blocco dello scorrimento) e dei tasti con le frecce verso l'alto e il basso. Per inoltrare comandi verso lo switch, premere il tasto “Scroll Lock” per due volte in un intervallo di due secondi. Si sentirà un segnale sonoro di conferma. A questo punto si potrà premere il tasto con la freccia verso l’alto o il basso per commutare le porte. Si può commutare

UTILIZZO DELLO SWITCH

direttamente una qualsiasi porta immettendo il numero della porta dello switch che si desidera utilizzare. Ad esempio, se si preme “Scroll Lock”, “Scroll Lock” e “2”, viene selezionato il computer della porta 2.

+ +

Commutazione verso la Porta 2—(02)

Modalità di Scansione automatica

In modalità di scansione automatica, lo switch resta su una data porta per otto secondi prima di commutare verso la successiva. Questo intervallo di tempo non può essere modificato. Per abilitare la scansione automatica, premere “Scroll Lock”, “Scroll Lock” ed “S”.

Nota: in questa modalità volutamente non sono presenti controlli del mouse o della tastiera, al fine di prevenire eventuali errori. Infatti, se tali controlli fossero abilitati, l’utente potrebbe spostare il mouse o la tastiera mentre lo switch KVM sta commutando verso la porta successiva. Ciò potrebbe interrompere la comunicazione tra il computer e lo switch causando un movimento imprevedibile del mouse, o una strana visualizzazione di caratteri durante l’utilizzo della tastiera.

Per commutare verso la successiva porta attiva, premere sul tasto con la freccia verso l’alto

14

Per commutare verso la porta atti- va precedente, premere sul tasto con la freccia verso il basso

Per disabilitare la scansione automatica, premere la barra spaziatrice.

15

P74711ea_F1DJ10x_man.indd 14-15

12/11/04 11:37:02 am

Page 80
Image 80
Belkin F1DJ104P-B, F1DJ102P-B user manual Utilizzo Dello Switch, Accensione dei sistemi, Modalità di Scansione automatica

F1DJ102P-B, F1DJ104P-B specifications

Belkin, a renowned name in the world of connectivity and networking solutions, has made significant strides in the realm of KVM switches with its F1DJ104P-B and F1DJ102P-B models. These devices are engineered to seamlessly manage multiple computers from a single set of peripherals, enhancing user efficiency and workspace organization.

The Belkin F1DJ104P-B model stands out with its ability to control up to four computers simultaneously. This 4-port KVM switch offers an intuitive interface and gives users the freedom to switch between systems effortlessly. It supports USB connectivity, allowing users to connect their keyboard, mouse, and monitor quickly, while its compact design ensures minimal space usage on the desk. One notable feature of this model is its support for high-resolution display output, with the capability to handle up to 1920 x 1200 pixels. This ensures that users can benefit from clear and sharp visuals, whether for work or entertainment.

On the other hand, the Belkin F1DJ102P-B caters to those who require a more streamlined solution, managing two computers efficiently with its 2-port configuration. Similar to its 4-port counterpart, the F1DJ102P-B incorporates USB connectivity, making it user-friendly and straightforward to set up. Like the F1DJ104P-B, it also supports high-definition video output, providing crisp imagery that enhances productivity and clarity.

Both models support a hotkey function that allows users to switch between connected computers conveniently without needing to reach for a button on the device itself, thus making operation more efficient and ergonomic. Furthermore, the inclusion of LED indicators makes it easy to identify which computer is currently active, aiding in quick transitions.

Durability is another hallmark of Belkin's offerings. Both models are constructed with high-quality materials, ensuring longevity and reliability in diverse working environments. With their compatibility across various operating systems, such as Windows and macOS, end users can enjoy an adaptable and hassle-free experience.

In summary, the Belkin F1DJ104P-B and F1DJ102P-B KVM switches are powerful tools designed to enhance productivity and streamline workspace management. Their combination of high-resolution support, user-friendly features, and robust design makes them ideal for professionals and multitaskers looking to optimize their computing experience. Whether you choose the 2-port or the 4-port version, both models deliver excellent performance tailored to meet your specific needs.