Flat Rack

The rack is designed with a stop so it will stop before coming completely out of the oven and not tilt.

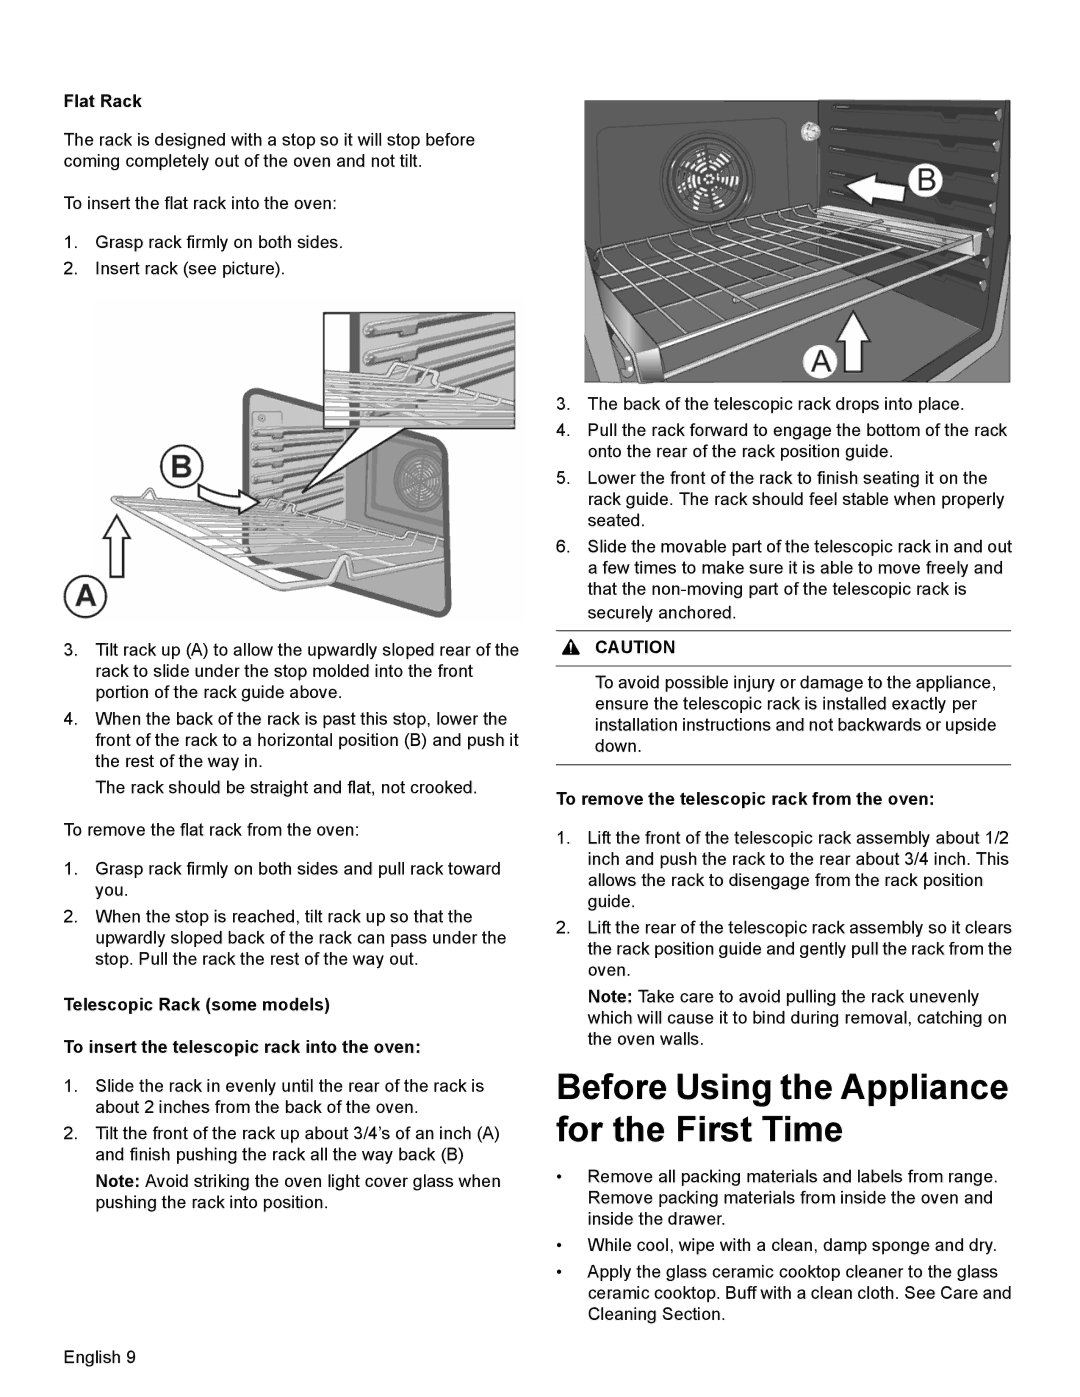
To insert the flat rack into the oven:

1.Grasp rack firmly on both sides.

2.Insert rack (see picture).

3.Tilt rack up (A) to allow the upwardly sloped rear of the rack to slide under the stop molded into the front portion of the rack guide above.

4.When the back of the rack is past this stop, lower the front of the rack to a horizontal position (B) and push it the rest of the way in.

The rack should be straight and flat, not crooked.

To remove the flat rack from the oven:

1.Grasp rack firmly on both sides and pull rack toward you.

2.When the stop is reached, tilt rack up so that the upwardly sloped back of the rack can pass under the stop. Pull the rack the rest of the way out.

Telescopic Rack (some models)

To insert the telescopic rack into the oven:

1.Slide the rack in evenly until the rear of the rack is about 2 inches from the back of the oven.

2.Tilt the front of the rack up about 3/4’s of an inch (A) and finish pushing the rack all the way back (B)

Note: Avoid striking the oven light cover glass when pushing the rack into position.

English 9

3.The back of the telescopic rack drops into place.

4.Pull the rack forward to engage the bottom of the rack onto the rear of the rack position guide.

5.Lower the front of the rack to finish seating it on the rack guide. The rack should feel stable when properly seated.

6.Slide the movable part of the telescopic rack in and out a few times to make sure it is able to move freely and that the non-moving part of the telescopic rack is securely anchored.

9CAUTION

To avoid possible injury or damage to the appliance, ensure the telescopic rack is installed exactly per installation instructions and not backwards or upside down.

To remove the telescopic rack from the oven:

1.Lift the front of the telescopic rack assembly about 1/2 inch and push the rack to the rear about 3/4 inch. This allows the rack to disengage from the rack position guide.

2.Lift the rear of the telescopic rack assembly so it clears the rack position guide and gently pull the rack from the oven.

Note: Take care to avoid pulling the rack unevenly which will cause it to bind during removal, catching on the oven walls.

Before Using the Appliance for the First Time

Remove all packing materials and labels from range. Remove packing materials from inside the oven and inside the drawer.

While cool, wipe with a clean, damp sponge and dry.

Apply the glass ceramic cooktop cleaner to the glass ceramic cooktop. Buff with a clean cloth. See Care and Cleaning Section.

Page 12
Image 12
Bosch Appliances HEI8054U manual Before Using the Appliance for the First Time, To remove the telescopic rack from the oven

HEI8054U specifications

The Bosch HEI8054U is a premier induction cooktop designed to combine elegance with high-functionality for modern kitchens. This appliance stands out due to its innovative technologies, sleek design, and user-friendly features.

One of the most notable aspects of the HEI8054U is its induction cooking technology. Unlike traditional gas or electric cooktops, induction cooking uses electromagnetic energy to directly heat cookware. This means that the cooktop surface remains cool to the touch, enhancing safety and minimizing the risk of burns. The result is not only quick heating but also efficient energy use—making the HEI8054U an eco-friendly choice.

The HEI8054U features four cooking zones, each equipped with a powerful induction element that can quickly bring water to a boil or efficiently simmer delicate sauces. The FlexInduction zone is a standout feature, allowing users to combine two cooking zones into one large space for griddles or large pots. With this flexibility, home chefs can maximize cooking potential without being restricted to standard cookware sizes.

Another key characteristic of the Bosch HEI8054U is its precise temperature control. The appliance includes a PowerBoost function that temporarily increases the heat settings for faster boiling, ideal for busy home cooks who want to save time. The intuitive touch control panel allows for easy adjustments with a simple swipe of a finger, delivering precision and control for achieving perfect results.

For added convenience, the HEI8054U has a timer feature that allows users to set cooking durations for each individual zone, providing peace of mind and ensuring that meals are cooked to perfection without constant monitoring. Additionally, the appliance offers a safety lock feature to prevent accidental changes to settings, making it family-friendly.

Aesthetically, the Bosch HEI8054U is designed to complement any modern kitchen. Its smooth black ceramic glass surface not only looks stunning but is also easy to clean, resisting spills and stains. The overall design integrates seamlessly with kitchen cabinetry, further elevating the cooking space.

In summary, the Bosch HEI8054U induction cooktop is a versatile, efficient, and stylish addition to any kitchen. With its advanced induction technology, intuitive controls, and flexible cooking zones, it offers a streamlined cooking experience that meets the demands of today’s culinary enthusiasts. Its safety features and sleek design make it an ideal choice for those looking to enhance both functionality and aesthetics in their cooking environments.