09801-9 10000W
Equipment Description
Table of Contents
Safety Rules
When Adding or Draining Fuel
When Starting Equipment
When Operating Equipment
When Transporting or Repairing Equipment
Generator produces powerful voltage
When Adjusting or Making Repairs to Your Generator
When Testing for Engine Spark
Spark Arrester Muffler
Know Your Generator
Recoil Starter
Assembly
Install Wheel Kit
Unpacking the Generator
Vibration
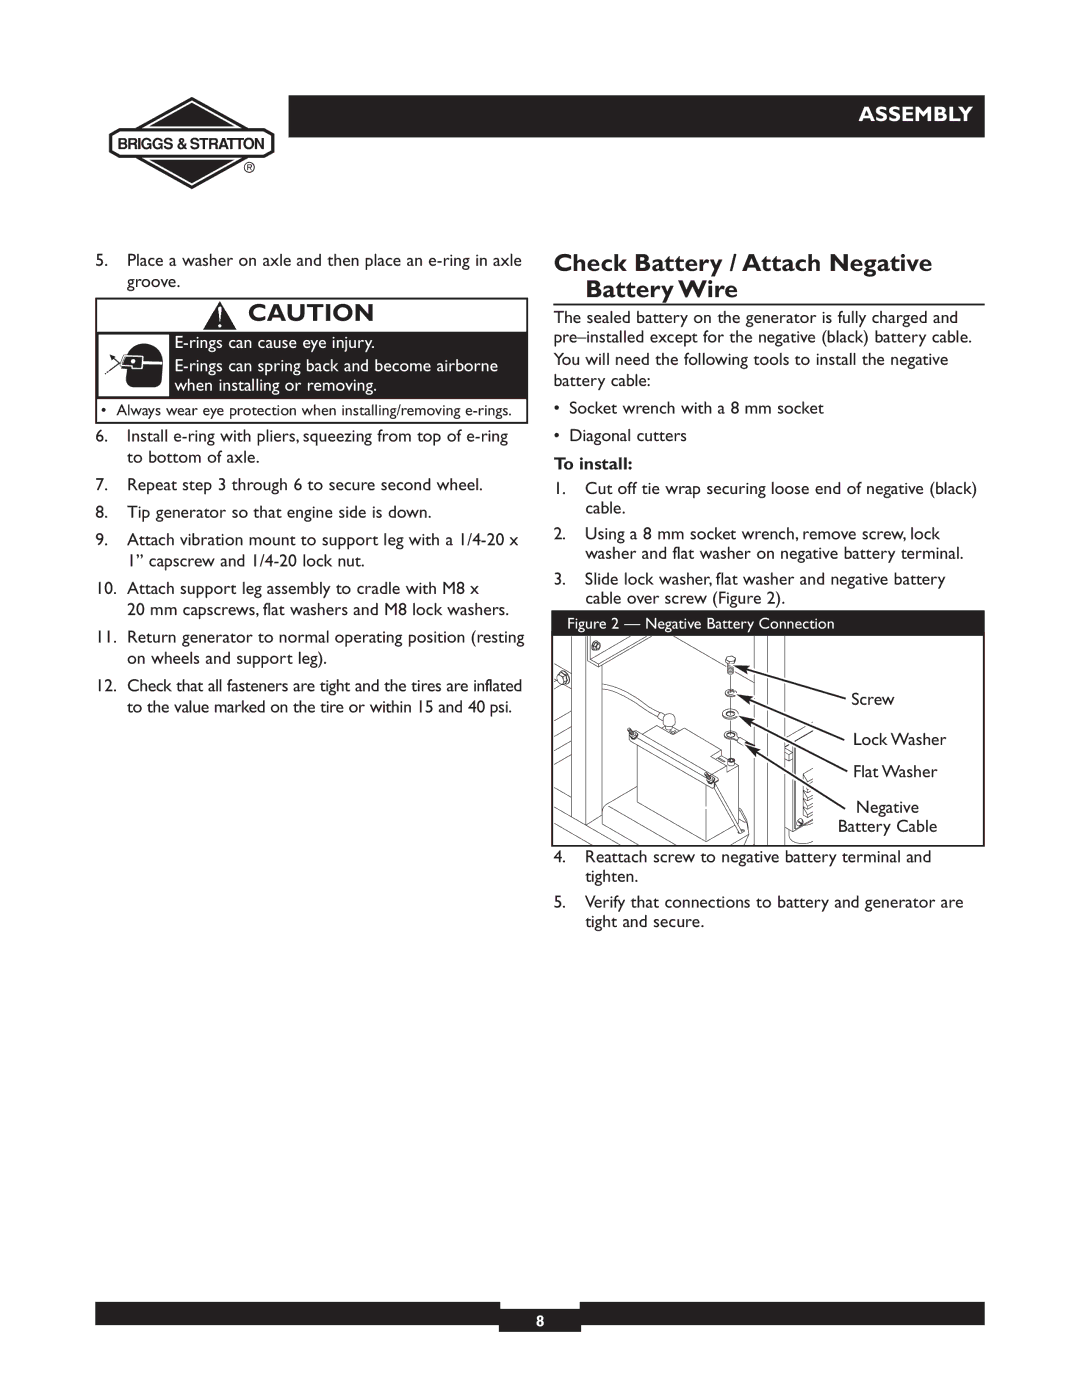
Battery Cable
Check Battery / Attach Negative Battery Wire
Always wear eye protection when installing/removing e-rings
When Adding Fuel
Before Starting the Engine
Add Engine Oil
Add Fuel
Using the Generator
Connecting to a Building’s Electrical System
System Ground
Generator Location
Starting the Engine
Connecting Electrical Loads
Operating Generator
Operating Automatic Idle Control
Charging a Battery
Stopping the Engine
Operation
HOW to USE the Battery Charger
Cold Weather
Creating a Temporary Shelter
Creating a Permanent Shelter
Receptacles
Volt AC, 50 Amp Receptacle
120/240 Volt AC, 30 Amp, Locking Receptacle
Volt AC, 30 Amp Locking Receptacle
Volt DC, 10 Amp Receptacle
Volt AC, 20 Amp, Duplex Receptacle
Volt, 20 Amp Locking Type Receptacle
Capacity
Power Management
DON’T Overload Generator
Specifications
General Maintenance Recommendations
Storage
Generator Storage
Engine Storage
Other Storage Tips
Troubleshooting
Problem Cause Correction
Contact Authorized service facility
Disconnect shorted electrical load
Warranty Period
Limited Warranty
Symboles de Danger et Moyens
Table DES Matières
Description DE L Équipement
Règles DE Sécurité
Lors DE Lajout OU DE LA Vidange DU Carburant
Lors DU Démarrage DE Léquipement
Lorsque Léquipement Fonctionne
Lorsque Vous Transportez OU Réparez Léquipement
Lorsque Vous Réglez OU Réparez Votre Générateur
Lors DE Tests Dallumage DU Moteur
Connaissez Votre Générateur
Installe la Roue la Trousse
Référez-vous à la et installez les roues comme suit
Assemblage
Enlever le Générateur De La Boite
Installation
Avant LE Démarrage DU Moteur
Ajoutez de lhuile à moteur
Ajoutez de lessence
Emplacement de la Génératrice
Utilisation DE LA Génératrice
Mise à la terre du système
Branchement au système électrique dun édifice
Utilisation DU Générateur
Démarrage du Moteur
Branchement des Charges Électriques
Placez le interrupteur Marche/Arrêt en position Marche
Recharge d’une Batterie
Arrêt du Moteur
Fonctionnement du Contrôle Automatique du Ralenti
Protégez lunité contre les intempéries
Comment Utiliser LE Chargeur DE Batterie
Fonctionnement PAR Temps Froid
Vent
Création d’un abri temporaire
Création d’un abri permanent
Prises DE Courant
Prise à Verrouillage de 240 Volts c.a., 50 Ampères
Prise à Verrouillage de 120/240 Volts c.a., 30 Ampères
Prise à Verrouillage de 120 Volts c.a., 30 Ampères
Prise de 10 Ampères, 12 Volts c.c
Prise à Verrouillage de 120 Volts c.a., 20 Ampères
Volts c.a., 20 Ampères Prise de Courant Double
NE PAS Surcharger Générateur
Capacité
Gestion de la Consommation
Exemple
Recommandations Générales D’ENTRETIEN
Spécifications
Remisage
Remisage du Générateur
Remisage du Moteur
Autres Idées de Remisage
Dépannage
Période DE Garantie
Garantie Limitée
Tabla DE Contenidos
Descripción DEL Equipo
Reglas DE Seguridad
Advertencia
Peligro
Cuando Añada Combustible O Vacíe EL Depósito
Cuando Ponga EN Funcionamiento EL Equipo
Cuando Opere EL Equipo
Quemaduras severas pueden ocurrir al hacer contacto
Cuando Pruebe LA Bujía DEL Motor
Precaución
Cuando Ajuste O Haga Reparaciones a SU Generador
Conozca SU Generador
Culatazo el Principio Usó para comenzar motor
Instale el Juego de Ruedas
Montaje
Para Retirar El Generador De La Caja
Para instalar
Tornillo
Antes DE Darle Arranque AL Motor
Agregar Aceite al Motor
Agregue Combustible
Coloque la generador sobre una superficie nivelada
USO DEL Generador
Tierra del Sistema
Ubicación del Generador
Conexión al Sistema Eléctrico de un Edificio
Operando EL Generador
Encienda el Motor
Conexion De Cargas Electricas
Coloque el interruptor ignición a la posición On Figura
Carga de la Bateria
Parado Del Motor
Funcionamiento del Control Automático de Marcha en Vacío
Proteja la unidad de la intemperie
Operación Durante UN Clima Frío
Cómo al Uso el Corcel de Batería
Creación de una Estructura de Protección Provisional
Creación de una Estructura de Protección Permanente
Receptáculos Precaución
Voltios AC, 50 Amperios Receptáculo
120/240 Voltios AC, 30 Amperios, Receptáculo de Seguridad
Tomacorrientes de 120 Voltios AC, 30 Amperios
Tomacorrientes de 120 Voltios AC, 20 Amperios
Volt AC, 20 Amperios, Receptáculos Dobles
Tomacorrientes de 12 Voltios DC
Juego de Cable de 3 Alambres
No Sobrecargue Generador
Capacidad
Control de la Energía
Ejemplo
Especificaciones
Recomendaciones Generales DE Mantenimiento
Almacenamiento
Almacenando el Generador
Almacenando el Motor
Otras Sugerencias Para el Almacenando
Diagnositicos DE Averías
Notas
Período DE Garantía
Garantía Limitada