Sewing Basics Utility Stitches
Page
Important Safety Instructions
For a longer service life
For Users in the UK, EIRE, Malta Cyprus only
Contents
Utility Stitches
Included accessories
Accessories
About zigzag foot J
Accessory compartment
Optional accessories
Main parts
Names of Machine Parts and Their Functions
Operation buttons
Needle and presser foot section
Buttons provided on some models
Spool pin
Operation panel
BPushplace.the spool pin down until it locks into
Shown.1
Power supply precautions
Using Your Sewing Machine
Power supply
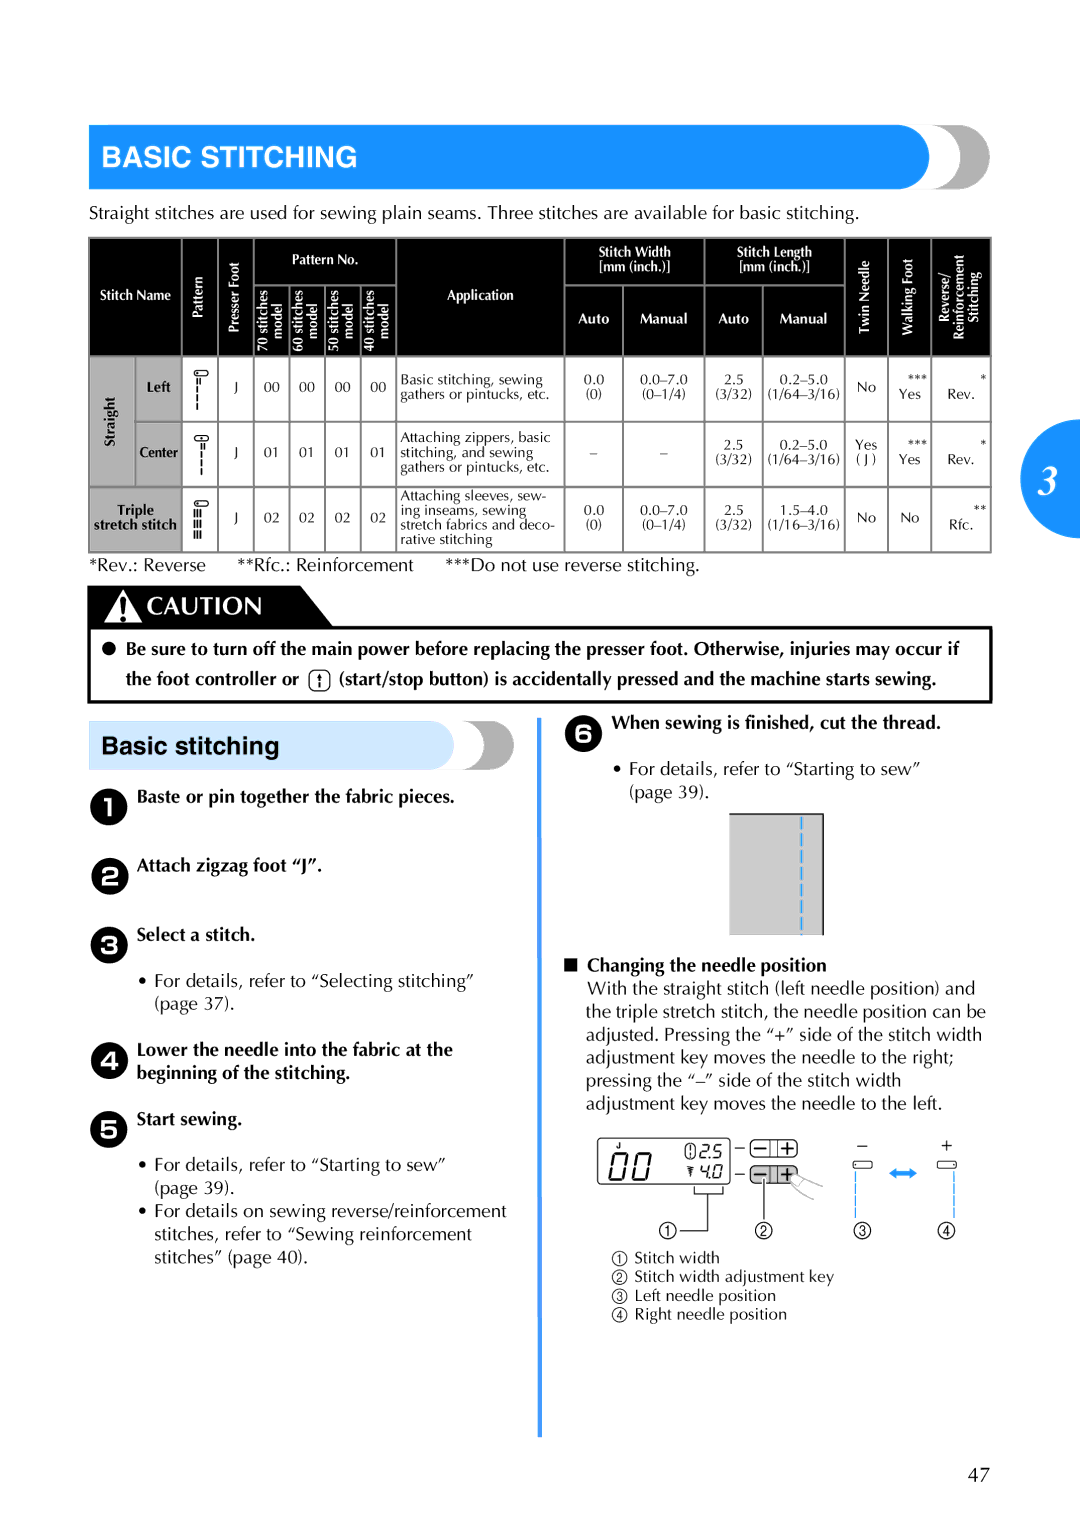
Changing the needle stop position
Foot controller
Aright to select the desired sewing speed
Side of stitch selection key
Winding the bobbin
Threading the Machine
BRemove the spool cap
DSlide the spool cap onto the spool pin
KTrim the excess thread above the bobbin
Make sure that the thread passes under the pretension disk
For models equipped with the fast bobbin winding system
Thread is cut to a suitable length
Actual size 11.5mm 7/16 inch This model
Lower threading
For models equipped with the quick-set bobbin
Slit Cutter Cut the thread with the cutter
Upper threading
GSlide the spool cap onto the spool pin
Remove the spool cap
Thread take-up lever
Needle bar thread guide
Catch the thread on the hook as shown below
DFully lower the needle threader lever
Lightly hold the end of the upper thread
Drawing up the lower thread
Bobbin cover should still be removed
Replacing the Needle
Needle precautions
Needle types and their uses
Replacing the needle
Checking the needle
CLower the presser foot lever
Install the twin needle in the same way
Sewing with the twin needle
Installthread.the thread spool and thread the upper
Thread the upper thread for the left needle
For details, refer to steps a through l of Upper threading
HAttach zigzag foot J
For details, refer to step a through l of Upper threading
Models equipped with a needle threader
Turn on the sewing machine Select a stitch
Replacing the presser foot
Replacing the Presser Foot
Replace the presser foot as described below
Mark on the wheel points up. With models
Remove the presser foot
Removing the presser foot holder
For details, refer to Replacing the presser foot
Page
Follow the basic procedures below to sew
General sewing procedure
Sewing
Selecting stitching
DIfwidth.necessary, adjust the stitch length
Press the + or side of to increase or
On the left changes the digit on the left
Right of in the LCD
Adjusting the stitch length and width
On the wheel points up. With models equipped
Starting to sew
BRaise the presser foot lever
Sewing reinforcement stitches
Raise the presser foot lever
Each other
Correct tension
Thread tension
Upper tension is too tight
Upper tension is too loose
Trial sewing
Useful Sewing Tips
Changing the sewing direction
Sewing curves
Presser foot remains level, allowing the fabric to be fed
Sewing hook-and-loop Fastener
Sewing stretch fabrics
Sewing thin fabrics
Stitching cylindrical pieces
Slide the flat bed attachment to the left to release it
Overcasting Stitches
Using zigzag foot
Attach zigzag foot J Select stitch , or
CSew with the edge of the fabric
Attach overcasting foot G Select stitch or
Using overcasting foot
Basic Stitching
When sewing is finished, cut the thread
Basic stitching
For details, refer to Starting to sew
Reverse the skirt or pants
Blind HEM Stitching
Fold back the fabric inside along the basting
Thick fabric Normal fabric
Stitch width
If the needle does not catch the hem fold
Buttonholes can be sewn and buttons can be sewn on
Buttonhole Sewing
Auto Rfc. Automatic Reinforcement **Rfc. Reinforcement
Size of the buttonhole is set
Raiseposition.the buttonhole lever to its original
Once sewing is completed,
Trim off any excess of the gimp thread
Sewing buttonholes on stretch fabrics
DPlacethe fabric.a button between the presser foot
Button sewing
ESelect a stitch
With stitch Select stitch
Normally, the feed dog position lever is Positioned at
After sewing for about 10 seconds at low
Rev. Reverse Do not use reverse stitching
Zipper Insertion
Refer to Basic stitching on
Sew the stitching in order, from a to c
FSelect stitch
Stretch stitching
Sewing Stretch Fabrics and Elastic Tape
Elastic attaching
BAttach zigzag foot J CSelect stitch
Utility Stitches
Piecing
APPLIQUÉ, Patchwork and Quilt Stitching
Patchwork crazy quilt stitching
Appliqués
Piecing
Remove the basting, if necessary
For a seam allowance on the left side
Quilting
DSelect stitch
Sewing
Free-motion quilting
Using the optional quilting guide
† Walking foot † Presser foot holder
ARemoveholder. the presser foot and the presser foot
Slide the feed dog position lever, located at
Triple stretch stitching
Reinforcement Stitching
Bar tack stitching
Attach zigzag foot J Select stitch Start sewing
Pullpossible.down the buttonhole lever as far as
Once sewing is completed,
Decorative Stitching
Fagoting
Smocking
Scallop stitching
DTrim along the stitches
CSew parallel stitching at intervals of 10 mm 3/8 inch
Joining
Shell tuck stitching
Fold the fabric along the bias BAttach zigzag foot J
Unfold the fabric, and then iron the tucks down to one side
Heirloom stitching
Utility stitches
Stitch Settings
Pattern No
Decorative Stitch Buttonhole Bar tack
For decoration, etc
For decoration, etc Yes
Cleaning the machine surface
Maintenance
Cleaning the bobbin case
Remove the bobbin case
Align the U and marks
Needle plate cover
Frequent troubleshooting topics
Troubleshooting
Upper thread tightened up
For details, refer to Cleaning the bobbin case on
Symptom
Tangled thread on wrong side of fabric
Cause Incorrect upper threading
HFeed the upper thread as shown in the illustration below
Thread take-up lever
Incorrect thread tension
DRemoveholder. the presser foot and presser foot
Fabric is caught in the machine and cannot be removed
If threads remain in the bobbin case, remove them
Be careful not to drop the removed screws in the machine
Memo
Checking machine operations
Do not yet install the presser foot and thread
Turn on the machine Select middle needle position stitch
Correctly thread the machine
List of symptoms
Machine does
While sewing
Not work
Fabric being Sewn with
Thread breaks
Upper
Lower
Or breaks
Skipped
Stitches are
There is a high
Pitched noise While sewing
Thread has
After sewing
Tightened up
Thread
Operation beep for models equipped with the operation beep
Error Messages
Numerics
Index
42 , 45
English 885-V60/V61/V62/V63/V64/V65 XE6528-2012