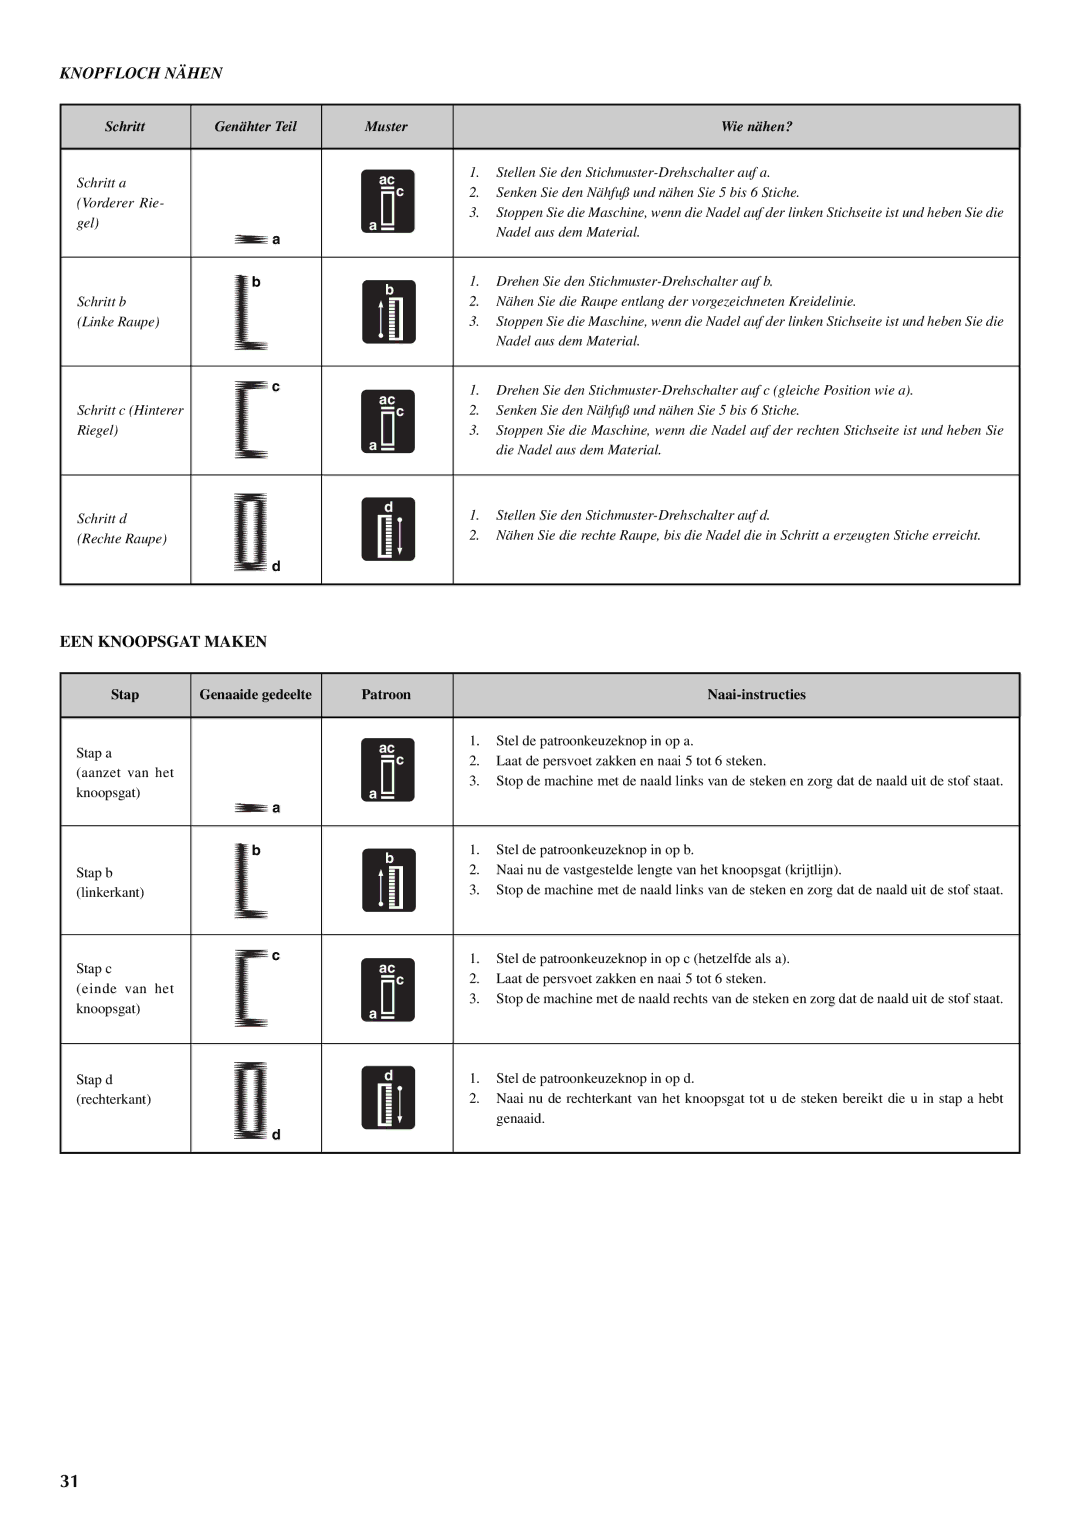
KNOPFLOCH NÄHEN

Schritt

Genähter Teil

Muster


Wie nähen?


Schritt a


ac

1.

Stellen Sie den Stichmuster-Drehschalter auf a.


(Vorderer Rie-


c

2.

Senken Sie den Nähfuß und nähen Sie 5 bis 6 Stiche.


3.

Stoppen Sie die Maschine, wenn die Nadel auf der linken Stichseite ist und heben Sie die

gel)


a


a


Nadel aus dem Material.


b


b

1.

Drehen Sie den Stichmuster-Drehschalter auf b.

Schritt b


2.

Nähen Sie die Raupe entlang der vorgezeichneten Kreidelinie.


(Linke Raupe)


3.

Stoppen Sie die Maschine, wenn die Nadel auf der linken Stichseite ist und heben Sie die


Nadel aus dem Material.


c

ac

1.

Drehen Sie den Stichmuster-Drehschalter auf c (gleiche Position wie a).

Schritt c (Hinterer


2.

Senken Sie den Nähfuß und nähen Sie 5 bis 6 Stiche.


c


Riegel)


a


3.

Stoppen Sie die Maschine, wenn die Nadel auf der rechten Stichseite ist und heben Sie


die Nadel aus dem Material.


Schritt d


d

1.

Stellen Sie den Stichmuster-Drehschalter auf d.


(Rechte Raupe)

d


2.

Nähen Sie die rechte Raupe, bis die Nadel die in Schritt a erzeugten Stiche erreicht.


EEN KNOOPSGAT MAKEN

Stap


Genaaide gedeelte

Patroon


Naai-instructies


Stap a


ac

1. Stel de patroonkeuzeknop in op a.


c

2.

Laat de persvoet zakken en naai 5 tot 6 steken.

(aanzet van het


3. Stop de machine met de naald links van de steken en zorg dat de naald uit de stof staat.

knoopsgat)


a


a


b


b

1.

Stel de patroonkeuzeknop in op b.

Stap b


2.

Naai nu de vastgestelde lengte van het knoopsgat (krijtlijn).


(linkerkant)


3.

Stop de machine met de naald links van de steken en zorg dat de naald uit de stof staat.


Stap c


c

ac

1.

Stel de patroonkeuzeknop in op c (hetzelfde als a).


2.

Laat de persvoet zakken en naai 5 tot 6 steken.

(einde van

het


c


3.

Stop de machine met de naald rechts van de steken en zorg dat de naald uit de stof staat.

knoopsgat)


a


Stap d


d

1.

Stel de patroonkeuzeknop in op d.

(rechterkant)


2.

Naai nu de rechterkant van het knoopsgat tot u de steken bereikt die u in stap a hebt


d


genaaid.


31

Page 38
Image 38
Brother VX 1400 operation manual Schritt Genähter Teil Muster Wie nähen?

VX 1400 specifications

The Brother VX 1400 is a versatile sewing machine designed for both novice and experienced sewists. Known for its user-friendly features, the VX 1400 combines reliability with innovative technology to deliver exceptional performance.

One of the standout features of the Brother VX 1400 is its built-in stitch options. With a selection of over 25 stitches, including utility stitches, decorative stitches, and stretch stitches, this machine allows users to explore a variety of sewing projects. The easy-to-use selector dial makes it simple to choose the desired stitch, ensuring that users can complete their tasks with efficiency and precision.

The VX 1400 is equipped with an automatic needle threader, a game-changer for those sewing for extended periods. This feature simplifies the threading process, allowing users to focus more on their creative projects rather than dealing with frustrating interruptions. Additionally, the top-loading bobbin system further enhances convenience, making it easier to insert and monitor bobbin thread levels.

Another key characteristic of the Brother VX 1400 is its compact design. Lightweight and portable, this sewing machine is ideal for those who want to take their sewing on the go. Whether you’re heading to a sewing class or working on a project at a friend’s house, the VX 1400 is easy to transport without compromising on functionality.

The machine also features adjustable stitch length and width, providing sewists with complete control over their creations. This adaptability is particularly beneficial for various fabrics, from lightweight materials to heavier textiles, allowing users to customize their sewing experience.

For additional convenience, the Brother VX 1400 comes with an attached free arm, which is perfect for sewing cylindrical projects like sleeves and pant legs. This feature greatly enhances ease of use, particularly for intricate sewing tasks.

In terms of technology, the VX 1400 maintains simplicity while incorporating modern conveniences that cater to today’s sewing enthusiasts. Overall, the Brother VX 1400 stands out in its class by combining essential features with ease of use, making it a great choice for anyone interested in the art of sewing. Whether you're mending clothing or creating beautiful home decor, this machine is equipped to handle a wide range of sewing tasks. With the Brother VX 1400, your creative possibilities are virtually endless.