Elastic Stitching


Point élastique

Pattern

9 (Elastic Stitch)

The Elastic Stitch can be used in 3 ways: mending, sewing elastic or joining fabric. Each is explained below.

Set the pattern selection dial to 9.

MENDING

1.Place the reinforcement fabric under the tear to be mended.

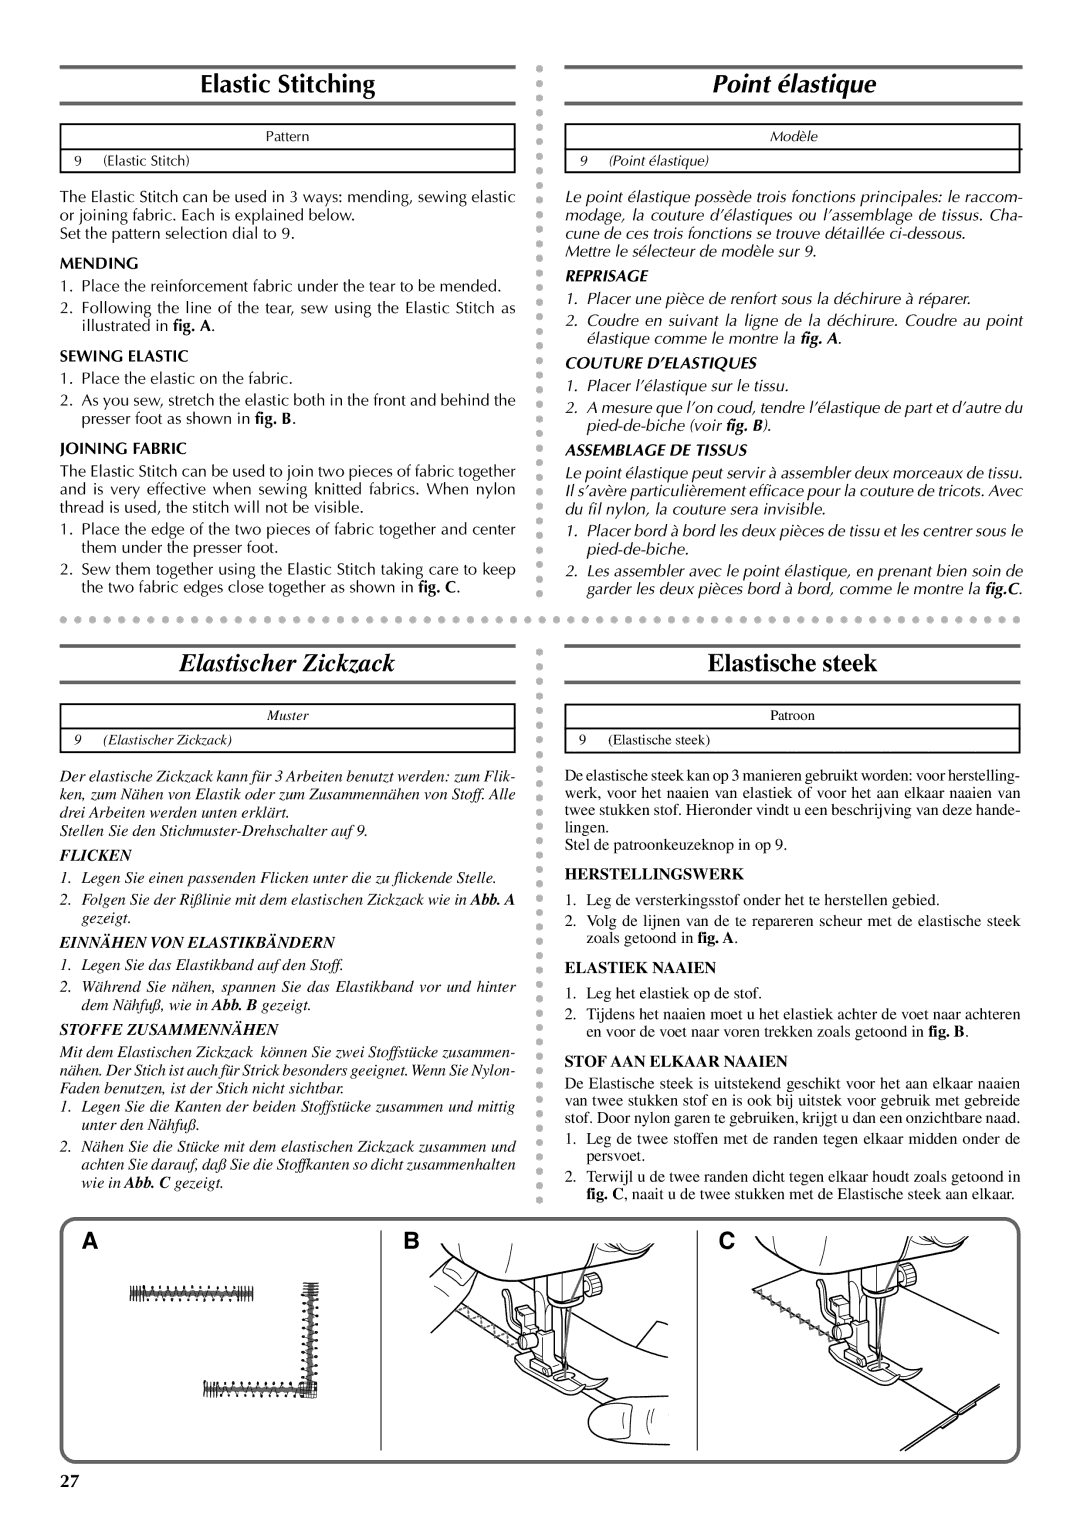
2.Following the line of the tear, sew using the Elastic Stitch as illustrated in fig. A.

SEWING ELASTIC

1.Place the elastic on the fabric.

2.As you sew, stretch the elastic both in the front and behind the presser foot as shown in fig. B.

JOINING FABRIC

The Elastic Stitch can be used to join two pieces of fabric together and is very effective when sewing knitted fabrics. When nylon thread is used, the stitch will not be visible.

1.Place the edge of the two pieces of fabric together and center them under the presser foot.

2.Sew them together using the Elastic Stitch taking care to keep the two fabric edges close together as shown in fig. C.

Modèle

9 (Point élastique)

Le point élastique possède trois fonctions principales: le raccom- modage, la couture d’élastiques ou l’assemblage de tissus. Cha- cune de ces trois fonctions se trouve détaillée ci-dessous.

Mettre le sélecteur de modèle sur 9.

REPRISAGE

1.Placer une pièce de renfort sous la déchirure à réparer.

2.Coudre en suivant la ligne de la déchirure. Coudre au point élastique comme le montre la fig. A.

COUTURE D’ELASTIQUES

1.Placer l’élastique sur le tissu.

2.A mesure que l’on coud, tendre l’élastique de part et d’autre du pied-de-biche (voir fig. B).

ASSEMBLAGE DE TISSUS

Le point élastique peut servir à assembler deux morceaux de tissu. Il s’avère particulièrement efficace pour la couture de tricots. Avec du fil nylon, la couture sera invisible.

1.Placer bord à bord les deux pièces de tissu et les centrer sous le pied-de-biche.

2.Les assembler avec le point élastique, en prenant bien soin de garder les deux pièces bord à bord, comme le montre la fig.C.

Elastischer Zickzack


Elastische steek

Muster

9 (Elastischer Zickzack)

Der elastische Zickzack kann für 3 Arbeiten benutzt werden: zum Flik- ken, zum Nähen von Elastik oder zum Zusammennähen von Stoff. Alle drei Arbeiten werden unten erklärt.

Stellen Sie den Stichmuster-Drehschalter auf 9.

FLICKEN

1.Legen Sie einen passenden Flicken unter die zu flickende Stelle.

2.Folgen Sie der Rißlinie mit dem elastischen Zickzack wie in Abb. A gezeigt.

EINNÄHEN VON ELASTIKBÄNDERN

1.Legen Sie das Elastikband auf den Stoff.

2.Während Sie nähen, spannen Sie das Elastikband vor und hinter dem Nähfuß, wie in Abb. B gezeigt.

STOFFE ZUSAMMENNÄHEN

Mit dem Elastischen Zickzack können Sie zwei Stoffstücke zusammen- nähen. Der Stich ist auch für Strick besonders geeignet. Wenn Sie Nylon- Faden benutzen, ist der Stich nicht sichtbar.

1.Legen Sie die Kanten der beiden Stoffstücke zusammen und mittig unter den Nähfuß.

2.Nähen Sie die Stücke mit dem elastischen Zickzack zusammen und achten Sie darauf, daß Sie die Stoffkanten so dicht zusammenhalten wie in Abb. C gezeigt.

A

B


Patroon

9 (Elastische steek)

De elastische steek kan op 3 manieren gebruikt worden: voor herstelling- werk, voor het naaien van elastiek of voor het aan elkaar naaien van twee stukken stof. Hieronder vindt u een beschrijving van deze hande- lingen.

Stel de patroonkeuzeknop in op 9.

HERSTELLINGSWERK

1.Leg de versterkingsstof onder het te herstellen gebied.

2.Volg de lijnen van de te repareren scheur met de elastische steek zoals getoond in fig. A.

ELASTIEK NAAIEN

1.Leg het elastiek op de stof.

2.Tijdens het naaien moet u het elastiek achter de voet naar achteren en voor de voet naar voren trekken zoals getoond in fig. B.

STOF AAN ELKAAR NAAIEN

De Elastische steek is uitstekend geschikt voor het aan elkaar naaien van twee stukken stof en is ook bij uitstek voor gebruik met gebreide stof. Door nylon garen te gebruiken, krijgt u dan een onzichtbare naad.

1.Leg de twee stoffen met de randen tegen elkaar midden onder de persvoet.

2.Terwijl u de twee randen dicht tegen elkaar houdt zoals getoond in fig. C, naait u de twee stukken met de Elastische steek aan elkaar.

C

27

Page 34
Image 34
Brother VX 1400 operation manual Elastic Stitching, Point élastique, Elastischer Zickzack Elastische steek

VX 1400 specifications

The Brother VX 1400 is a versatile sewing machine designed for both novice and experienced sewists. Known for its user-friendly features, the VX 1400 combines reliability with innovative technology to deliver exceptional performance.

One of the standout features of the Brother VX 1400 is its built-in stitch options. With a selection of over 25 stitches, including utility stitches, decorative stitches, and stretch stitches, this machine allows users to explore a variety of sewing projects. The easy-to-use selector dial makes it simple to choose the desired stitch, ensuring that users can complete their tasks with efficiency and precision.

The VX 1400 is equipped with an automatic needle threader, a game-changer for those sewing for extended periods. This feature simplifies the threading process, allowing users to focus more on their creative projects rather than dealing with frustrating interruptions. Additionally, the top-loading bobbin system further enhances convenience, making it easier to insert and monitor bobbin thread levels.

Another key characteristic of the Brother VX 1400 is its compact design. Lightweight and portable, this sewing machine is ideal for those who want to take their sewing on the go. Whether you’re heading to a sewing class or working on a project at a friend’s house, the VX 1400 is easy to transport without compromising on functionality.

The machine also features adjustable stitch length and width, providing sewists with complete control over their creations. This adaptability is particularly beneficial for various fabrics, from lightweight materials to heavier textiles, allowing users to customize their sewing experience.

For additional convenience, the Brother VX 1400 comes with an attached free arm, which is perfect for sewing cylindrical projects like sleeves and pant legs. This feature greatly enhances ease of use, particularly for intricate sewing tasks.

In terms of technology, the VX 1400 maintains simplicity while incorporating modern conveniences that cater to today’s sewing enthusiasts. Overall, the Brother VX 1400 stands out in its class by combining essential features with ease of use, making it a great choice for anyone interested in the art of sewing. Whether you're mending clothing or creating beautiful home decor, this machine is equipped to handle a wide range of sewing tasks. With the Brother VX 1400, your creative possibilities are virtually endless.