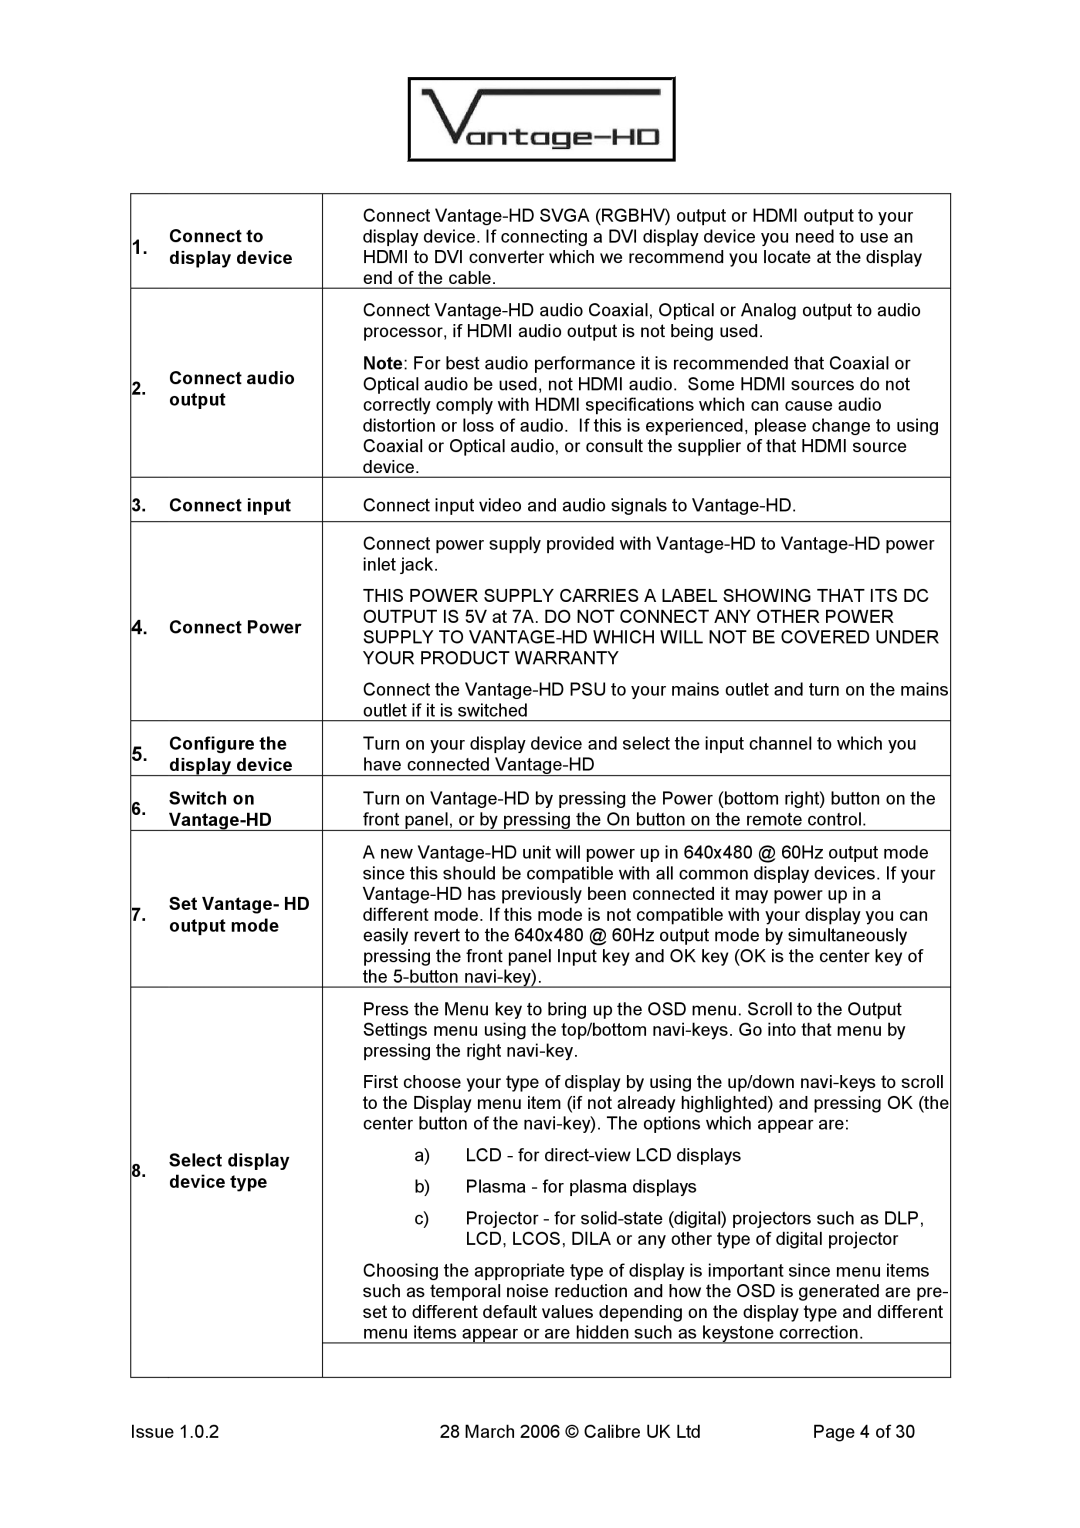
| Connect to | Connect | |||
1. | display device. If connecting a DVI display device you need to use an | ||||
display device | HDMI to DVI converter which we recommend you locate at the display | ||||
|
| end of the cable. |
| ||
|
| Connect | |||
|
| processor, if HDMI audio output is not being used. |
| ||
| Connect audio | Note: For best audio performance it is recommended that Coaxial or | |||
2. | Optical audio be used, not HDMI audio. Some HDMI sources do not | ||||
| output | correctly comply with HDMI specifications which can cause audio | |||
|
| distortion or loss of audio. If this is experienced, please change to using | |||
|
| Coaxial or Optical audio, or consult the supplier of that HDMI source | |||
|
| device. |
|
| |
3. | Connect input | Connect input video and audio signals to |
| ||
|
|
| |||
|
| Connect power supply provided with | |||
|
| inlet jack. |
|
| |
|
| THIS POWER SUPPLY CARRIES A LABEL SHOWING THAT ITS DC | |||
4. | Connect Power | OUTPUT IS 5V at 7A. DO NOT CONNECT ANY OTHER POWER | |||
SUPPLY TO | |||||
|
| ||||
|
| YOUR PRODUCT WARRANTY |
| ||
|
| Connect the | |||
|
| outlet if it is switched |
| ||
5. | Configure the | Turn on your display device and select the input channel to which you | |||
display device | have connected |
| |||
6. | Switch on | Turn on | |||
| front panel, or by pressing the On button on the remote control. | ||||
| |||||
|
| A new | |||
|
| since this should be compatible with all common display devices. If your | |||
| Set Vantage- HD | ||||
7. | different mode. If this mode is not compatible with your display you can | ||||
output mode | |||||
| easily revert to the 640x480 @ 60Hz output mode by simultaneously | ||||
|
| ||||
|
| pressing the front panel Input key and OK key (OK is the center key of | |||
|
| the |
| ||
|
| Press the Menu key to bring up the OSD menu. Scroll to the Output | |||
|
| Settings menu using the top/bottom | |||
|
| pressing the right |
| ||
|
| First choose your type of display by using the up/down | |||
|
| to the Display menu item (if not already highlighted) and pressing OK (the | |||
|
| center button of the | |||
8. | Select display | a) | LCD - for |
| |
device type | b) | Plasma - for plasma displays |
| ||
|
| ||||
|
| c) | Projector - for | ||
|
|
| LCD, LCOS, DILA or any other type of digital projector | ||
|
| Choosing the appropriate type of display is important since menu items | |||
|
| such as temporal noise reduction and how the OSD is generated are pre- | |||
|
| set to different default values depending on the display type and different | |||
|
| menu items appear or are hidden such as keystone correction. | |||
|
|
|
| ||
Issue 1.0.2 |
| 28 March 2006 © Calibre UK Ltd | Page 4 of 30 | ||
