Operating Instructions and Parts Manual
Troubleshooting Chart
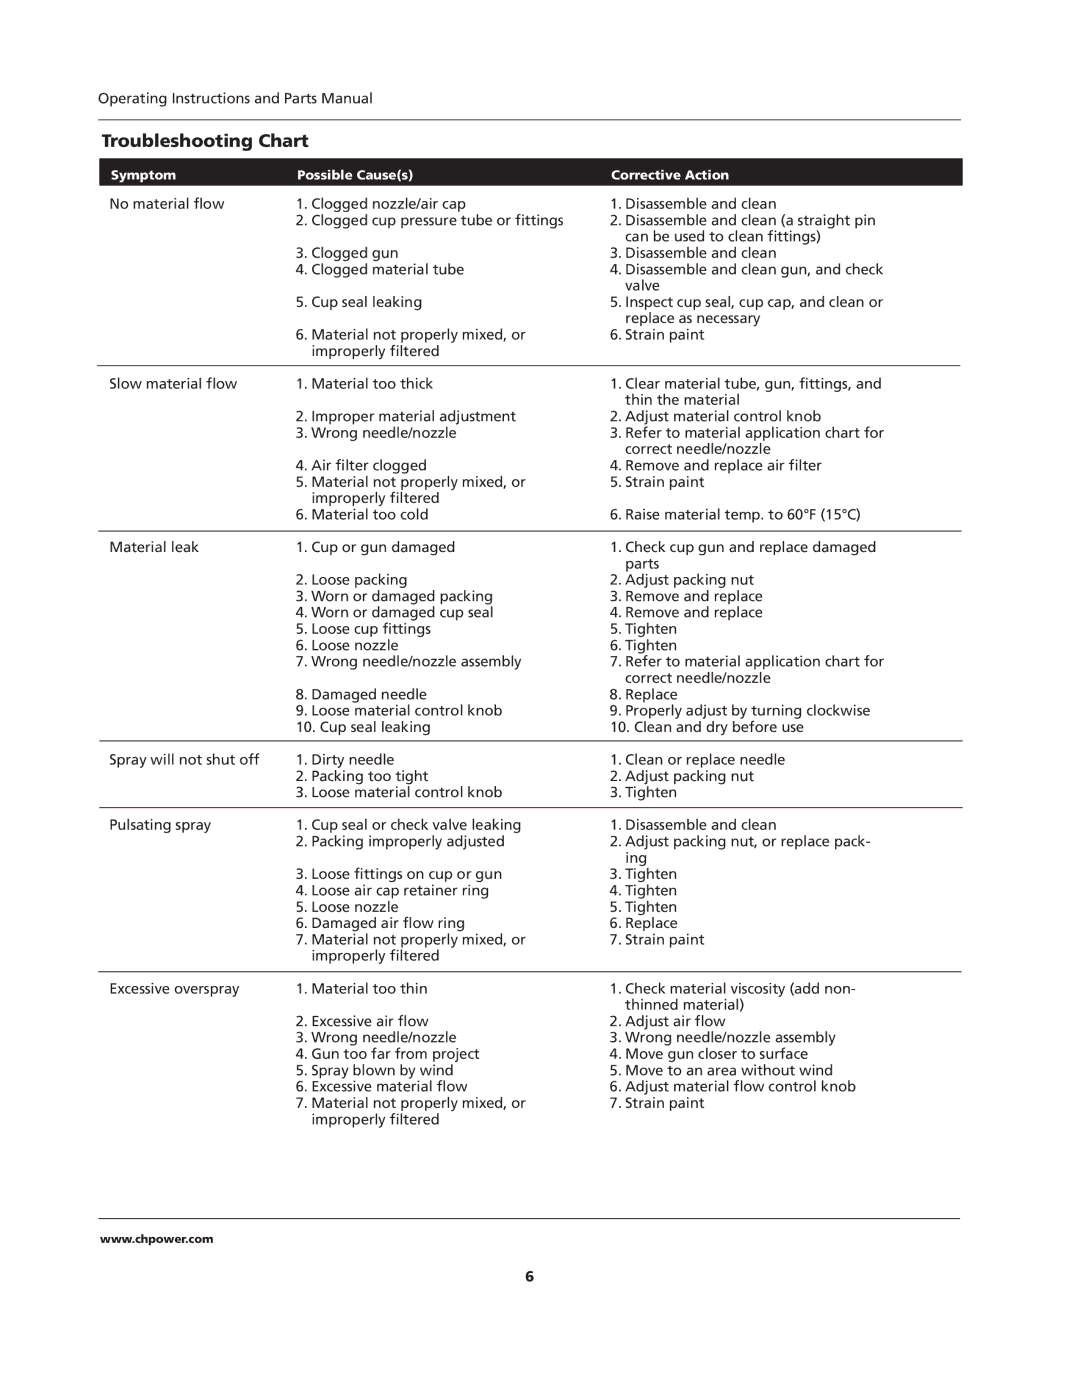
| Symptom | Possible Cause(s) | Corrective Action | |
| No material flow | 1. Clogged nozzle/air cap | 1. Disassemble and clean | |
|
| 2. Clogged cup pressure tube or fittings | 2. Disassemble and clean (a straight pin | |
|
|
| can be used to clean fittings) | |
|
| 3. Clogged gun | 3. Disassemble and clean | |
|
| 4. Clogged material tube | 4. Disassemble and clean gun, and check | |
|
|
| valve | |
|
| 5. Cup seal leaking | 5. Inspect cup seal, cup cap, and clean or | |
|
|
| replace as necessary | |
|
| 6. Material not properly mixed, or | 6. Strain paint | |
|
| improperly filtered |
|
|
|
|
|
|
|
| Slow material flow | 1. Material too thick | 1. Clear material tube, gun, fittings, and | |
|
|
| thin the material | |
|
| 2. Improper material adjustment | 2. Adjust material control knob | |
|
| 3. Wrong needle/nozzle | 3. Refer to material application chart for | |
|
|
| correct needle/nozzle | |
|
| 4. Air filter clogged | 4. Remove and replace air filter | |
|
| 5. Material not properly mixed, or | 5. Strain paint | |
|
| improperly filtered | 6. Raise material temp. to 60°F (15°C) | |
|
| 6. Material too cold | ||
|
|
|
| |
| Material leak | 1. Cup or gun damaged | 1. Check cup gun and replace damaged | |
|
|
| parts | |
|
| 2. Loose packing | 2. Adjust packing nut | |
|
| 3. Worn or damaged packing | 3. Remove and replace | |
|
| 4. Worn or damaged cup seal | 4. Remove and replace | |
|
| 5. Loose cup fittings | 5. Tighten | |
|
| 6. Loose nozzle | 6. Tighten | |
|
| 7. Wrong needle/nozzle assembly | 7. Refer to material application chart for | |
|
|
| correct needle/nozzle | |
|
| 8. Damaged needle | 8. Replace | |
|
| 9. Loose material control knob | 9. Properly adjust by turning clockwise | |
|
| 10. Cup seal leaking | 10. Clean and dry before use | |
|
|
|
| |
| Spray will not shut off | 1. Dirty needle | 1. Clean or replace needle | |
|
| 2. Packing too tight | 2. Adjust packing nut | |
|
| 3. Loose material control knob | 3. Tighten | |
|
|
|
| |
| Pulsating spray | 1. Cup seal or check valve leaking | 1. Disassemble and clean | |
|
| 2. Packing improperly adjusted | 2. Adjust packing nut, or replace pack- | |
|
|
| ing | |
|
| 3. Loose fittings on cup or gun | 3. Tighten | |
|
| 4. Loose air cap retainer ring | 4. Tighten | |
|
| 5. Loose nozzle | 5. Tighten | |
|
| 6. Damaged air flow ring | 6. Replace | |
|
| 7. Material not properly mixed, or | 7. Strain paint | |
|
| improperly filtered |
|
|
|
|
|
| |
| Excessive overspray | 1. Material too thin | 1. Check material viscosity (add non- | |
|
|
| thinned material) | |
|
| 2. Excessive air flow | 2. Adjust air flow | |
|
| 3. Wrong needle/nozzle | 3. Wrong needle/nozzle assembly | |
|
| 4. Gun too far from project | 4. Move gun closer to surface | |
|
| 5. Spray blown by wind | 5. Move to an area without wind | |
|
| 6. Excessive material flow | 6. Adjust material flow control knob | |
|
| 7. Material not properly mixed, or | 7. Strain paint | |
|
| improperly filtered |
|
|
www.chpower.com
6