Read this guide first
Veuillez dabord lire ce guide
Bitte lesen Sie dieses Handbuch zuerst
Leggere questa guida
Page
iR6570/iR5570
Users Guide
Manuals for the Machine
Easy Operation Guide Users Guide This Document
Reference Guide Copying and Mail Box Guide Sending Guide
Network Quick Start Guide Remote UI Guide Network Guide
UFR II Driver Guide Mac UFR II Driver Guide MEAP SMS Administrator
Guide
UFR II Printer Driver Installation and Instructions
Mac OS X UFR II Printer Driver Installation and Instructions
Chapter 1 Before You Start Using This Machine
Contents
Preface
Chapter 2 Routine Maintenance
Chapter 3 Troubleshooting
Chapter 4 Appendix
Main Power and Control Panel Power
Symbols Used in This Manual
How To Use This Manual
Preface
Laser Safety
Legal Notices
Additional Information
CLASS I LASER PRODUCT LASER KLASSE
APPAREIL A RAYONNEMENT LASER DE CLASSE APPARECCHIO LASER DI CLASSE
PRODUCTO LASER DE CLASE APARELHO A LASER DE CLASSE
WEEE Directive
About the ENERGY STAR Program
EMC Directive
Abbreviations Used in This Manual
Trademarks
Copyright
Disclaimers
Legal Limitations on the Usage of Your Product and the Use of Images
of Art without Permission of
Installation
Important Safety Instructions
xiii
Do not install the machine in unstable locations
Power Supply
Handling
xvii
Finisher-T1/Saddle Finisher-T2
xviii
Never open covers other than those instructed in this manual
Maintenance and Inspections
Consumables
Other Warnings
Contents of Instruction Manual CD-ROM
About the Instruction Manual CD-ROM
Instruction Manual CD-ROM
Universal Send Kit CD-ROM
System Requirements
User Manual CD-ROM Menu
xxii
Using The CD-ROM Menu
xxiii
a BROWSE MANUAL
b RETURN
2 The breaker lever automatically switches to the OFF side position
Periodic Inspection of the Breaker
Checking the Breaker
xxiv
4 Press the main power switch to ON I side
3 Move the breaker lever to ON I side
side
I side
xxvi
Machine
Before You Start Using This
CHAPTER
Installation Location and Handling
Installation Precautions
Avoid Installing the Machine in the Following Locations
temperature and humidity, whether low or high
Avoid locations where a considerable
Avoid locations where ammonia gas is
Avoid poorly ventilated locations
amount of dust accumulates
Avoid exposing the machine to rapid changes in temperature
equipment
Do not remove the machines leveling feet
1-4 Installation Location and Handling
The power cord may become damaged if it
Select a Safe Power Supply
Plug the machine into a 220-240 V AC outlet
Provide Adequate Installation Space
The optional Copy Tray-L1 is attached
Handling Precautions
Moving the Machine
If you intend to move the machine, contact
your local authorized Canon dealer beforehand
Do not use flammable sprays, such as
spray glue, near the machine. There is a danger of ignition
For safety reasons, turn OFF the control
Use a modular cable less than 3 meters in length
What This Machine Can Do
Copying
See the Copying and Mail Box Guide
Mail Box Function
Sending Function optional
See the Sending Guide
Printing optional
See the PS/PCL/UFR II Printer Guide
Using the Remote User Interface
See the Remote UI Guide
Scanning optional
See the Network ScanGear Users Guide
System Configuration and Parts
Optional Equipment
1-13
c b a d i
External View and Internal View
i j k l m n o
Control Panel Parts
1-15
Touch Panel Display
Attached Optional Equipment
1-17
Displayed Function Keys
Error
1-18 System Configuration and Parts
Copy Job
Send Job
Main Power and Control Panel Power
How to Turn ON the Main Power
The Start Up screen is displayed until the machine is ready to scan
1-21
If login authentication by the SDL or SSO login service is set
Setting the Current Date and Time
Things You Must Do Before Using This Machine
1-23
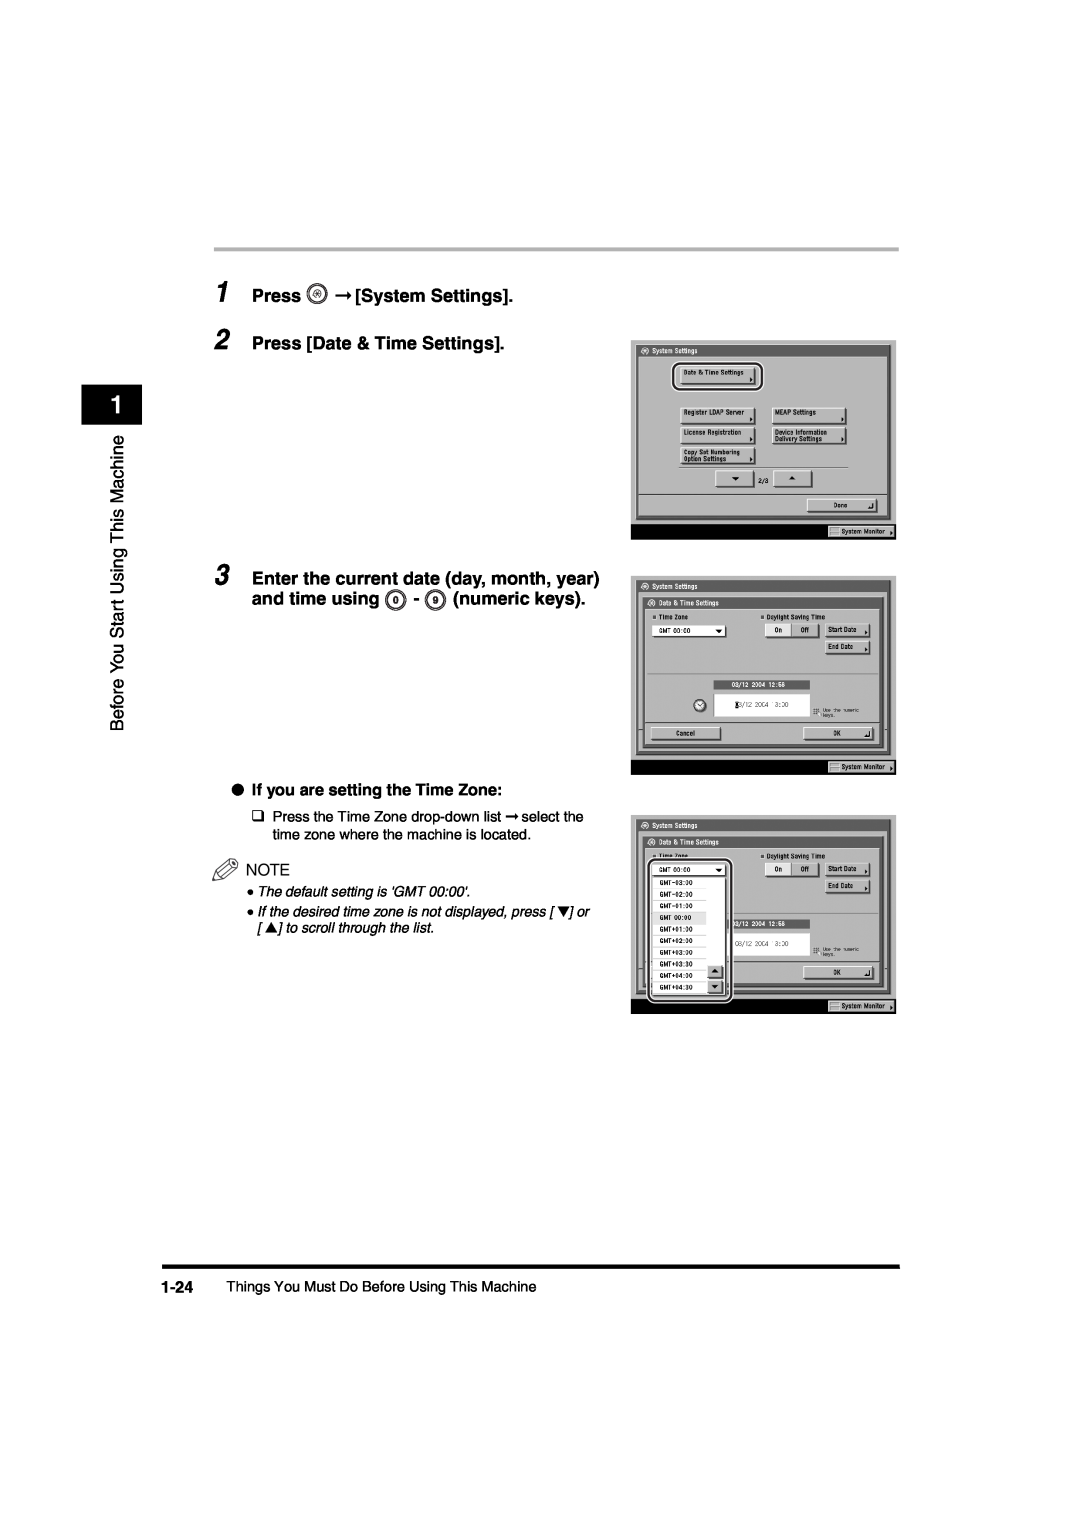
1 Press System Settings 2 Press Date & Time Settings
If you are setting the Time Zone
If you are setting Daylight Saving Time
1-25
Registering the Units Name
5 Press Done repeatedly until the Basic Features screen appears
4 Press OK
1 Press Communications Settings TX Settings under Common Settings
4 Press Done repeatedly until the Basic Features screen appears
2 Press Unit Name 3 Enter a name press OK
Before You Start Using This Machine
Usage Help
Displaying a Help Screen
Help Menu
Press Making Copies Various originals
Press Done to return to the Various Originals screen
Press Done to return to the Help Menu screen
Before You Start Using This Machine
Before You Start Using This Machine
1-30 Displaying a Help Screen
This chapter describes how to load paper, and replace toner
Routine Maintenance
CHAPTER
Loading Paper
Routine Maintenance
2 Grip the handle, and pull out the paper drawer until it stops
Loading Paper
3 Open a package of paper, and remove the paper stack
2-4 Loading Paper
4 Load the paper stack into the paper drawer
2-6 Loading Paper
Replacing the Toner Cartridge
Replacing the Toner Cartridge
1 Open the toner replacement cover 2 Lower the locking lever
2-8 Replacing the Toner Cartridge
3 Remove the toner cartridge by supporting it with both hands
Routine Maintenance
5 Insert the new toner cartridge
2-10 Replacing the Toner Cartridge
7 Close the toner replacement cover
6 Return the locking lever to its original
position
When closing the toner replacement cover, be
Routine Maintenance
2-12 Replacing the Toner Cartridge
List of Error Codes without Messages
Troubleshooting3
CHAPTER
Clearing Paper Jams
Troubleshooting
a b c d e g f
If a paper jam occurs inside the main unit
b c d
If a paper jam occurs inside an optional unit
Page
List of Error Messages
List of Error Codes without Messages
Copying/Printing was interrupted
Troubleshooting
numeric keys on the control
Troubleshooting
You cannot print because the set page Limit total has been reached
Register the Department ID and password of the copy job in the remote copy printers. Use
An error occurred because the main power switch was turned OFF while a job was being
CHAPTER
Appendix
This chapter provides other useful information
Multifunctional Operations
Appendix
Multifunctional Operations
Available Paper Stock
Available Paper Stock
How to Fill in This Check Sheet
How to Inspect the Breaker Periodically
Check Sheet for the Periodic Inspection of the Breaker
Page
CANON INC
CANON U.S.A., INC
CANON CANADA INC
CANON EUROPA N.V
![1 Press ➞ [System Settings].](/images/new-backgrounds/110039/110039103x1.webp)
 ➞ [System Settings].