DVD Camcorder
English
Important Usage Instructions
Introduction
Camcorder switches to the second layer
Playback of a recording spanning both layers, you may
Just select a scene from the index screen
No need to worry about recording over a tape
Easy Playback on a DVD player
Converting still images into Photomovie scenes
DVD-RW
Disc Type
Video
Table of contents
Additional Information
Editing Functions
Playing Back the Disc on an External Device
External Connections
General Information
Specifications
About this Manual
About this Manual
Conventions Used in the Manual
About the Joystick and the Joystick Guide
Bottom position. Push the joystick
About the Power Switch
About the Operating Modes
Operation
Trademark Acknowledgements
Supplied Accessories
Getting to Know the Camcorder
Left side view Right Side View Front view
Components Guide
Back view Top view Bottom view
Recording Movies Recording Still Images
Operating mode Recording program White balance Image effect
Recording mode Self timer Disc type
Screen Displays
Recording reminder
Disc access display
Disc operation
Remaining recording time
Viewing Still Images
Getting Started
Charging the Battery Pack
Disconnect the compact power adapter from the camcorder
Getting Started
Playback Time
Battery Pack
Charging Time
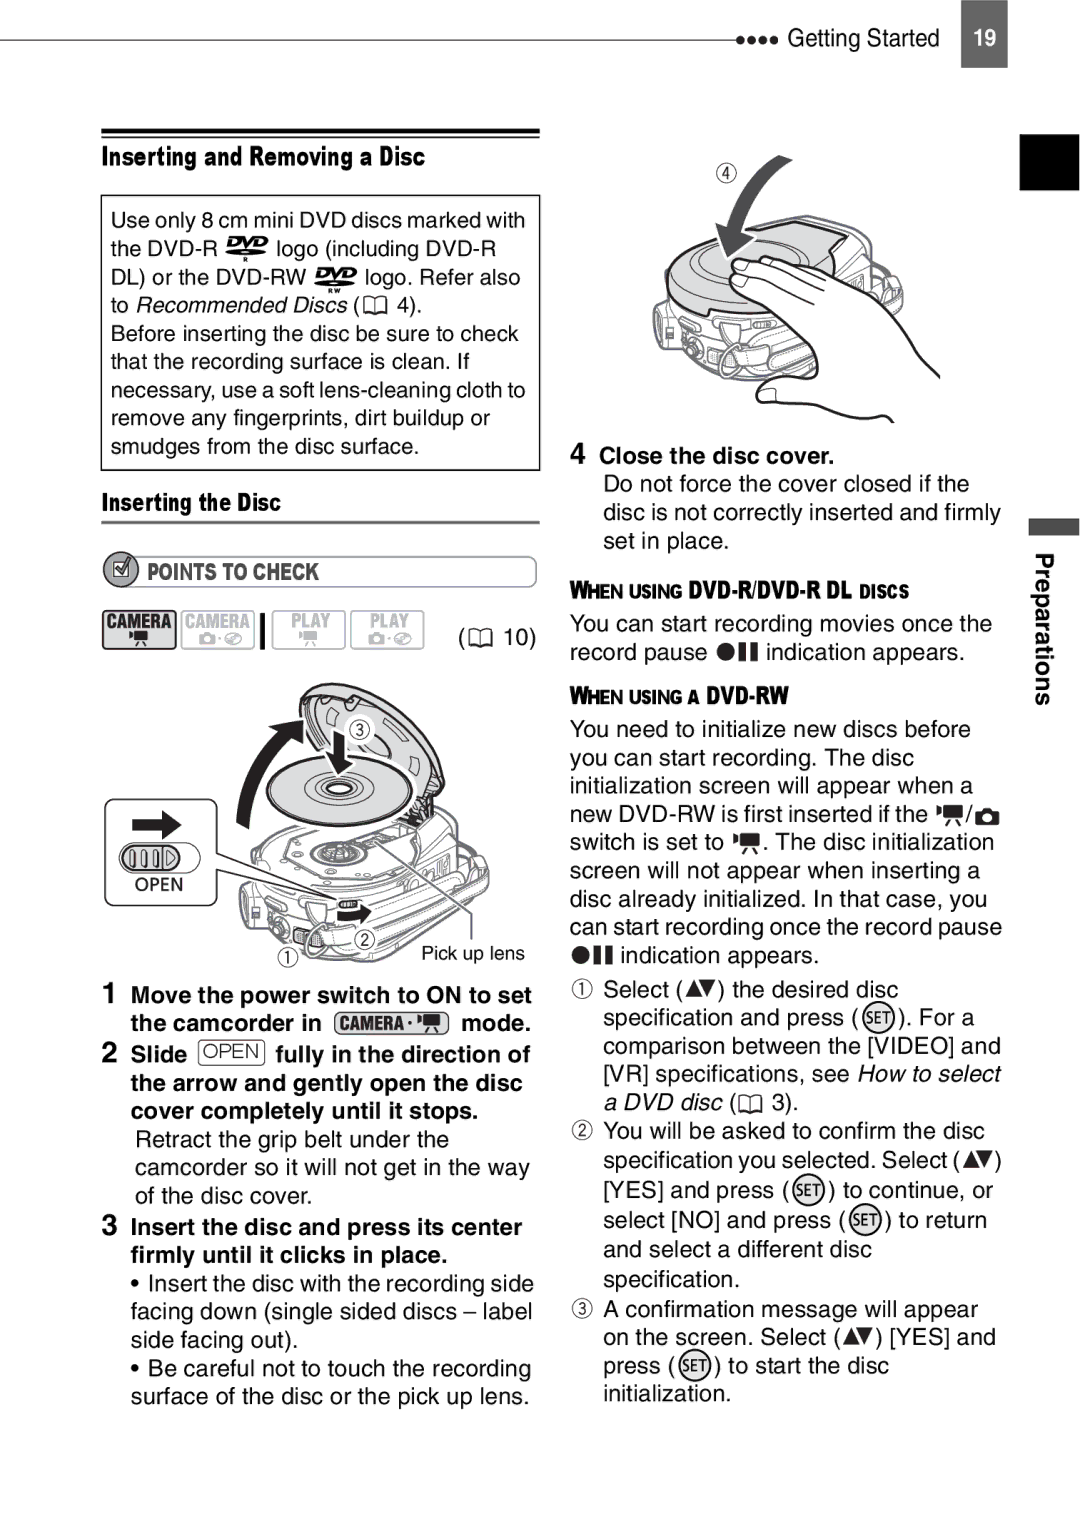
Inserting the Disc
Camcorder in mode
When Using DVD-R/DVD-R DL Discs
Inserting and Removing a Disc
Fasten the grip belt
Preparing the Camcorder
Removing the Disc
Grab the edge of the disc and gently pull it out
Keep DISP. pressed down for more than 2 seconds
Adjusting the LCD Screen
Rotating the LCD Panel Open the LCD panel 90 degrees
LCD Backlight
Press Func
Using the Menus
Press FUNC. to save the settings and close the menu
Selecting a FUNC. Menu Option
Changing the Language
First Time Settings
Changing the Time Zone
DATE/TIME 1.JAN.2007 1200 AM
Setting the Date and Time
DATE/TIME Setup
Select DATE/TIME Setup and press Select DATE/TIME and press
Basic Functions
Move the lens cover switch down to
Recording
Shooting Video
Push the joystick toward
Camera Setup
Selecting the Aspect Ratio of your
Recording
Press Photo fully
Taking Photos
Optical zoom 35x 30x Digital zoom
Zooming
Quick Start Function
Press Quick Start firmly
Playback
Green Play indicator will turn on
Playback
Playing Back the Video
Slow Playback
Push the joystick toward or To adjust the volume
Displaying the Photos
Fast Playback
Select , an image
Slideshow
Slideshow
Index Screen Move the zoom lever toward W
Move the zoom lever toward T
Magnifying Photos during Playback
Zoom lever Joystick
Image Effect OFF, VIVID, Neutral
Menu Options Lists
FUNC. Menu
Program AE
1024x768, S 640x480 Quality
Setup Menus
CANCEL, Start
Camera Setup
Compensate for a normal degree of camcorder shake
About the color of the zoom indicator
Mode switch P On , OFF
Mode switch P ONAiAF, ONCENTER, OFF ON, OFF
Disc Operations
VIDEO, VR, Cancel
Disc type Video mode Finalized NO, YES
Disc type VR mode NO, YES
Still IMG Oper
Display Setup
10 min
System Setup
High Volume
RESET, Continuous
Changes the date format for on-screen displays
DATE/TIME Setup
D 2007.1.1 AM 1200, M.D,Y JAN , 2007 1200 AM
Y 1.JAN.2007 1200 AM
Sports Beach Fireworks
Using the Recording Programs
Auto
Portrait Snow Spotlight
Flexible Recording Changing the Aperture and Shutter Speed
Desired option
Last icon on the right icon
Shutter speed guidelines
Picture may not appear smooth during playback
Push the joystick toward EXP
Manual Exposure Adjustment
Manual Focus Adjustment
Adjust the brightness of the image as required
AUTO
White Balance
Infinity Focus
FUNC. Desired option
Image Effects
Press FUNC. to save the setting and close the menu
1024x768/FINE
Still Image Recording Options
Selecting the Size and Quality of Still Images
Still Image Recording Options
Except for the Fireworks recording program
Camera Setup Focus PRI
ONAiAF Mode switch P*, Auto
Automatic Focus Priority
Selecting the Data Code
Display Setup Data Code
Other Functions
On-Screen Displays
Camera Setup Self Timer
Self Timer
BLK&WHT, Sepia
Applying
Setting
Pause mode
FUNC. ** Desired fader/effect
Editing Functions
Managing Scenes
Creating a Playlist
Adding Scenes to the Playlist
Deleting a Scene Just After Recording
Moving Scenes in the Playlist
Deleting Scenes
Deleting a Single Scene
Editing
Dividing a Scene
Select YES and press
Deleting All Scenes
Managing the Disc
Managing the Disc
Protecting the Disc
Initializing the Disc
Enter the title Up to 20 characters
Changing the Disc Title
Disc Operations Disc Initialize Video YES
Disc Operations Disc Title
Erase ALL Images
Managing Photos
Erasing Photos
Menu
Converting All Images
Converting Photos into Photomovie Scenes
Converting a Single Image
FUNC. Convert to Scene FUNC. Execute
Restrictions after Disc Finalization
Finalizing the Disc
Recordings Disc
Finalizing the Disc
Power the camcorder using the compact power adapter
Disc Operations Finalize
Additional scenes even
Disc type DVD-RW Video mode
Disc Operations Unfinalize
Discs that Can be Unfinalized
AV Terminal
Connecting to a TV or VCR
Connection Diagrams
Connecting to a TV or VCR
Recording to a VCR or Digital Video Recorder
Recording/Playback
Troubleshooting
Power Source
Trouble?
Faintly heard Occasionally the operation Sound can be heard
Not a malfunction Not go off Point where the start/stop
Disc cannot be ejected
Off the camcorder and let it cool down before resuming use
Playback/Editing
Playing Back the Disc in an External DVD Device
Message Explanation
List of Messages
Do not disconnect the compact power adapter or remove
Disc could not be read. Try cleaning it or replace the disc
Onto it. Try cleaning the disc or replace it
Could not recover a corrupted file
Camcorder
Handling Precautions
Battery Pack
Treat the battery pack with care
Camcorder for about 3 months
Built-in Rechargeable Lithium Battery
Mini DVD Disc
70 Do’s and Don’ts
Condensation
Maintenance/Others
Cleaning
Storage
Power Sources
Using the Camcorder Abroad
72 Do’s and Don’ts
General Information
System Diagram Availability differs from area to area
Use of genuine Canon accessories is recommended
Optional Accessories
Battery Packs
CG-300E Battery Charger
SC-2000 Soft Carrying Case
WS-20 Wrist Strap
DC201/DC210/DC211
Specifications
System
Output Terminals
CA-570 Compact Power Adapter
BP-208 Battery Pack
Power/Others
Aspect ratio 9 Point AiAF Autofocus
Index
White balance Wide angle Wide TV 169 Widescreen Wind screen
Quick Start function
Canon INC


 Getting Started 19
 POINTS TO CHECK
 mode.
mode.