Ghid de baz ă
Imprimarea de pe o cartelă de memorie
Privire de ansamblu asupra aparatului
Imprimarea fotografiilor imprimate
Scanarea
Privire de ansamblu asupra aparatului
Componentele principale
Panoul de operare
Vedere din spate
Port USB
Vedere din interior
Lampa Acces
Panoul de operare
Butonul OK
Apăsaţi butonul Acasă Home a
Selectarea meniurilor pe ecranul Acasă
Standard, apoi apăsaţi butonul OK C
Selectarea elementelor de setare
Selectarea elementelor de la baza ecranului LCD
Alte operaţii
Apăsaţi butonul Navi H
Efectuarea funcţiilor utilizate frecvent cu operare uẟoară
Imprimarea de pe o cartelă de memorie
Pregătiţi-văpentru imprimare
Porniţi alimentarea
Încărcaţi hârtia
Unitate flash USB
Cartelă de memorie
Apăsaţi butonul + sau B pentru a specifica numărul de copii
Alte opţiuni
Apăsaţi butonul OK C
Modificarea setărilor
Size
Media type
Borderless print
Paper source
Print quality
Imprimarea fotografiilor cu aspecte diferite
Modificarea afiẟării
Full-screen display
Trimming
Corectarea imaginilor
Date setting
Înainte de introducerea cartelei de memorie
Cartele de memorie care nu necesită un adaptor de cartelă
Cartele de memorie care necesită un adaptor de cartelă
Date imagine care se pot imprima
Introducerea cartelei de memorie
Pregătiţi cartela dvs. de memorie
Slotul pentru cartel ă ca în imaginea de mai jos
Scoaterea cartelei de memorie
Deschideţi capacul pentru slotul de cartelă
Închideţi capacul pentru slotul de cartelă
Introducerea unităţii flash USB
Îndepărtarea unităţii flash USB
Îndepărtaţi unitatea flash USB
În partea superioară a paginii
Copierea
Pregătirea pentru copiere Porniţi alimentarea
Efectuarea de copii
Consultaţi Încărcarea documentelor originale
Apăsaţi butonul + sau E pentru a specifica numărul de copii
Magnification
Intensity
Size
Image repeat
Utilizarea diferitelor funcţii de copiere
Puteţi reimprima fotografii imprimate în diverse aspecte
Imprimarea fotografiilor imprimate
Deschideţi capacul pentru documente
Reimprimarea fotografiilor imprimate
Suprafaţa de sticlă de scanare
Specificaţi numărul de copii
Selectaţi Select and print , apoi apăsaţi butonul OK
Aparatul începe imprimarea
În partea superioară a paginii
Brightness
Scanarea
Selectarea diverselor metode de prelucrare
Selectarea unui dispozitiv pentru salvarea datelor scanate
În partea superioară a paginii
Imprimarea de pe computerul dumneavoastră
Asiguraţi-văcă aparatul este pus în funcţiune
Porniţi Easy-PhotoPrint EX ẟi selectaţi Photo Print
Faceţi clic pe Photo Print
Faceţi clic pe imaginea de imprimat
Faceţi clic pe Select Paper
Selectaţi aspectul fotografiei
Faceţi clic pe Print
Crearea propriilor imprimări
Utilizarea diverselor funcţii ale Easy-PhotoPrint EX
Album
Stickers
Asiguraţi-văcă numele aparatului dumneavoastră este selectat
Faceţi clic pe Preferences sau Properties
Asiguraţi-văde setările afiẟate
Faceţi clic pe OK
Faceţi clic pe Print sau pe OK pentru a porni imprimarea
Specificaţi setările de imprimare necesare
Pentru Mac OS X
Selectaţi calitatea de imprimare în Print Quality
Pentru Mac OS X v.10.4.x sau Mac OS X
Faceţi clic pe OK Specificaţi setările de imprimare necesare
În partea superioară a paginii
Alte utilizări
Imprimarea formularelor ẟablon cum ar fi hârtia de caiet
Imprimarea de diverse formulare ẟablon
Începeţi imprimarea Confirmaţi dimensiunea paginii
Cu Template print puteţi să imprimaţi următoarele ẟabloane
Staff paper Handwriting paper
Dispozitive care se pot conecta
În partea superioară a paginii
Print settings
Plain paper feed settings
Mobile phone print setting
Setări Advanced
PictBridge print settings
Bluetooth settings
Reset setting
Language selection
Faceţi clic aici Solution Menu
Solution Menu
Faceţi dublu clic pe My Printer de pe desktop Notă
Easy-WebPrint EX
Instalarea Easy-WebPrint EX
În partea superioară a paginii
Încărcarea hârtiei / documentelor originale
Sursa de hârtie pentru încărcarea hârtiei
Încărcarea hârtiei simple în casetă
Încărcarea hârtiei fotografice în tava din spate
În partea superioară a paginii
Pregătiţi hârtia
Încărcarea hârtiei în casetă
Introduceţi caseta în aparat
Dimensiunea paginii
Page
Încărcarea hârtiei fotografice
Încărcarea hârtiei în tava din spate
Nu încărcaţi mai sus de semnul pentru limita de încărcare D
Încărcarea plicurilor
Dumneavoastră
Specificaţi setările cu driverul pentru imprimantă
Page
Tip de suport
Tipuri de suport pe care le puteţi utiliza
Consultaţi Imprimarea fotografiilor cu aspecte diferite
Informaţii despre stocarea hârtiei
Dimensiuni pagină
Puteţi folosi următoarele dimensiuni ale paginii
Dimensiunea maximă
În partea superioară a paginii
Tipuri de suport pe care nu le puteţi utiliza
JOS pe suprafaţa de sticlă de scanare
Încărcarea documentelor originale
Închideţi uẟor capacul pentru documente
Ghid avansat Depanarea
Încărcarea unui singur original
Puteţi copia sau scana următoarele documente originale
Documente originale pe care le puteţi încărca
Document text, revist ă sau ziar
Max ,5 x 11,7 inchi / 216,0 x 297,0 mm
Întreţinere de rutină
Ridicaţi unitatea de scanare capacul până când se opreẟte
Procedura de înlocuire
Scoateţi rezervorul de cerneală dacă lampa clipeẟte des
Atenţie
Page
Finalizat curăţarea capului de imprimare
Imprimare
Aparatul poate emite un zgomot în timpul funcţionării
Cu ecranul LCD de pe aparat
Verificarea nivelului de cerneală
Cu lămpile de cerneală
Verificaţi lămpile de cerneală
Lampa de cerneală este stinsă
Când rezultatele imprimării sunt neclare sau inegale
Când imprimarea devine ẟtearsă sau culorile sunt incorecte
Notă
Imprimarea unui model de verificare a duzei
Selectaţi Maintenance , apoi apăsaţi butonul OK
Selectaţi Nozzle check pattern, ẟi apăsaţi butonul OK
Selectaţi Yes, apoi apăsaţi butonul OK
În partea superioară a paginii
Orizontale
Examinarea unui model de verificare a duzei
Selectaţi All A, apoi apăsaţi butonul OK
Confirmaţi mesajul, apoi apăsaţi butonul OK
Selectaţi Also B, apoi apăsaţi butonul OK
Curăţarea capului de imprimare
Selectaţi Cleaning, apoi apăsaţi butonul OK
Scrisoare în casetă
Curăţaţi capul de imprimare
Page
Selectaţi Deep cleaning, apoi apăsaţi butonul OK
Curăţarea în profunzime a capului de imprimare
Curăţaţi în profunzime capul de imprimare
Notă
Selectaţi Auto head align, apoi apăsaţi butonul OK
Alinierea capului de imprimare
Scanare
În partea superioară a paginii
Curăţarea rolei de alimentare cu hârtie
Selectaţi Roller cleaning, apoi apăsaţi butonul OK
Acasă
Curăţarea tamponului din casetă
Anexă
Nerevocate Timbre fiscale revocate sau nerevocate
Imprimarea alb-negru foloseẟte cerneală colorată?
De ce aparatul are două rezervoare de cerneală neagră?
Lampa de cerneală indică nivelul scăzut al cernelii
Este în regulă capul de imprimare?
Sfat! Verificaţi dacă hârtia se încarcă corect
Interiorul imprimantei este pătat cu cerneală?
Aţi încărcat hârtia în poziţia corectă?
Sfat! Nu aẟezaţi niciun obiect pe capacul pentru documente
Cum se menţine calitatea optimă de imprimare?
Apăsaţi butonul Activare on de pe aparat pentru a-l opri
În acest caz Imprimaţi modelul de verificare a duzei
Imprimaţi periodic
Imprimare de pe un computer
Imprimare
Page
Imprimarea cu ajutorul panoului de operare al aparatului
Imprimarea broẟurilor
Page
Scanarea
Scanarea
Page
Memorie
Depanare
Copierea
Page
Imaginea scanată este înconjurată de zone albe
Suplimentare
Page
Cum se utilizează acest manual
Utilizarea panoului Cuprins Contents
Utilizarea ferestrei Explanation
Imprimarea documentului curent
Imprimarea acestui manual
Faceţi clic pe Pornire imprimare Start Printing
Faceţi clic pe fila Iniţ. imprimare Print Setup
Executaţi imprimarea
Selectaţi documentele de imprimat
Imprimarea pentru Manualul meu My Manual
Imprimarea tuturor documentelor
Puteţi imprima toate documentele din On-screen Manual
În partea superioară a paginii
Faceţi clic pe
Utilizarea cuvintelor cheie pentru a găsi un document
Faceţi clic pe Pornire căutare Start Searching
Introduceţi un cuvânt cheie
Documente care conţin toate cuvintele cheie introduse
Afiẟaţi documentul pe care doriţi să îl citiţi
Afiẟarea documentului
Înregistrarea documentelor în Manualul meu My Manual
Înregistrarea documentului în Manualul meu My Manual
Afiẟarea documentului de adăugat la Manualul meu My Manual
Afiẟare Manualul meu My Manual
Siguranţă
Simboluri utilizate în acest document
Exif Print
Mărci comerciale
Imprimare de pe un computer
Imprimarea cu pachetul software al aplicaţiei
What Is Easy-PhotoPrint EX?
About Exif Print
Starting Easy-PhotoPrint EX from Other Applications
Supported Image File Formats Extensions
File Formats Extensions Supported by Easy-PhotoPrint EX
BMP .bmp Jpeg .jpg, .jpeg
Printing Photos
Questions and Answers
Steps
Try This
Top
Easy-PhotoPrint EX starts and Menu appears
Starting Easy-PhotoPrint EX
Selecting a Photo
Click Photo Print from Menu
Click the image you want to print
See Help for details on the Select Images screen
Correcting and Enhancing Photos
Click Select Paper
Selecting the Paper
Select Paper screen appears
See Help for details on the Select Paper screen
Click Print
Printing
Click Layout/Print
Select a layout you want to use
See Help for details on the Layout/Print screen
Menu
Creating an Album
How Can I Move or Copy the Saved File? What Is C1 or C4?
Starting Easy-PhotoPrint EX
Setup screen appears
Set the following items in the General Settings section
Selecting the Paper and Layout
Click Album from Menu
If you want to change the background, click Background
If you want to change the layout, click Layout
Select Images screen appears
Click Select Images
Top
Click Edit
Editing
Edit your album if necessary
Edit screen appears
See Help for details on the Edit screen
C4 Back cover
Click Print Settings
Print Settings screen appears
Printer Media Type
See Help for details on the Print Settings screen
Printing Calendars
How Can I Move or Copy the Saved File?
Starting Easy-PhotoPrint EX
Select a layout for Design
Click Calendar from Menu
See Help for details on the Page Setup screen
Selecting a Photo
Edit the calendar if necessary
See Help for details on the Edit screen
Printing
See Help for details on the Print Settings screen
Printing Stickers
Starting Easy-PhotoPrint EX
Click Stickers from Menu
Selecting a Photo
Edit the stickers if necessary
Printing
Top
Printing Layout
Starting Easy-PhotoPrint EX
Click Layout Print from Menu
Select a layout from Layouts
Selecting a Photo
Edit the layout if necessary
Printing
See Help for details on the Print Settings screen
Correcting and Enhancing Photos
Adjusting Images
Image appears in Preview
Using the Auto Photo Fix Function
Click Save Selected Image or Save All Corrected Images
Click Exit
Using the Red-Eye Correction Function
Click Red-Eye Correction
Click Red-Eye Correction Click OK
Make sure that Auto is selected
Click Manual, then click Correct/Enhance
Click Undo to undo the preceding correction operation
Using the Face Brightener Function
Click Face Brightener
Using the Face Sharpener Function
Click Face Sharpener
Facial area in and around the selected area is sharpened
Auto Enhancement
Using the Digital Face Smoothing Function
Click Digital Face Smoothing
Image
Manual Enhancement
Click Exit
Click Blemish Remover
Using the Blemish Remover Function
Click Exit
Adjusting Images
Following adjustments are available
Contrast
Sharpness
Correct/Enhance Images Window
1Toolbar
Toolbar
Auto Tab
2Task Area
Select to correct automatically
Applies automatic corrections suitable for photos
Manual Tab
Brightness
Defaults
Contrast
Sharpness
Cancels the latest correction/enhancement
Face Brightener
Blemish Remover
Top
Questions and Answers
How Can I Move or Copy the Saved File?
Top
How Do I Print with Even Margins?
What Is C1 or C4?
Photo Print Settings
Printing Vivid Photos
Reducing Photo Noise
Cropping Photos Photo Print
Top
Printing Dates on Photos Photo Print
Printing Multiple Photos on One
Selecting a Photo
Printing an Index
Top
ID photos can only be printed on 4x6 10x15cm paper
Printing ID Photos ID Photo Print
Top
Printing Photo Information
Saving Photos
Edit the file if necessary
Opening Saved Files
Click Library from Menu
Select the file you want to open and click Open
Top
Other Settings
Changing Layout
Album
New layout
Layout Print
Changing Background
When Select from samples is Selected
When Single color is Selected
When Image file is Selected
Set Image File Path and Image Layout, then click OK
Top
Adding Photos
Swapping Positions of Photos
Replacing Photos
Changing Position, Angle and Size of Photos
Cropping Photos
Framing Photos
Top
Printing Dates on Photos
Top
Attaching Comments to Photos
Top
Adding Text to Photos
Saving
Setting Holidays
Top
Setting Calendar Display
Opening Saved Files
Editing Album Editing Calendar Editing Stickers
Imprimare cu alt software de aplicaţie
Various Printing Methods
Complete the setup
Printing with Easy Setup
Select the paper source
Select a frequently used profile
Registering a Frequently Used Printing Profile
Setting a Page Size and Orientation
Select the paper size
Set Orientation
Default Setting
Setting the Number of Copies and Printing Order
Specify the number of copies to be printed
Specify the print order
Complete the setup
Setting the Stapling Margin
Set the margin width
Specify the side to be stapled
Complete the setup
Borderless Printing
Setting Borderless Printing
Check the paper size
Set borderless printing
Expanding the Range of the Document to Print
Adjust the amount of extension from the paper
Top
Select the print paper size
Fit-to-Page Printing
Set fit-to-page printing
Select the paper size for the data
Complete the setup
Scaled Printing
Set the scaling rate by using one of the following methods
Set scaled printing
Select a Printer Paper Size
Specify a scaling factor
Selecting Scaled changes the printable area of the document
Set page layout printing
Layout Printing
Pages
Order
Border
Setting Poster Printing
Poster Printing
Set poster printing
Printing Only Specific Pages
Set the print range
Image Divisions
Print Cut/Paste in margins
Top
Booklet Printing
Set booklet printing
Set the margin for stapling and the margin width
Margin for stapling
Insert blank
Margin
Duplex Printing
Check the Duplex Printing check box on the Page Setup tab
Set duplex printing
Select the layout
Related Topic
Cleaning Inside the Machine
Stamp/Background Printing
Click Stamp/Background... on the Page Setup tab
Select a stamp
Printing a Stamp
Select the background
Set the stamp details
Set the background details
Printing a Background
Function of booklet printing
Related Topics
Registering a Stamp
Stamp Settings dialog box opens
Click Define Stamp
Registering a New Stamp
Configure the stamp while viewing the preview window
Select the stamp for which the settings are to be changed
Changing and Registering Some of Stamp Settings
Save the stamp
Click Define Stamp... in the Stamp/Background dialog box
Overwrite save the stamp
Select the stamp to be deleted
Deleting an Unnecessary Stamp
Registering Image Data to be Used as a Background
Background Settings dialog box opens
Click Select Background
Registering New Background
Select the image data to be registered to the background
Changing and Registering Some Background Settings
Save the background
Layout Method
Deleting an Unnecessary Background
Select the background to be deleted
Select the media type
Printing an Envelope
Load an envelope into the machine
Set the orientation
Select the print quality
Automatically Select
Switching the Paper Source to Match the Purpose
Rear Tray
Cassette
Paper Allocation
Set the preview
Displaying the Print Results before Printing
Check the Preview before printing check box on the Main tab
Canon IJ Preview
Set the custom size in the application software
Setting Paper Dimensions Custom Size
Set the custom paper size
Changing the Print Quality and Correcting Image Data
Open the printer driver setup window
Setting the print quality and halftone expression method
Printing a Color Document in Monochrome
Set grayscale printing
Check the Grayscale Printing check box on the Main tab
Top
Select the manual color adjustment
Specifying Color Correction
Select color correction
None
Driver Matching
Optimal Photo Printing of Image Data
Color Management
Selecting a Printing Method Suited to the Image Data
Adjusting Colors with the Printer Driver
Set the other items
Printing with ICC Profiles
Click Matching tab, and select None for Color Correction
Select the input profile
Click Matching tab, and select ICM for Color Correction
Select Standard
Related Topics
Adjusting Color Balance
Adjust color balance
Procedure for adjusting color balance is as follows
Complete the setup
Adjusting Brightness
Specify the brightness
Select Light, Normal, or Dark for Brightness, and click OK
Complete the setup
Adjust intensity
Adjusting Intensity
Adjust the slider gradually
Adjusting Contrast
Adjust the contrast
You can adjust the image contrast during printing
Complete the setup
Set the Simulate Illustration
Simulating an Illustration
Set Monochrome Effects
Representing Image Data with a Single Color
Grayed out and is unavailable
Presenting Image Data with Vivid Colors
Set Vivid Photo
Check the Vivid Photo check box on the Effects tab
Smoothing Jagged Outlines
Set image optimizer
Check the Image Optimizer check box on the Effects tab
Top
Set Photo Optimizer PRO
Changing Color Properties to Improve Coloration
Top
Set Photo Noise Reduction
Top
Overview of the Printer Driver
Various Printing Methods
Canon IJ Printer Driver
How to Use Printer Driver Help
To view all descriptions of a tab
To see a description for each item
Open the Printer Driver Setup Window through the Start Menu
How to Open the Printer Driver Setup Window
Printer driver setup window appears
Select your model name and click Preferences or Properties
Related Features
Features
When Errors Occur
Canon IJ Status Monitor
Launching the Canon IJ Status Monitor
Canon IJ Preview
Imprimarea cu ajutorul panoului de operare al aparatului
Imprimarea hârtiei liniate sau a hârtiei grafice
Hârtie grafică
Hârtie de caiet
Imprimarea de formulare ẟablon
Sunt disponibile următoarele formulare template
Hârtie muzicală
Listă cu bife
Hârtie pentru scris de mână
Program săptămânal
Realizarea de copii Utilizarea funcţiilor utile de copiere
Copierea
Efectuarea de copii
Elemente de configurare
Notă
Calitatea de imprimare
Elemente de configurare
Mărirea
Intensitatea
În partea superioară a paginii
Intensitate manuală, apoi specificaţi intensitatea
Modificarea setării de intensitate
Examinarea documentului original
Afiẟarea ecranului de examinare
Copiere specială
Utilizarea funcţiilor utile de copiere
Se va afiẟa ecranul Special copy
Setări pentru copiere specială
Selectaţi 2-on-1 copy, apoi apăsaţi butonul OK
Setări pentru copiere specială
Urmaţi instrucţiunile de pe ecran
Selectaţi 4-on-1 copy, apoi apăsaţi butonul OK
Selectaţi Borderless copy, apoi apăsaţi butonul OK
Copierea fără chenar Borderless Copy
Selectaţi Image repeat, apoi apăsaţi butonul OK
Repetarea unei imagini pe o pagină Image Repeat
Selectaţi Frame erase, apoi apăsaţi butonul OK
Copierea unei anumite zone Trimming
După ce aţi specificat zona de mascare, apăsaţi butonul OK
Copierea imaginilor cu ẟtergerea unei porţiuni Masking
Imprimarea de pe o cartelă de memorie
Imprimarea fotografiilor salvate pe o cartelă de memorie
Ecranul Advanced
Ecranul de confirmare a setărilor de imprimare
Setare dată
Setare nr. fiẟier
Corectare automată a fotografiei
Corectare ochi roẟii
Optimizator foto pro
Fotografie însufleţită
Reducere zgomot
Luminare faţă
Imprimarea cu ajutorul foii index foto
Print all photos
Umpleţi cercurile corespunzătoare din foaia index foto
Set no. of copies
Search
Încărcaţi hârtia pentru a imprima fotografii
În partea superioară a paginii
Utilizarea funcţiilor utile de imprimare
Imprimarea de pe o cartelă de memorie
Selectaţi opţiunea Layout print, apoi apăsaţi butonul OK
Selectaţi opţiunea Paste one by one
Căutarea fotografiilor în funcţie de data realizării Search
Imprimarea pe hârtie autocolantă Sticker Print
Selectaţi Sticker print, apoi apăsaţi butonul OK
Imprimarea unei zone specificate Trimming
Selectaţi Print all photos, apoi apăsaţi butonul OK
Imprimarea tuturor fotografiilor
Imprimarea indexului foto
Selectaţi Dpof print, apoi apăsaţi butonul OK
Imprimare Dpof
Selectaţi Captured info print, apoi apăsaţi butonul OK
Imprimarea de informaţii captate
Sunt disponibile următoarele metode de imprimare
Este selectată opţiunea Single photo
Imprimarea fotografiilor ID ID photo size print
Selectaţi Calendar print, apoi apăsaţi butonul OK
Crearea unui calendar Calendar print
Modificarea afiẟării
Utilizarea funcţiilor utile de afiẟare
Alegeţi zona pe care doriţi să o imprimaţi
Imprimarea unei zone specificate Trimming
Butoanele , , ẟi
Rotiţa de derulare rapidă
În partea superioară a paginii
Deschideţi ecranul cu metoda de căutare
Căutarea fotografiilor în funcţie de data realizării Search
Setaţi metoda de căutare
Specificaţi intervalul de timp, apoi apăsaţi butonul OK
În partea superioară a paginii
Specificaţi atributul de citire/scriere
Asiguraţi-văcă această cartelă de memorie nu este introdusă
Consultaţi Imprimarea de pe o cartelă de memorie
Not writable from PC
Imprimarea de pe o unitate flash USB
Imprimarea fotografiilor salvate pe o unitate flash USB
Elemente de configurare
Setare dată
Corectare ochi roẟii
Fotografie însufleţită
Imprimarea cu ajutorul foii index foto
Apăsaţi butonul Culoare Color
Încărcaţi hârtia pentru a imprima fotografii
În partea superioară a paginii
Utilizarea funcţiilor utile de imprimare
USB
Selectaţi opţiunea Layout print, apoi apăsaţi butonul OK
Imprimarea pe hârtie autocolantă Sticker Print
Imprimarea tuturor fotografiilor
Imprimarea indexului foto
Imprimare Dpof
Imprimarea de informaţii captate
Imprimarea fotografiilor ID ID photo size print
Crearea unui calendar Calendar print
Utilizarea funcţiilor utile de afiẟare
Imprimarea unei zone specificate Trimming
În partea superioară a paginii
Căutarea fotografiilor în funcţie de data realizării Search
În partea superioară a paginii
Imprimarea fotografiilor din Printed Photo
Imprimarea din fotografii imprimate
Din fotografii imprimate Elemente de configurare
Selectaţi tipul de hârtie fotografică pe care o veţi utiliza
Ecranul de setări avansate de imprimare
Restabilirea imaginilor decolorate
Imprimarea pe hârtie autocolantă Sticker Print
Imprimarea specială a fotografiilor
Puteţi imprima toate fotografiile scanate
Imprimarea tuturor fotografiilor Print All Photos
Setări pentru imprimarea unei fotografii scanate
Încărcaţi hârtie în tava din spate
Se afiẟează ecranul Easy photo reprint
Imprimarea pe hârtie autocolantă Sticker Print
Setări pentru imprimarea unei fotografii scanate
Imprimarea tuturor fotografiilor Print All Photos
Imprimarea unei zone specificate Trimming
Notă
Scanarea
Scanarea imaginilor Înaintea scanării Aẟezarea documentelor
Scanarea imaginilor
Scanarea imaginilor
Înainte de a scana imagini, verificaţi următoarele
Înaintea scanării
Placing Documents
When Scanning Photos, Postcards, Business
Placing Documents
Cards or CD/DVD Documents Placing a Single Document
Placing Multiple Documents
În partea superioară a paginii
Memorie
Specificaţi setările necesare, apoi apăsaţi butonul OK
Apoi apăsaţi butonul OK
Introducerea unităţii flash USB
De memorie
Îndepărtarea unităţii flash USB
Asiguraţi-văcă aparatul nu scrie date pe unitatea flash USB
Îndepărtaţi unitatea flash USB
Ecranul de setare a scanării
On dacă doriţi să accentuaţi conturul datelor scanate
Descreen
Show-through
Jpeg
Se afiẟează lista de fiẟiere
Aparatul începe ẟtergerea fiẟierului
În partea superioară a paginii
Setaţi aplicaţia de pornire
Aparatul este conectat la computer în mod corespunzător
Dacă utilizaţi Mac OS X v.10.5.x sau Mac OS X
Această operaţie nu este necesară
Selectaţi tipul de document, apoi apăsaţi butonul OK
Selectaţi PC, apoi apăsaţi butonul OK
Pentru a specifica MP Navigator EX
Dacă doriţi să editaţi sau să imprimaţi imaginile scanate
Dacă utilizaţi Windows Vista
Dacă utilizaţi Windows XP
În partea superioară a paginii
Appendix Various Scan Settings
Click Preferences
Start MP Navigator EX
Starting MP Navigator EX
See the section below for details
Scanarea cu pachetul software al aplicaţiei
What Is MP Navigator EX Supplied Scanner Software?
What You Can Do with This Software
Screens
View & Use Window
Scan/Import Window
Scanning documents, photos, magazines, etc. from the Platen
Starting MP Navigator EX
Scanning two or more photos small documents at one time
Scanning images larger than the Platen
Starting One-click Mode
Click Switch Mode at the bottom left of the screen
Starting MP Navigator EX
Double-click Canon MP Navigator EX 3.0 icon on the desktop
Appears at startup
Scanning Photos and Documents
Start MP Navigator EX and open the Navigation Mode screen
Scan photos and documents placed on the Platen
Placing Documents
When setting is completed, click OK
Scan Settings Dialog Box Photos/Documents
Click Scan
Save the scanned images
Edit the scanned images as required
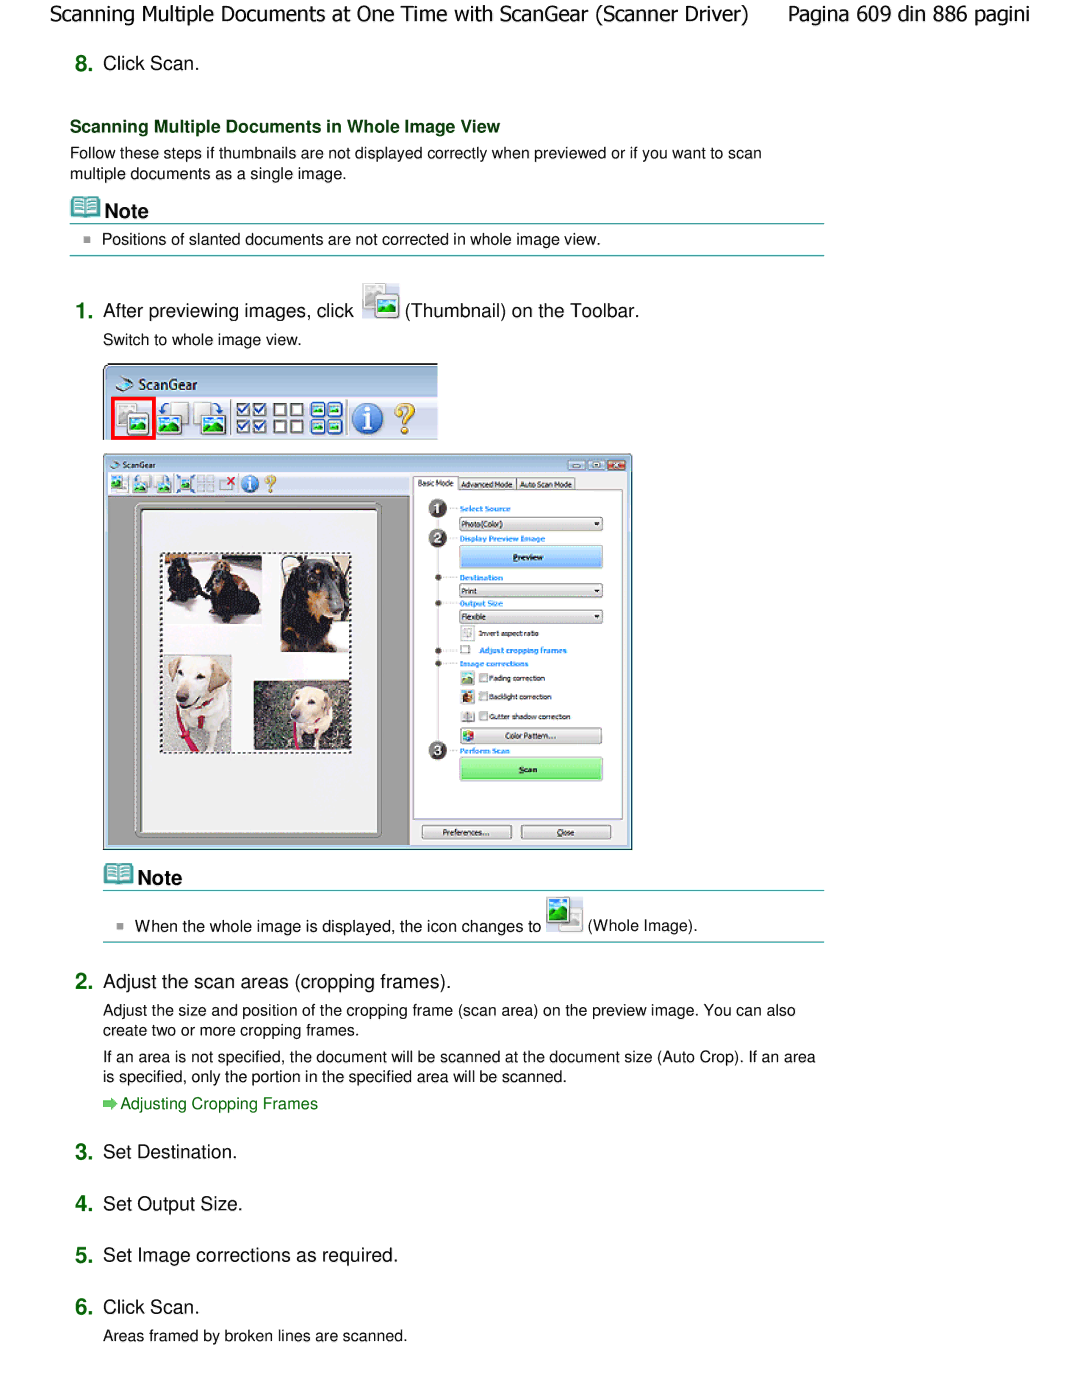
Scanning Multiple Documents at One Time
Place the document on the Platen
Scanning Multiple Documents in Whole Image View
Click Specify
Edit the scanned images as required
Scanning Images Larger than the Platen Stitch Assist
Click Specify
Place the left half of the document face-down on the Platen
Adjust the scanned image as required
Stitch-assist window opens
Right half of the document is scanned
Click Next
Save the scanned images
Point to One-click
Easy Scanning with One-click
Custom Scan with One-click Tab One-click Mode Screen
Click the corresponding icon
Scanning starts
Correcting/enhancing images automatically
Useful MP Navigator EX Functions
Correcting/enhancing images manually
Searching for lost images
Correcting/Enhancing Images Automatically
Click Edit/Convert, then click Fix photo images on the list
Selected image appears in Preview
Correcting/Enhancing Images Manually
Images
You can correct/enhance scanned images manually
Correcting/Enhancing Images Manually
Over the image
Click Exit
Select the image you want to adjust from the thumbnail list
Click Save Selected Image or Save All Corrected Images
File format of adjusted images is JPEG/Exif
Searching Images
Quick Search
Advanced Search
Word or phrase in the file
File Name
Category
Modified Date
Case sensitive
Search subfolders
Match all criteria
Match any criteria
Sort by, select Categories
Classifying Images into Categories
Creating Custom Categories
Enter Category name and click OK
Categories
Click Add to List
Edit Custom Categories dialog box opens
Saving scanned images to computer
Utilizing Images in MP Navigator EX
Printing scanned photos
Sending scanned images via e-mail
Save images scanned with MP Navigator EX to a computer
Save dialog box, specify the save settings
Specify the destination folder, file name and file type
Save Dialog Box
Click Save
Specify the file type, file name and destination folder
Specified as well
Passwords
Page
Add/delete pages as required
Rearrange the page order as required
Click Save Selected Pages or Save All Pages
As well
Use the application to edit/print the file
Print Document Dialog Box
Printing Documents
Click Print
When Printing Photos Using MP Navigator EX
When Printing Photos Using Easy-PhotoPrint EX
Select images and click Print
Click Print Photo or Print Album on the list
Click Print Photo on the list
Displayed dialog box, specify paper size, print count, etc
Print Photo Dialog Box
Sending via E-mail
Specify the destination folder and file name
Send via E-mail Dialog Box
Click OK
Select images and click Edit/Convert
Editing Files
Correct/enhance images in the Correct/Enhance Images window
Click Fix photo images on the list
Converting Documents to Text
Click Convert to text file on the list
Machine See Lets Try Scanning to scan images
Select the Password security settings checkbox
Password Security -Settings dialog box opens
Re-enter the password and click OK
Document Open Password Permissions Password
Files are saved according to the settings
Entering a Password to Open a File
Password dialog box opens. Enter the password and click OK
Corresponding dialog box opens
Enter the password and click OK
Learn about the screens and functions of MP Navigator EX
MP Navigator EX Screens
Navigation Mode Screen
Scan/Import Documents or Images Tab
Photos/Documents Platen
Memory Card
My Box Scanned/Imported Images
View & Use Images on your Computer Tab
Specify Folder
Recently Saved Images
Related Topic
For further procedures, refer to the applications manual
Custom Scan with One-click Tab
Custom
Start scanning by clicking the button
Settings and Operation Buttons
Photos/Documents Platen Screen Scan/Import Window
Window opens
Toolbar
When Images are Sorted by Categories
Thumbnail Window
Selected Images Area
Cancel Selection
Selected Images Area
Images selected in the Thumbnail window are displayed
Scanning Resolution
Scan Settings Dialog Box Photos/Documents
Select the resolution at which to scan documents
Document Size
Reduce Show-through
Remove gutter shadow
Correct slanted document
Restores the default settings
Detect the orientation of text documents and rotate images
Document Language
Save Dialog Box
When Save as type is JPEG/Exif
Save as type
Set
Top
Save as type
Set Password security settings Add to
Select the language of the document to be scanned
Enable keyword search
It is recommended that you normally select this setting
Standard
Security
Memory Card Screen Scan/Import Window
Photos/Documents Platen Screen Scan/Import Window
Memory Card Import
Refreshes the Thumbnail window contents
Zoom Refresh
Importing Images Saved on a Memory Card
Top
View & Use Window
Display Setting Items
Scan/Import window opens
Image Handling Buttons
Advanced search options opens
Image Handling Buttons
Image Correction/Enhancement
Files
Zoom Search
Images N
Category name Images N Selected n
Selected n
Specific Categories / All Categories
Edit Custom Categories
All Categories
See Classifying Images into Categories for details
Classify Images
Rearrange Pages
Delete Selected Pages
Deletes the selected image
Preview Mode
Reset
Add
Save Selected Pages Save All Pages
Enlarges/reduces the image to display it fully in Preview
Thumbnail Mode
Print Document Dialog Box
Scale
Auto
Paper Size
Media Type
Displays the selected printers advanced setting screen
Print Photo Dialog Box
Properties
Specify the number of copies to print
Orientation
Select this checkbox to print the image in vivid colors
Close
Adjust attachment file size
Send via E-mail Dialog Box
Mail Program
Task Area Toolbar
Task Area
Saves the corrected images selected
Closes the Correct/Enhance Images window
See Correcting/Enhancing Images Manually for details
Correction/Enhancement
Adjustment Brightness
Cancels the latest correction
Rotates the image 90 degrees counter-clockwise
Rotates the image 90 degrees clockwise
Enlarges/reduces the image to display it full-screen
Inverts the image horizontally
Mail
One-click Mode Screen
Custom Scan with One-click Tab
Scan Settings
Auto Scan Dialog Box
Scan Postcards and business cards
When Save as type is Auto
Save Settings
Cancels the specified settings. The current screen closes
Cancel
Returns all settings in the screen to their defaults
Start scanning by clicking the one-click button
Save Dialog Box One-click Mode Screen
Select how to scan the document
Color Mode
Resolution
To reduce moire, set Document Type to Magazine
Save the JPEG/Exif file in AdobeRGB
Open with
Application Settings
Color
Scan Settings Dialog Box
Grayscale
Black and White
Resolution
Detect the orientation of text documents and rotate images
Save Dialog Box
Password security settings Add to
Exif Settings
Well
Rotate Left 90/Rotate Right
Advanced Information Settings Area
Exif Settings Dialog Box
Apply the Same Setting of Input Items Automatically
Basic Information
Select the type of document to be scanned
Open the save dialog box after scanning the image
Select a file type to save the scanned images
Settings such as destination folder and file name
Cancels the application setting
Allows you to select an application to start
Specified as well
Set Password security settings Rotate Left 90/Rotate Right
Mail Dialog Box
File Size
Attachment Settings
Select it
Specify an e-mail software program
OCR Dialog Box
OCR with
Scans documents with the specified settings
Custom Dialog Box
Save Settings
When Save as type is Auto
Application Settings
Preferences Dialog Box
Product Name
Compress scanned images when transferring
Save in My Box
Location of Temporary Files
Application to run
Top
Scanner Button Settings Tab Save
Event
Select Event
Scan Settings
Save Settings
Actions
When Save as type is JPEG/Exif
Set When Save as type is Auto
Related Topic
Scanner Button Settings Tab Attach to E-mail
Set When Save as type is JPEG/Exif
Attachment Settings
Related Topic
Scanner Button Settings Tab Open with Application
Application Settings
Scanner Button Settings Tab Attach to E-mail
Using images saved on a memory card
Using images saved on a computer
Appendix Opening Files Other than Scanned Images
Start MP Navigator EX as follows
Importing Images Saved on a Memory Card
Windows Vista/Windows XP
Windows Vista/Windows XP
Windows
Start MP Navigator EX and open the Navigation Mode screen
Click Save
Top
Opening Images Saved on a Computer
Click the folder containing the images you want to open
Images saved in the folder appear in the Thumbnail window
Top
Scanarea cu alt software de aplicaţie
What Is ScanGear Scanner Driver?
Basic Mode
Advanced Mode
Auto Scan Mode
Starting ScanGear scanner driver
Scanning with Advanced Settings Using ScanGear Scanner
Scanning documents after making simple image corrections
Scanning with a simple operation
Starting ScanGear Scanner Driver
Start MP Navigator EX and open the One-click Mode screen
Point to Scan/Import and click Photos/Documents Platen
Starting from MP Navigator EX
Starting from an Application
Start the application
Scanning in Basic Mode
Click Preview
Adjust the scan area cropping frame as required
Set Output Size
Set Image corrections as required Click Scan
Scanning in Advanced Mode
Click Advanced Mode
Advanced Mode tab appears
Set Color Mode
Set Output Settings
Input Settings
Output Settings
Top
Click Auto Scan Mode
Scanning in Auto Scan Mode
Scanning in Basic Mode Scanning in Advanced Mode
Auto Scan Mode Tab
Top
Scanning Multiple Documents in Whole Image View
Select the checkboxes of the images you want to scan
Select the images you want to scan
After previewing images, click Thumbnail on the Toolbar
Adjust the scan areas cropping frames
Scanning Multiple Documents in Whole Image View
Areas framed by broken lines are scanned
Top
Adjusting Saturation and Color Balance
Adjusting Colors Using a Color Pattern
Adjusting Brightness and Contrast
Adjusting Histogram
Adjusting the image brightness and color tone
Setting Items
Sharpening slightly out-of-focus images
Reducing gradations and stripe patterns
Reducing dust and scratches
Correcting backlit images
Reducing graininess
Adjusting Colors Using a Color Pattern
Color Adjustment
Increasing the complementary color
After
Adjusting Saturation and Color Balance
Saturation
Color Balance
Top
Channel
Adjusting Brightness and Contrast
Contrast
Brightness
Reading Histograms
Adjusting Histogram
Moving the Black-point and White-point Sliders
Adjusting Histograms Using the Slider
Images with more data distributed to the highlight side
Images with more data distributed to the shadow side
Moving the Mid-point Slider
Adjusting Histograms Using the Droppers
Move the Mid-point Slider toward the highlight side
Move the Mid-point Slider toward the shadow side
Reading Tone Curves
Adjusting Tone Curve
No correction No adjustment Overexposure Convex curve
Adjusting Tone Curve
Underexposure Concave curve
High contrast S curve
Edit custom curve
Adjusting Threshold
Setting Threshold
ScanGear Scanner Driver Screens
MagazineColor
Select Source PhotoColor
NewspaperGrayscale
DocumentGrayscale
Whole image view
Thumbnail view
Add/Delete
Adjust cropping frames
Delete
Invert aspect ratio
Thumbnail view Whole image view
Preview Area
When Thumbnail is displayed on the Toolbar
Frames
When Whole Image is displayed on the Toolbar
Scanning in Basic Mode
Favorite Settings
Advanced Mode Tab
Output Settings
Input Settings
Image Settings
Enable/disable various image correction functions
Performs a trial scan
Crop
Allows you to specify the scan area by dragging the mouse
Move Image
Preview Area
Related Topic
Input Settings allows you to set the following items
Input Settings
Select Source
Type of document to be scanned is displayed
Input Size
Renders the image in 256 levels 8 bit of black and white
Output Settings
Output Settings allows you to set the following items
Output Resolution
Switch Aspect Ratio
Paper Size L, etc. & Monitor Size 1024 x 768 pixels, etc
Data Size
Top
Image Adjustment
Image Settings
Image Adjustment will not be applied
Select this to apply Image Adjustment to photos
Reduce Dust and Scratches
Newspaper
Low
Medium
Fading correction will not be applied
Select this when the photo is slightly grainy
Grain Correction
Graininess will not be reduced
Gutter shadow will not be corrected
Setting Unsharp Mask to OFF may reduce the noise patterns
Color Adjustment Buttons
Saturation/Color Balance
Brightness/Contrast
Histogram
Tone Curve Settings
Final Review
Threshold
Save up to 20 items
Placing Documents
Supported Documents
Placing Documents appears
View scanned images
Instructions
Scanner Tab
Color Settings Tab
Preview Tab
Scanned documents
Quiet Mode
On the Scanner tab, you can specify the following settings
Select Folder Where Temporary Files are Saved
Sound Settings
Top
Automatically Execute Preview
Preview at Start of ScanGear
Display Saved Preview Image
Cropping Frame on Previewed Images
Cropping Size for Thumbnail View
No cropping frame will be displayed after previewing
Larger
Standard size
Status of ScanGear dialog after scanning
On the Scan tab, you can specify the following settings
Close ScanGear automatically
Do not close ScanGear automatically
Color Adjustment
Color Settings Tab
Recommended
Color Matching
Top
Appendix Useful Information on Scanning
Adjusting a Cropping Frame
Adjusting Cropping Frames
Cropping Frame Types
Initial Cropping Frame
You can only create one cropping frame per image
Creating Multiple Cropping Frames
Deleting Cropping Frames
What is Resolution?
Resolution
Setting the Resolution in MP Navigator EX
Setting the Resolution in ScanGear Scanner Driver
Advanced Mode tab
Appropriate Resolution Settings
Image resolution/printing resolution 300 dpi
Color Mode Output
BMP Standard File Extension .bmp
File Formats
Jpeg Standard File Extension .jpg
Exif Standard File Extension .jpg
Color Matching
Example When sRGB is selected as the output profile target
Scanner
Monitor
Alte metode de scanare
Specify the settings
Scanning with WIA Driver
Scanning with WIA Driver
See how to scan a picture
Resolution DPI
Click Preview to preview the image
Preview or scan images as separate files
Click to restore the original settings
Picture type
Select the type of scan you want for your document
Click Custom Settings to set the preferences as required
Scanning Using the Control Panel Windows XP Only
Select Picture type according to the document to be scanned
Scanner and Camera Wizard dialog box opens
Click Next and follow the instructions
În partea superioară a paginii
În partea superioară a paginii
Recomandat de producătorul dispozitivului
Setări pe un dispozitiv compatibil PictBridge
Setări pe aparat
Manualul de instrucţiuni al dispozitivului
Despre setările de imprimare PictBridge
Setări pe un dispozitiv compatibil PictBridge
Aceste elemente
Se va afiẟa ecranul PictBridge print settings
Setări pe aparat
Dată ẟi nr. fiẟier Optimizare
În partea superioară a paginii
Imprimarea cu ajutorul unui mijloc de comunicare Bluetooth
Imprimarea cu ajutorul unui mijloc de comunicare Bluetooth
Setaţi dimensiunea paginii ẟi aspectul
Modificarea setărilor Bluetooth
Lansaţi imprimarea de pe telefonul mobil
Despre datele care pot fi transmise
Modificarea setărilor Bluetooth
Se va afiẟa ecranul Bluetooth settings
Ecranul Bluetooth Settings
Afiẟarea ecranului Mobile phone print setting
Mobile phone print setting
Întreţinere
Curăţarea aparatului
Curăţare
Curăţarea exteriorului aparatului
În partea superioară a paginii
Deschideţi cu grijă tava de ieẟire a hârtiei
Notă
Curăţarea elementelor proeminente din interiorul aparatului
Alinierea capului de imprimare
Notă
Page
Alinierea poziţiei capului de imprimare
Pe LCD este afiẟat un mesaj de eroare
Efectuarea întreţinerii de pe un computer
Check the results
Cleaning the Print Heads
Related Topic
Cleaning the Paper Feed Rollers
Prepare the machine
Select Rear Tray or Cassette, and click OK
Aligning the Print Head Position
Transmit the settings
Confirm the displayed message and click OK
Confirm the displayed message and click OK
Top
Checking the Print Head Nozzles
Click Nozzle Check on the Maintenance tab
Print a nozzle check pattern
Check the print result
Click Bottom Plate Cleaning on the Maintenance tab
Cleaning Inside the Machine
Perform the bottom plate cleaning
Bottom Plate Cleaning
Despre mijloacele de comunicare Bluetooth
Expedierea produsului
Măsuri de precauţie la manipulare
Shipping the Product
Pregătire pentru utilizarea unităţii Bluetooth
Bluetooth Unit
Make sure that the Power lamp is lit
Attaching the Bluetooth Unit to the Printer
Attaching to and Removing from the Printer
Make sure that the printer is turned on
Removing the Bluetooth Unit from the Printer
În partea superioară a paginii
Install the MP Drivers
Check the device name of the printer using the LCD
Computer
Top
Setting the Printer
Installing the MP Drivers
Display the Bluetooth settings screen on the LCD
Setting the Printer
Select Device name
Check the device name
Top
Registering the Printer
Add Bluetooth Device Wizard will start
Click Add on the Devices sheet
See Deleting the Printer
Select Dont use a passkey, and then Next
Select the device name of the printer and click Next
Page
Top
Select Delete from the Organize menu
Deleting the Printer
În partea superioară a paginii
Specify the required settings
Printing with Computers
Compliant Devices other than a Computer
Printing begins
Click Print or OK to print the document
Top
Setting Bluetooth Printing
Start printing from the Bluetooth compliant device
Setarea imprimării Bluetooth Ecranul Bluetooth Settings
Setări Bluetooth
Select the contents which you want to set on the LCD
Setting Bluetooth Printing
Access refusal
Bluetooth Settings Screen
Device name
Security
Enable
OFF Default setting
Disable Default setting
Security Screen
Depanare
Troubleshooting
Troubleshooting
Check 2 Is unsupported Bluetooth driver used?
Check 1 Have MP Drivers been installed?
Printer Cannot be Registered
Attaching to and Removing from the Printer
Top
Check 1 Is Bluetooth unit ready for use?
Printing Does Not Start
Check 3 Is the printer to be used selected correctly?
Do not retry printing. Check the error message on the LCD
Specifications
Modificarea setărilor aparatului
Modificarea setărilor aparatului de pe LCD
Se va afiẟa ecranul Device settings
Se afiẟează ecranul Settings
Selectaţi elementul de setare, apoi apăsaţi butonul OK
Se va afiẟa ecranul de setări pentru elementul selectat
În partea superioară a paginii
Setări pentru alimentarea hârtiei simple
Setări de imprimare
Auto Photo Fix setting
Prevent paper abrasion
Extended copy amount
Guide display settings
Quiet mode
Setări avansate
Date display
Key repeat
Setare pentru imprimare de pe telefonul mobil
Imprimare autocolant
Imprimare pe hârtie diferită de hârtia autocolantă
Acces refusal
Device name
Security
Passkey
Setare de imprimare fotografii
Setări de imprimare PictBridge
OFF
Reducere zgomot
Selectare limbă
Setările pot fi restabilite la valorile implicite
Resetare setări
Modificarea setărilor aparatului de la computer
Change the individual settings
Click Print Options... on the Page Setup tab
Changing the Print Options
Print Options dialog box opens
Save Commonly Used Settings dialog box opens
Save the settings
Registering a Frequently Used Printing Profile
Set the necessary items
Select the printing profile to be deleted
Delete the printing profile
Deleting Unnecessary Printing Profile
Setting the Paper Source for Plain Paper
Paper Source Setting for Plain Paper
Paper Source Setting for Plain Paper dialog box opens
Managing the Machine Power
Execute power off
Power Off
Set the quiet mode
Click Quiet Mode on the Maintenance tab
Quiet Mode
Reducing the Machine Noise
Changing the Machine Operation Mode
If necessary, complete the following settings
Custom Settings
Ghid avansat Depanare
În Mac OS X În Mac OS X v.10.4.x sau Mac OS X v
Dacă apare o eroare
În partea superioară a paginii
Aparatul nu poate fi pornit
Dacă problema persistă, contactaţi centrul de service
Întreţinere de rutină
Pe LCD este afiẟat un mesaj de eroare
Instalaţi un rezervor de cerneală corespunzător
Actual de cerneală
Aliniaţi capul de imprimare folosind opţiunile driverului de
Dacă eroarea persistă, conectaţi aparatul la computer ẟi
În partea superioară a paginii
Dacă lampa Alimentare Power este stinsă
Dacă lampa Alimentare Power este aprinsă
LCD-ul nu se poate vedea deloc
Apăsaţi butonul Acasă Home ẟi aẟteptaţi timp de 5 secunde
Pe LCD este afiẟată o limbă necorespunzătoare
Nu se poate face instalarea pentru MP Drivers
Faceţi clic pe Start apoi pe Computer
Începeţi instalarea urmând procedura de mai jos
În alte cazuri
Faceţi clic pe Cancel pe ecranul Printer Connection
Faceţi clic pe Back pe următorul ecran care apare
Reporniţi computerul
Tergerea driverelor MP Drivers inutile
Comunicaţie
Conectarea la computer nu se realizează corespunzător
Rezultatele imprimării nu sunt satisfăcătoare
Imprimarea cu Configurare u ẟoar ă
Imprimarea fotografiilor direct de pe un
Dispozitiv compatibil
Consultaţi ẟi secţiunile de mai jos
Verificarea 3 Dacă problema persistă, pot exista alte cauze
Tergeţi fiẟierele inutile pentru a elibera spaţiu pe disc
Nu se efectuează imprimarea completă
Page
Curăţaţi suprafaţa de sticlă de scanare
Verificarea 6 Suprafaţa de sticlă de scanare este murdară?
Încărcarea hârtiei / documentelor originale
Verificarea 2 Efectuaţi alinierea capului de imprimare
Liniile sunt aliniate greẟit
Hârtia imprimată se ondulează sau prezintă pete de cerneală
Ajustarea intensităţii
Când copiaţi
Hârtia este pătată/Suprafaţa imprimată este zgâriată
Verificarea 3 Încărcaţi hârtia după corectarea ondulaţiei
Pentru hârtia simplă
Pentru setare cu ajutorul driverului de imprimantă
Pentru setare de pe panoul de operare
Verificarea 8 Rola de alimentare a hârtiei este murdară?
Verificarea 7 Suprafaţa de sticlă de scanare este murdară?
Verificarea 9 Interiorul aparatului este murdar?
Zonă de imprimare
Selectaţi Custom Settings din meniul pop-up
Confirmaţi mesajul ẟi faceţi clic pe OK
Deschiderea utilitarului Canon IJ Printer Utility Macintosh
Hârtia este pătată pe verso
Verificarea 2 Dimensiunea hârtiei încărcate este corectă?
Culorile sunt neuniforme sau prezintă dungi
Verificarea 3 Efectuaţi alinierea capului de imprimare
Imprimarea nu începe
Dacă există lucrări de imprimare inutile, ẟtergeţi-le
Tergerea unei operaţiuni de imprimare nedorite
Verificarea 8 Configuraţi corespunzător portul imprimantei
Verificarea 2 Hârtia este încărcată?
Copierea/Imprimarea se opreẟte înainte de a fi finalizată
Aparatul funcţionează, dar nu este eliminată cerneală
Verificarea 1 Sunt înfundate duzele capului de imprimare?
Verificarea 2 S-a terminat cerneala?
Verificarea 1 Imprimarea se face în Quiet Mode?
Viteza de imprimare este mai mică decât cea aẟteptată
În fila Main, selectaţi Fast pentru a seta Print quality
Setărilor aparatului de pe LCD
Verificarea 1 Este lampa Alimentare stinsă?
Verificarea 2 Pe LCD este afiẟat un mesaj de eroare?
LCD este afiẟat un mesaj de eroare
Verificarea 4 Confirmaţi setarea pentru sursa de hârtie
Alimentarea cu hârtie nu se realizează corect
Verificarea 5 Îndepărtaţi obiectele străine din casetă
Setare cu driverul de imprimantă
Verificarea 9 Capacul din spate este închis complet?
Verificarea 7 Curăţaţi rola de alimentare a hârtiei
În partea superioară a paginii
Blocaje de hârtie
Înlăturaţi hârtia urmând procedura de mai jos
Încărcaţi din nou hârtia ẟi apăsaţi butonul OK de pe aparat
Demontaţi capacul din spate
Hârtia este blocată în aparat la unitatea de transport
Scoateţi caseta
Scoateţi hârtia afară uẟor
Notă
În alte cazuri
Asiguraţi-văde următoarele
Verificarea 3 Încărcaţi hârtia după corectarea ondulaţiei
Un mesaj apare pe ecranul computerului
Se afiẟează „5100 sau
Este afiẟat
Imprimantă. se afiẟează
Eroare de scriere/Eroare de ieẟire/Eroare de comunicare
Verificarea 5 Verificaţi starea dispozitivului pe computer
Numărul de eroare 1700 este afiẟat
Numărul de eroare 300 este afiẟat
Numărul de eroare 2001 este afiẟat
Un mesaj de eroare ẟi luaţi măsurile necesare
Numărul de eroare 2002 este afiẟat
Alte mesaje de eroare
Confirmare
Modificarea setării ecranului de confirmare
Jos
Modificarea setării
Pentru a opri trimiterea de informaţii
Dacă utilizaţi Windows Vista
Pentru utilizatorii Windows
Monitorul de stare a imprimantei nu este afiẟat
Faceţi clic pe OK
Din Pe LCD este afiẟat un mesaj de eroare ẟi luaţi măsurile
Verificare Consultaţi Capul de imprimare nu este instalat
Verificare Consultaţi Absorbantul de cerneală este aproape
Plin. din Pe LCD este afiẟat un mesaj de eroare ẟi luaţi
Întreţinere de rutină
Imprimarea cu ajutorul unui mijloc de comunicare Bluetooth
Nu se imprimă corespunzător de pe o foaie index foto
Se afiẟează Failed to scan Photo Index Sheet
Verificarea 2 Reimprimaţi foaia index foto
Imprimării?
Nu se poate scoate o cartelă de memorie
Problems with Scanning
Scanner Does Not Work
Check 1 Make sure that the MP Drivers is installed
ScanGear Scanner Driver Does Not Start
Check 3 Start from a TWAIN-compliant application
Check 6 Make sure that the application is TWAIN-compliant
Check 5 Clean the Platen and Document Cover
Check 1 Increase the scanning resolution
Scan Quality Image Displayed on the Monitor Is Poor
Check 2 Set the scale to 100%
Check Specify the scan area
Scanned Image Is Surrounded by Extra White Areas
Cannot Scan Multiple Documents at One Time
Check 2 Scan each item individually
Some applications do not support multiple image scanning
Check 2 Multiple image scanning may not be supported
Cannot Scan Properly in Auto Scan Mode
Slow Scanning Speed
Scan Settings Dialog Box
There is not enough memory. Message Is Displayed
Check 4 Multiple devices may be connected to USB ports
Computer Stops Operating during Scanning
General Tab
Disconnect other devices
Uninstall MP Navigator EX
Uninstall the MP Drivers
Reinstall the MP Drivers and MP Navigator EX
Scanner Does Not Work After Upgrading Windows
Software Problems
Top
Check Set the printing size in the application
Scanned Image Is Printed Enlarged Reduced
Scanned Image Is Enlarged Reduced on the Computer
Check 1 Change the display setting in the application
Scanned Image Does Not Open
MP Navigator EX Problems
Cannot Scan at the Correct Size
Scanner Button Settings Tab Save
Scan Settings Dialog Box Photos/Documents
Scan Settings Dialog Box Photos/Documents
Dacă nu puteţi rezolva problema
Întrebări frecvente
Instructions for Use Printer Driver
Restrictions on the Printer Driver
Classic as follows
Points to Note with Applications
General Notes Scanner Driver
Scanner Driver Restrictions
Applications with Restrictions on Use
Top
Partajarea imprimantei íntr-o reţea
Anexă
Zonă de imprimare
Zon ă de imprimare l ăţime x în ăl ţime
Alte dimensiuni pe lângă Letter, Legal, Plicuri
56 x 7,95 inchi / 141,2 x 202,0 mm
00 x 11,38 inchi / 203,2 x 289,0 mm
Letter
Letter, Legal
Plicuri
Cum se demontează/montează capacul pentru documente
Demontarea capacului pentru documente
Montarea capacului pentru documente
Display the Canon IJ Status Monitor
Deleting the Undesired Print Job
Display the print jobs
Delete the print jobs
Actualizarea driverelor MP Drivers
Obtaining the Latest MP Drivers
Before Installing the MP Drivers
Deleting the Unnecessary MP Drivers
Delete the printer driver
Checking the Personal Computer Settings
Before Installing the MP Drivers
Obtaining the Latest MP Drivers Installing the MP Drivers
Checking the Machine Status
Install the driver
Start the installer
Complete the installation
Turn off the machine
Top
Faceţi clic pe OK la afiẟarea mesajului de confirmare
Dezinstalarea manualelor on-screen
Dispozitivul în imposibilitatea de a imprima
Transportul aparatului
Notă
Se va deschide caseta de dialog Page Setup
Deschiderea casetei de dialog Page Setup
Deschiderea casetei de dialog Print
Se deschide caseta de dialog Print
Deschiderea utilitarului Canon IJ Printer Utility Macintosh
În Mac OS X
Faceţi clic pe Utility
În Mac OS X v.10.4.x sau Mac OS X v
Restrictions on Printer Sharing
Sharing the Printer on a Network
Install the printer driver on the print server system
Settings on Print Server
Set sharing
Click the icon for the model name of printer to be shared
Install the printer driver on the client systems
Settings on Client PC
Start the wizard
Add a printer
Complete the setup
Restrictions on Printer Sharing
When You Are Sharing a Printer in a Network
Windows Vista
Windows XP or Windows
Transforming Your Photos into Creative Works of Art
Using Easy-PhotoPrint EX
Start Easy-PhotoPrint EX
Create a Personalized Photo Album
Create Stickers
Create a Calendar Using Your Favorite Photos
Calendars
You can add text to photos
Top
Start MP Navigator EX
Using MP Navigator EX
Scan Photos and Documents
Scan Small Documents at One Time
Scan and Correct/Enhance Photos
Scan with One-click
Quick Shortcut!! Solution Menu
About Solution Menu
Starting Solution Menu
Click Here Solution Menu
Restriction on Use of Solution Menu
Exiting Solution Menu
Starting an Application
Click Close on the title bar

 (Thumbnail) on the Toolbar.