Manuals
/
Brands
/
Photography
/
Camcorder
/
Canon
/
Photography
/
Camcorder
Canon
MV 950, MV940, MV960
- page 56
1
56
129
129
Download
129 pages, 4.61 Mb
56
Using Digital Effects
Faders (
58)
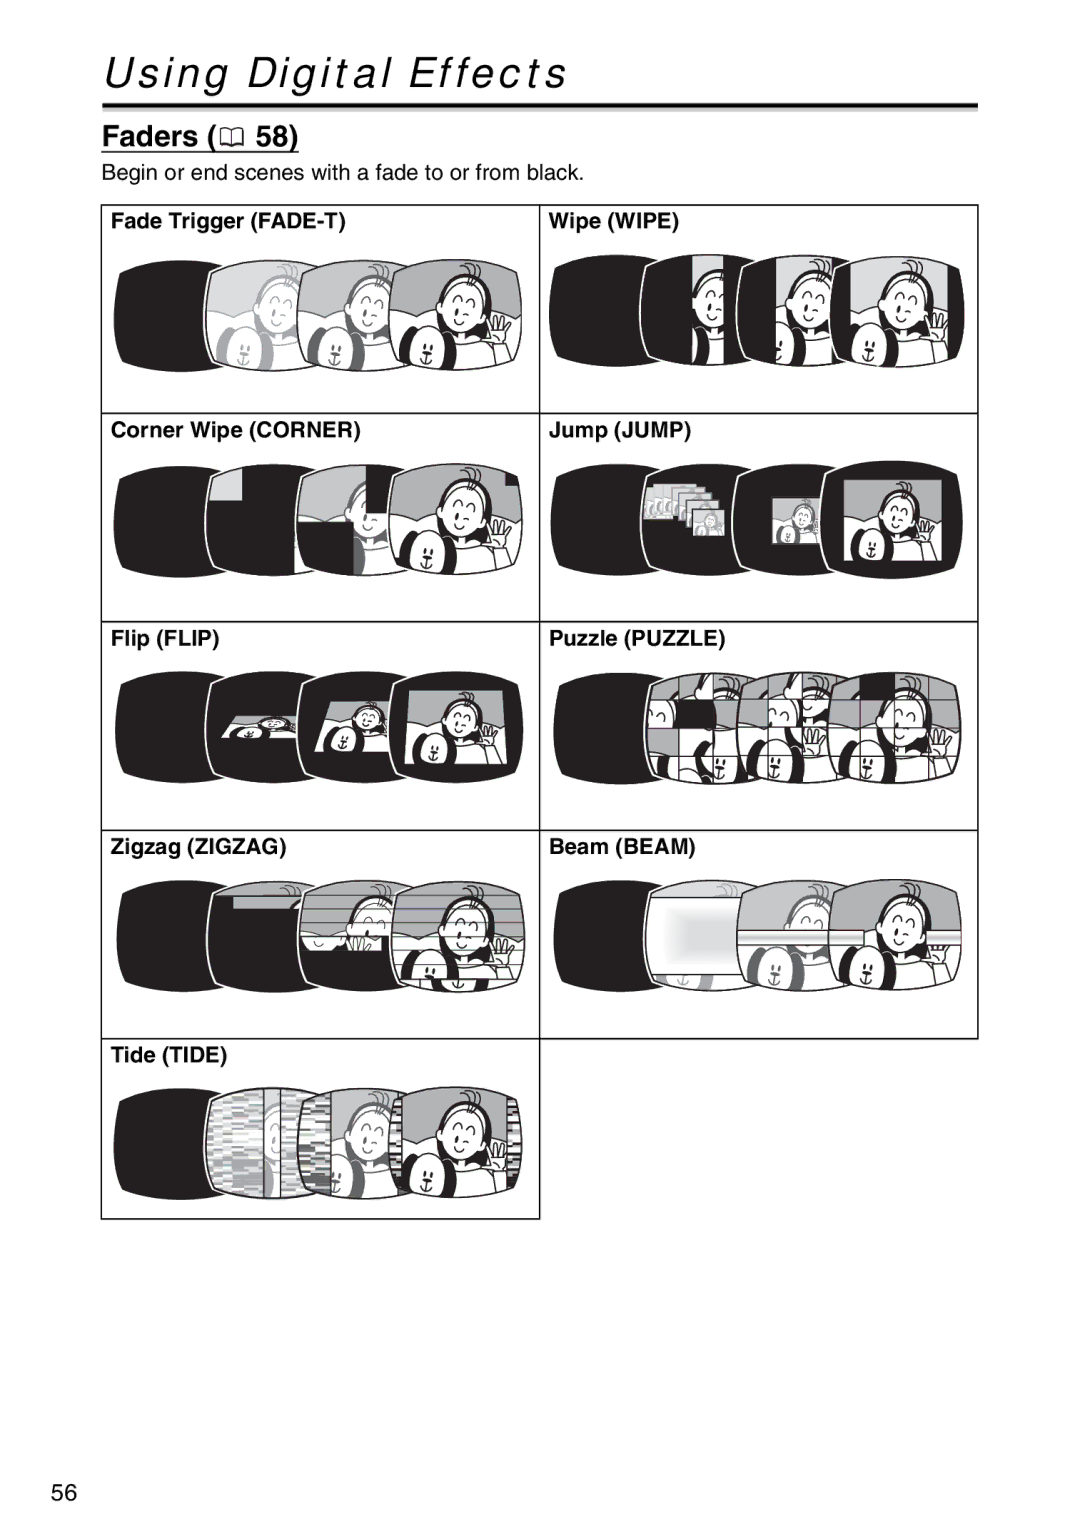
Begin or end scenes with a fade to or from black.
Fade Trigger (FADE-T)
Wipe (WIPE)
Corner Wipe (CORNER)
Jump (JUMP)
Flip (FLIP)
Puzzle (PUZZLE)
Zigzag (ZIGZAG)
Beam (BEAM)
Tide (TIDE)
Contents
Main
English English
PUB.DIE-252
Mini
PAL
Digital Video Camcorder
Instruction Manual
Important Usage Instructions
Using this Manual
Troubleshooting
Symbols and References Used in This Manual
About the Joystick and the Joystick Guide
EXP FOCUS
About the Operating Modes
Trademark Acknowledgments
Table of contents
Introduction
Basic Functions
Advanced Functions
Editing
Using a Memory Card
Direct Printing
Transferring Images
Additional Information
Introduction
Checking the Supplied Accessories
* Europe only.
Components Guide
MV960/MV950/MV940/MV930
Left side view
Right side view
Front view
Rear view
Page
WL-D85 Wireless Controller
Preparing the Power Supply
Attaching the Battery Pack
Charging the Battery Pack
Using a Household Power Source
Installing the Backup Battery
Loading/Unloading a Cassette
Preparing the Camcorder
Using the Wireless Controller
Inserting the Battery
Adjusting the LCD Screen
Rotating the LCD Screen
Open the LCD panel 90 degrees.
LCD Backlight
Press the LCD BACKLIGHT button.
Setting the Time Zone, Date and Time
Setting the Time Zone/Daylight Saving Time
Setting the Date and Time
8. Press the FUNC. button to close the menu. Time Zones and Difference from GMT/UTC.
Recording Movies on a Tape
Recording
Allowing the Subject to Monitor the LCD Screen
Displaying the Level Marker
DISPLAY SETUP/ LEVEL MARKER OFF
Reviewing and Searching when Recording
Screen Displays during Recording
Zooming
25x Optical Zoom
Move the zoom lever toward W to zoom out (wide- angle). Move it toward T to zoom in (telephoto).
Digital Zoom
Selecting the Zoom Speed
Tips for Making Better Videos
Holding the Camcorder
For More Stability
Lighting
Playing Back a Tape
Special Playback Modes
/ (Playback Pause)
(Fast Forward Playback) / (Rewind Playback)
/ (Reverse Playback)
+/ (Frame Advance) / / (Frame Reverse)
Adjusting the Volume
Playing Back on a TV Screen
TVs with SCART Terminal
TVs with Audio/Video Terminals
Selecting the Type of TV
Selecting the Audio Output Channel
Menus and Settings
Selecting Menus and Settings
Advanced Functions
Menu and Default Settings
Default settings are shown in boldface.
* The item will not appear in mode.
ST-1 ST-2
Advanced Functions
* The item will not appear in mode.
Page
Using the Recording Programs
Easy Recording Program
Recording Programs
Page
Availability of Functions in Each Mode:
Selecting the Easy Recording Program
Set the program selector to .
Selecting a Recording Program
Adjusting the Exposure Manually
Adjusting the Focus Manually
Infinity Focus
Setting the White Balance
Selecting an Image Effect
IMAGE EFFECT OFF
Setting the Shutter Speed
Auto Slow Shutter
Using the LED Light
Press the LIGHT button.
Using the Self-Timer
SELF TIMER OFF
3. Press the start/stop button.
3. Press the PH OTO button, first halfway to activate the autofocus and then fully.
Changing the Recording Mode (SP/LP)
Audio Recording
Changing the Audio Mode
Wind Screen
Page
Effects ( 58)
Card Mix ( 59)
Availability of Digital Effects by Operating Modes:
Selecting a Fader
Selecting an Effect
Selecting the Card Mix Effect
Widescreen TV Recording (16:9)
Press the WIDE SCR button.
Magnifying the Image
1. Move the zoom lever toward T.
2. Select ( , ) the magnified area with the joystick.
Displaying the Data Code
Six-Second Auto Date
End Search
Returning to a Pre-marked Position
1. Press the ZERO SET MEMORY button at the point you wish to return to later.
2. When you have finished playback, rewind the tape.
Date Search
Press the or button to begin searching.
Changing the Display Language
Changing the Date Format
Other Camcorder Settings
Beep
Adjusting the Brightness of the LCD Screen
Turning the Remote Sensor Off
Turning Off the Image Stabilizer
Changing the Display of the Start-Up Image
Demonstration Mode
Recording to a VCR or Digital Video Device
Connecting the Devices
Recording
Page
Recording from Analog Video Devices (VCR, TV or Camcorder)
Recording from Digital Video Devices (DV Dubbing)
Concerning Copyright
Copyright Precaution
Copyright Signals
Converting Analog Signals into Digital Signals (Analog-Digital Converter)
Connecting the Devices
Turning On the Analog-Digital Converter
Audio Dubbing
Connecting an External Audio Device
Dubbing
7. Press the AU DIO DUB. button on the wireless controller.
8. Press th e PAUSE button on the wireless controller to begin dubbing.
9. Press the STOP button on the wireless controller to stop dubbing.
Playing Back the Added Sound
Transferring Video Recordings to a Computer
Transferring Using a DV Cable
Inserting and Removing a Memory Card
Inserting the Card
Removing the Card
Selecting the Image Quality/Size
4. Close the menu.
1024x768
Changing the Still Image Quality during a Tapes Playback
3. Close the menu.
Changing the Movie Size
FINE/640x480
320x240
File Numbers
Recording Still Images on a Memory Card
4. Press the PHOTO button fully.
Recording a Still Image on a Memory Card While Recording Movies on a Tape
STILL IMG REC OFF
Recording from a Tape in the Camcorder
Recording from Other Video Devices
Reviewing a Still Image Right after Recording
Screen Displays during Still Image Recording
CAMERA SETUP REVIEW 2sec
Recording Movies on a Memory Card
Recording from a Tape in the Camcorder
Recording from Other Video Devices
1. Set the camcorder to mode.
Screen Displays during Movie Recording
Selecting the Focusing Point
Playing Back a Memory Card
Slide Show
Index Screen
Card Jump Function
Protecting Images
Protecting in Index Screen Display
Erasing Images
Erasing a Single Image
Erasing All Images
Initializing a Memory Card
Printing Still Images
Connecting the Printer to the Camcorder
Printing after Selecting the Print Settings
1. Press the P.SET button.
2. Select the print settings ( 99). 3. Select ( , ) the [PRINT] option and pres s ( ).
Selecting the Print Settings
Selecting the Number of Copies
Setting the Print Style
Page
Printing with Print Order Settings
Selecting Still Images for Printing (Print Order)
Selecting in Index Screen Display
Erasing All Print Orders
Printing
Transferring Memory Card Images to a Computer
Direct Transfer
Preparations
Digital Video Software
Starting CameraWindow
Connecting the Camcorder to a Computer
Transferring a Selected Image
Transferring a Still Image as Wallpaper
Selecting Images for Transfer (Transfer Order)
Selecting in Index Screen Display
Erasing All Transfer Orders
Screen Displays
Hiding the Displays on the LCD Screen
Hiding/Showing the Displays on the TV Screen
Screen Displays during Recording/Playback
(see also 24)
(see also 90)
List of Messages
Memory Card Related Messages
Direct Print Related Messages
Maintenance/Others
Camcorder Handling Precautions
Storage
Cleaning Camcorder Body and Lens
LCD Screen
Viewfinder
Video Heads
Condensation
Condensation may form in the following cases:
How to avoid condensation:
Battery Pack Handling Precautions
About the battery terminal cover
Lithium Button Battery Handling Precautions
Cassette Handling Precautions
Protecting Tapes from Accidental Erasure
Memory Card Handling Precautions
Using the Camcorder Abroad
Power Sources
Playback on a TV Screen
Troubleshooting
Recording/Playback
Power Source
Recording
Playback
Memory Card Operation
System Diagram
* The BP-2L5 is not available as a separate optional accessory.
Optional Accessories
Battery Packs
CB-2LTE/CB-2LWE Battery Charger
CBC-NB2 Car Battery Charger
WS-20 Wrist Strap
Page
Specifications
MV960/MV950/MV940/MV930
System
Memory Card
CA-570 Compact Power Adapter NB-2LH Battery Pack BP-2L5 Battery Pack
Input/Output Terminals
Power/Others
Index
A
B
C
D
T
U
V
W
Z