Interval training
1 Select Interval Training
Program
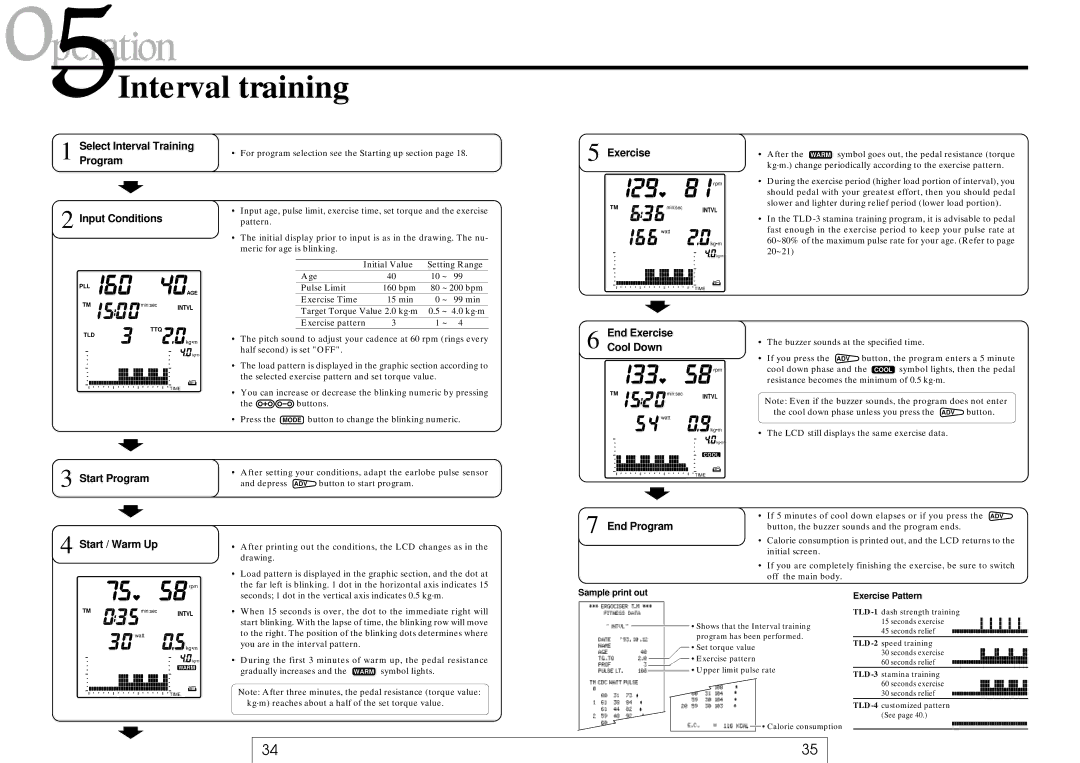
2 Input Conditions
PLL
|
| AGE |
TM | min:sec | INTVL |
|
|
TTQ ![]()
TLD
kg•m
![]()
![]() kg•m
kg•m
TIME
3 Start Program
•For program selection see the Starting up section page 18.
•Input age, pulse limit, exercise time, set torque and the exercise pattern.
•The initial display prior to input is as in the drawing. The nu- meric for age is blinking.
Initial Value | Setting Range | |||
Age | 40 | 10 | ~ | 99 |
Pulse Limit | 160 bpm | 80 | ~ 200 bpm | |
Exercise Time | 15 min | 0 | ~ | 99 min |
|
|
| ||
Target Torque Value 2.0 kg·m | 0.5 | ~ 4.0 kg·m | ||
Exercise pattern | 3 | 1 | ~ | 4 |
• The pitch sound to adjust your cadence at 60 rpm (rings every | ||||||
half second) is set "OFF". | ||||||
• The load pattern is displayed in the graphic section according to | ||||||
the selected exercise pattern and set torque value. | ||||||
• You can increase or decrease the blinking numeric by pressing | ||||||
the |
|
|
|
|
| buttons. |
|
|
|
|
| ||
• Press the | MODE button to change the blinking numeric. | |||||
• After setting your conditions, adapt the earlobe pulse sensor | ||||||
and depress ADV button to start program. | ||||||
5 Exercise
![]() rpm
rpm
TM | min:sec | INTVL |
|
|
watt
![]()
![]()
![]() kg•m
kg•m
![]()
![]() kg•m
kg•m
TIME
End Exercise
6 Cool Down
![]() rpm
rpm
TM | min:sec | INTVL |
|
|
![]()
![]() watt
watt
kg•m
![]()
![]() kg•m
kg•m
COOL
TIME
•After the WARM symbol goes out, the pedal resistance (torque kg·m.) change periodically according to the exercise pattern.
•During the exercise period (higher load portion of interval), you should pedal with your greatest effort, then you should pedal slower and lighter during relief period (lower load portion).
•In the
•The buzzer sounds at the specified time.
•If you press the ADV button, the program enters a 5 minute cool down phase and the COOL symbol lights, then the pedal resistance becomes the minimum of 0.5 kg·m.
Note: Even if the buzzer sounds, the program does not enter the cool down phase unless you press the ADV button.
•The LCD still displays the same exercise data.
4 Start / Warm Up
• After printing out the conditions, the LCD changes as in the |
drawing. |
• Load pattern is displayed in the graphic section, and the dot at |
7 End Program | • If 5 minutes of cool down elapses or if you press the ADV |
button, the buzzer sounds and the program ends. |
•Calorie consumption is printed out, and the LCD returns to the initial screen.
•If you are completely finishing the exercise, be sure to switch off the main body.
![]() rpm
rpm
TM | min:sec | INTVL |
|
|
![]()
![]()
![]() watt
watt
kg•m
![]()
![]() kg•m
kg•m
WARM
TIME
the far left is blinking. 1 dot in the horizontal axis indicates 15 |
seconds; 1 dot in the vertical axis indicates 0.5 kg·m. |
• When 15 seconds is over, the dot to the immediate right will |
start blinking. With the lapse of time, the blinking row will move |
to the right. The position of the blinking dots determines where |
you are in the interval pattern. |
• During the first 3 minutes of warm up, the pedal resistance |
gradually increases and the WARM symbol lights. |
Note: After three minutes, the pedal resistance (torque value: kg·m) reaches about a half of the set torque value.
Sample print out
• Shows that the Interval training program has been performed.
•Set torque value
• Exercise pattern
![]() • Upper limit pulse rate
• Upper limit pulse rate
![]() • Calorie consumption
• Calorie consumption
Exercise Pattern
45 seconds relief
34 | 35 |