Assembly
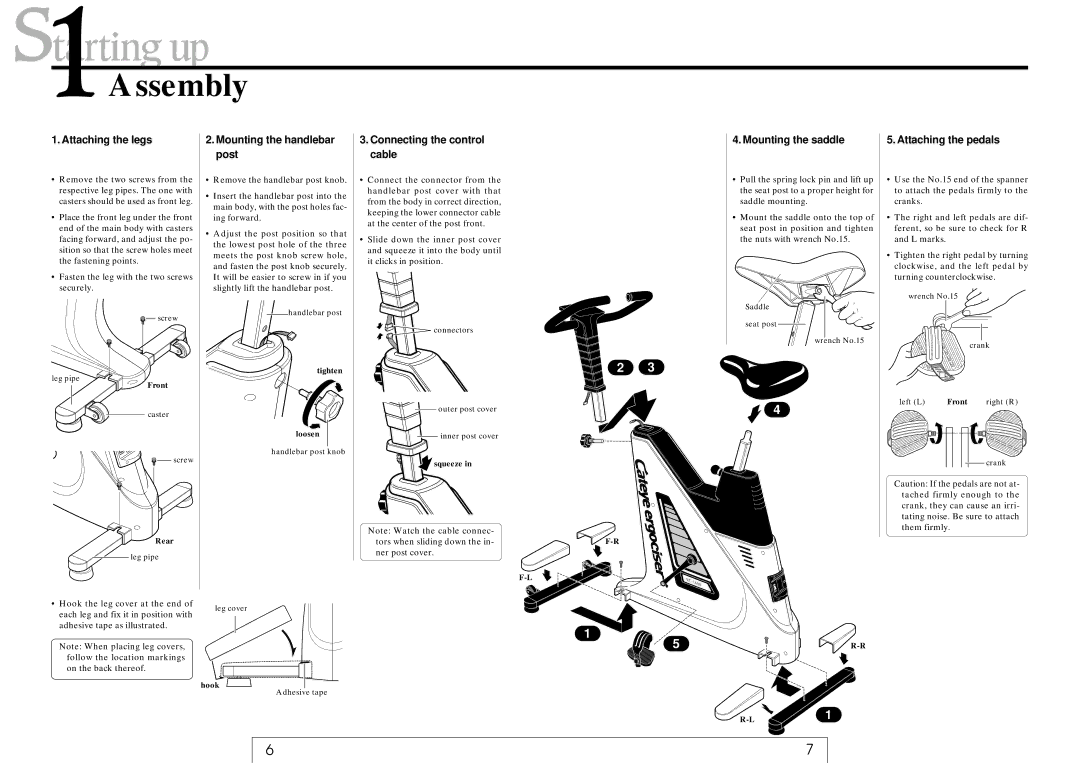
1. Attaching the legs
•Remove the two screws from the respective leg pipes. The one with casters should be used as front leg.
•Place the front leg under the front end of the main body with casters facing forward, and adjust the po- sition so that the screw holes meet the fastening points.
•Fasten the leg with the two screws securely.
![]()
![]() screw
screw
leg pipe
Front
caster
OF | F |
![]()
![]() screw
screw
Rear
leg pipe
•Hook the leg cover at the end of each leg and fix it in position with adhesive tape as illustrated.
Note: When placing leg covers, follow the location markings on the back thereof.
2.Mounting the handlebar post
•Remove the handlebar post knob.
•Insert the handlebar post into the main body, with the post holes fac- ing forward.
•Adjust the post position so that the lowest post hole of the three meets the post knob screw hole, and fasten the post knob securely. It will be easier to screw in if you slightly lift the handlebar post.
![]() handlebar post
handlebar post
tighten
loosen
handlebar post knob
leg cover
hook
Adhesive tape
3.Connecting the control cable
•Connect the connector from the handlebar post cover with that from the body in correct direction, keeping the lower connector cable at the center of the post front.
•Slide down the inner post cover and squeeze it into the body until it clicks in position.
![]()
![]() connectors
connectors
2 3
![]() outer post cover
outer post cover
![]() inner post cover
inner post cover
![]() squeeze in
squeeze in
Note: Watch the cable connec-
tors when sliding down the in-F-Rner post cover.
E |
| |
| C- |
|
| 16 | |
|
| 00 |
1
5
4. Mounting the saddle
•Pull the spring lock pin and lift up the seat post to a proper height for saddle mounting.
•Mount the saddle onto the top of seat post in position and tighten the nuts with wrench No.15.
Saddle
seat post
wrench No.15
4
5. Attaching the pedals
•Use the No.15 end of the spanner to attach the pedals firmly to the cranks.
•The right and left pedals are dif- ferent, so be sure to check for R and L marks.
•Tighten the right pedal by turning clockwise, and the left pedal by turning counterclockwise.
wrench No.15
crank
left (L) |
| Front |
| right (R) |
|
|
|
|
|
|
|
|
|
|
![]() crank
crank
Caution: If the pedals are not at- tached firmly enough to the crank, they can cause an irri- tating noise. Be sure to attach them firmly.
6 | 7 |