Instruction Manual

SMART-LIFT 236 Electric Ceiling Lifts


11.After installing the lift, use the test push button to carefully operate the lift all the way up and down to be sure the clear- ances are adequate. Be prepared to stop the lift immediately if the lift begins to sound labored or if one side or the other side begins to travel slower.

12.To maintain plenum rating, seal any openings in the lift hous- ing (except joist tabs) using foil tape.

Installation in a Wood Framework (or Side-Mounted to Joists)

A suitable framework must be constructed to support the lift in the ceiling. Refer to for dimensions of the lift. The lift housing has mounting tabs to assist in side-mounting the lift to the ceiling joists or otherwise securing it to a wood framework.

The ideal lift installation time is after the sheetrock has been installed, but before the sheetrock has been mudded or finished.

1.Remove the closure panel from the bottom of the lift to gain access to the front and back mounting holes.

CAUTION: For smooth and reliable operation, the lift must be installed square and parallel in all dimensions. Avoid stressing the lift at any time during installation.

2. Position the lift in the desired location, making sure the unit is level, square, parallel and there is no stress applied to the box (chassis).

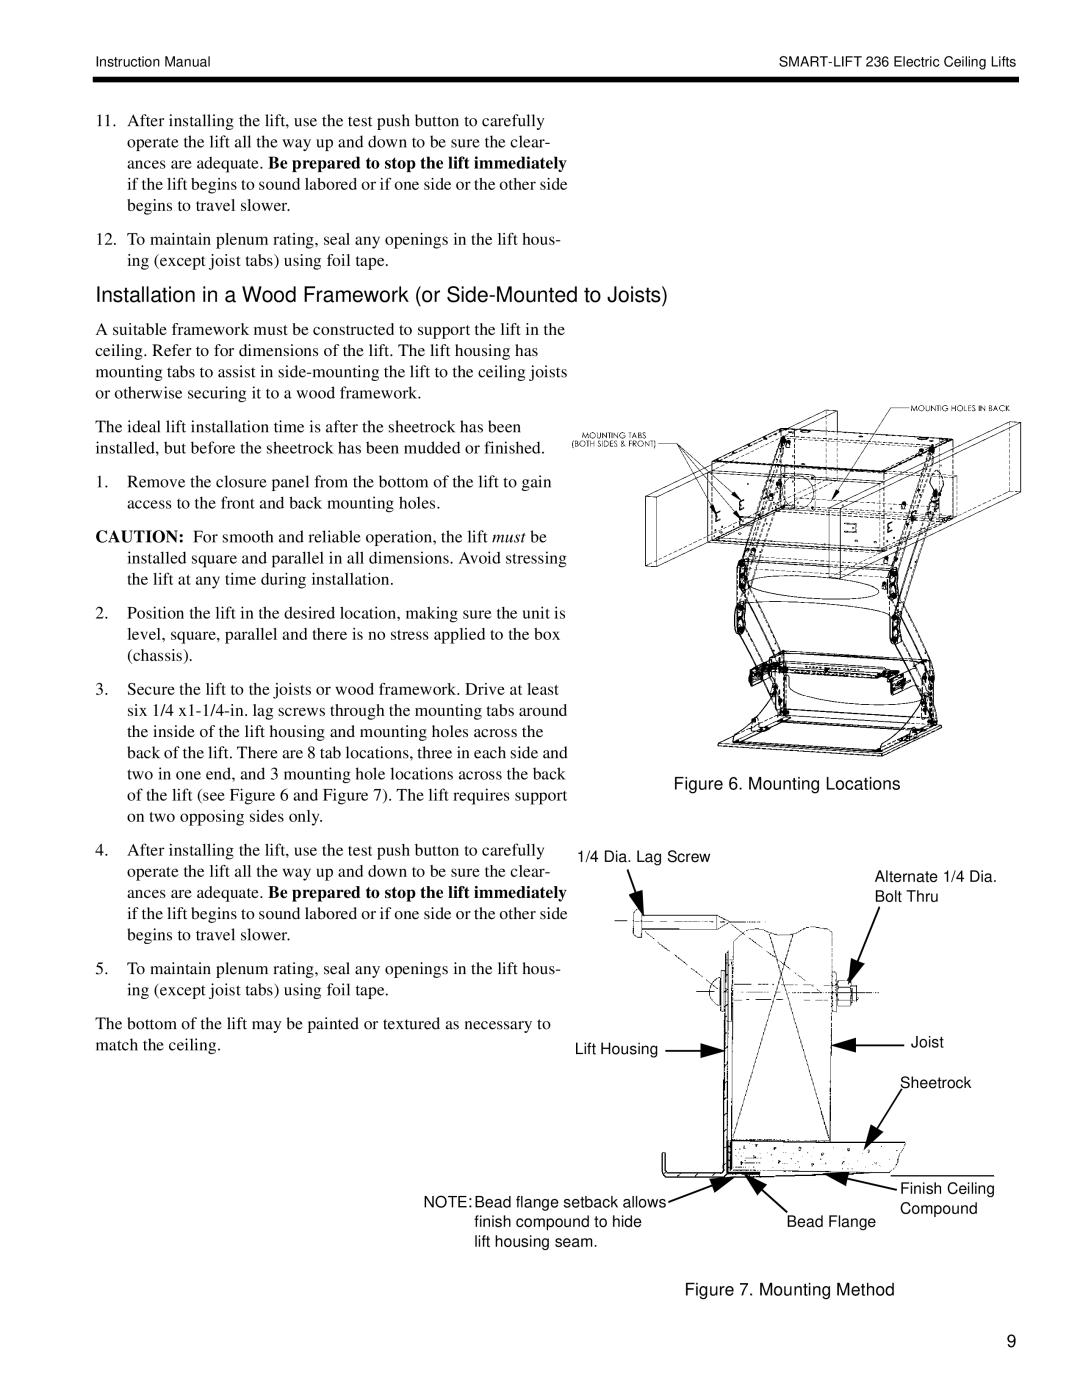
3. Secure the lift to the joists or wood framework. Drive at least six 1/4 x1-1/4-in. lag screws through the mounting tabs around the inside of the lift housing and mounting holes across the back of the lift. There are 8 tab locations, three in each side and two in one end, and 3 mounting hole locations across the back

Figure 6. Mounting Locations

of the lift (see Figure 6 and Figure 7). The lift requires support on two opposing sides only.

4.After installing the lift, use the test push button to carefully operate the lift all the way up and down to be sure the clear- ances are adequate. Be prepared to stop the lift immediately if the lift begins to sound labored or if one side or the other side begins to travel slower.

5.To maintain plenum rating, seal any openings in the lift hous- ing (except joist tabs) using foil tape.

The bottom of the lift may be painted or textured as necessary to match the ceiling.

1/4 Dia. Lag Screw

Lift Housing

Alternate 1/4 Dia.

Bolt Thru

Joist

Sheetrock

NOTE: Bead flange setback allows finish compound to hide lift housing seam.

Finish Ceiling

Compound

Bead Flange

Figure 7. Mounting Method

9

Page 10
Image 10
Chief Manufacturing SL-236 Installation in a Wood Framework or Side-Mounted to Joists, Mounting Locations

SL-236 specifications

The Chief Manufacturing SL-236 is a versatile and innovative solution designed to enhance the way we utilize space in various environments. This sturdy and stylish mounting system is ideal for displaying flat panel screens and is particularly well-suited for commercial and educational settings, as well as home theaters.

One of the main features of the SL-236 is its exceptional build quality. Constructed from high-strength materials, this mount provides reliable support for a wide range of screen sizes, accommodating displays from 37 inches all the way up to 70 inches. The robust design ensures that the screens remain securely in place, reducing the risk of accidents or damage.

Another standout characteristic of the SL-236 is its extensive range of motion. The mount allows for tilt, pan, and lift adjustments, providing users with the flexibility to position their screens at the most optimal viewing angles. The effortless adjustment mechanisms enable quick reconfiguration for different settings or preferences, making it a user-friendly option for those who frequently adjust their display setups.

In addition to its functional attributes, the Chief Manufacturing SL-236 incorporates advanced technology to enhance performance. The mount is designed with integrated cable management solutions, keeping wires organized and minimizing clutter. This not only contributes to a cleaner aesthetic but also helps maintain the overall integrity and functionality of the display system.

Ease of installation is another significant advantage of the SL-236. The mount comes with a comprehensive installation guide and includes all necessary hardware, streamlining the process for end users. This ease of setup makes it an attractive option for both professional installers and DIY enthusiasts.

The SL-236 also boasts a sleek, modern design that can seamlessly blend into various environments. Its aesthetic appeal is complemented by its robust performance, making it a popular choice among users who prioritize both form and function.

In summary, the Chief Manufacturing SL-236 is a top-tier mounting solution that combines durability, flexibility, and user-friendly features. With its extensive range of motion, superior build quality, advanced cable management, and ease of installation, it stands out as an exemplary choice for anyone looking to optimize their viewing experience while ensuring safety and style. Whether for commercial, educational, or residential use, the SL-236 is a premier solution for modern display needs.