Dell 3400MP Projector
May 2005 Rev. A00
Contents
NOM Information Mexico Only
Using the On-Screen Display
Your Dell Projector
Package Contents
About Your Projector
Connecting Your Projector
Connecting Your Projector
Connecting to a DVD Player
Connecting to a Computer
Connecting a DVD Player with an S-video Cable
Connecting a DVD Player with a Component Cable
Connecting a DVD Player with a Composite Cable
Connecting Your Projector
Turning Your Projector Off
Using Your Projector
Using Your Projector
Turning Your Projector On
Raising the Projector Height
Adjusting the Projected Image
Lowering the Projector Height
Adjusting the Projector Zoom and Focus
Diagonal
Adjusting Projection Image Size
Using the Control Panel
Using the Remote Control
PC mode, Movie mode, Game Mode, sRGB, or
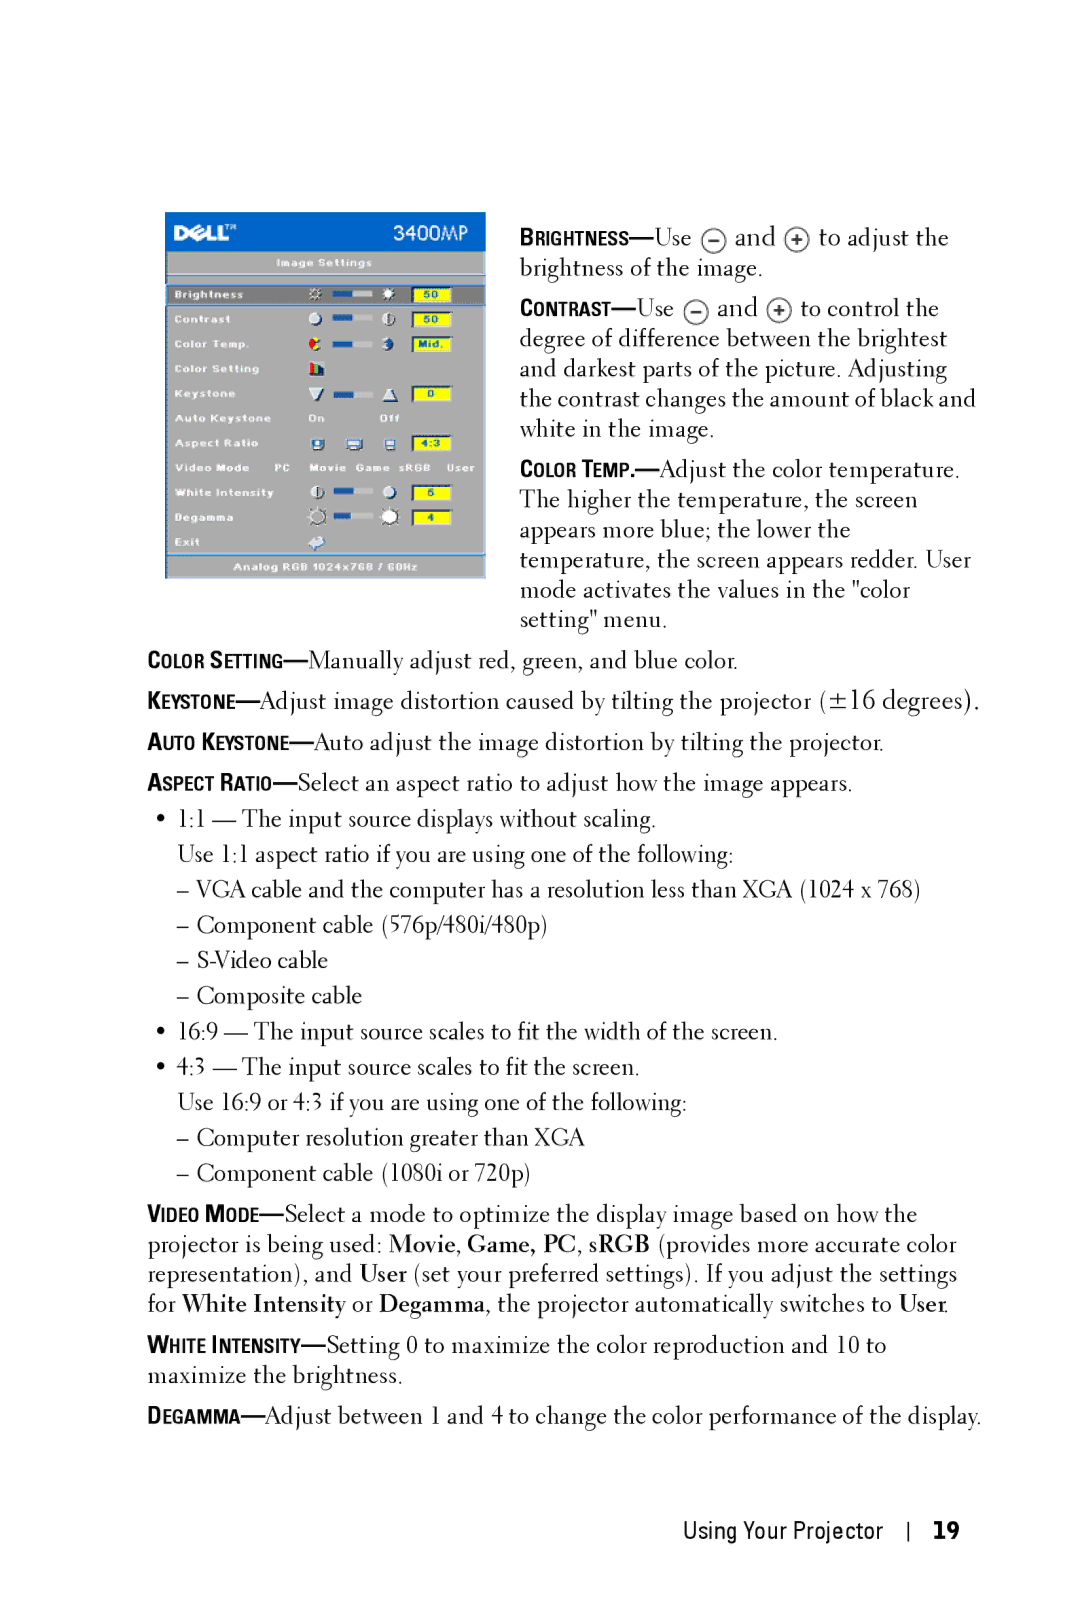
Image Settings
Using the On-Screen Display
To adjust
Management Menu
Audio Menu
Language Menu
Factory Reset Menu
Video Source Menu
Computer Source Menu
Increase the sharpness
Problem
Troubleshooting Your Projector
Troubleshooting Your Projector
Source tab
Possible Solution
Problem
Changing the Lamp
Self-diagnostic for Video
Troubleshooting Your Projector
Troubleshooting Your Projector
Specifications
Specifications
PCBC, CCC, PSB, EZU, NOM, S
Compatibility Modes
Specifications
International
Access Code Toll-Free Numbers Country Code City Code
Contacting Dell
Country City
Argentina Buenos Aires
Area Codes
Aruba
Sydney
Australia
0011
Bahamas
Austria Vienna Website support.euro.dell.com
Barbados
Bolivia
Belgium Website support.euro.dell.com Brussels
Emaildell
Bermuda
York, Ontario
Brunei
673
Canada North
China Xiamen
International Website and E-Mail Address
Support.dell.com.cn
420
Colombia
Costa Rica
Czech Republic Website support.euro.dell.com Prague
Dominican
Denmark Website support.euro.dell.com Copenhagen
Ldell
Dominica
Finland Website support.euro.dell.com Helsinki
Country Code City Code
358
Corporate
Guatemala
Germany Langen
Greece Website support.euro.dell.com
Grenada
India
353
Ireland Cherrywood
Jamaica
Italy Milan Website support.euro.dell.com
Japan Kawasaki Website support.jp.dell.com
Korea Seoul
Macao
Latin America
Luxembourg Website support.euro.dell.com
352
Netherlands
Malaysia Website support.ap.dell.com Penang
Mexico
Montserrat
New Zealand
Netherlands Amsterdam
Nicaragua
Poland Warsaw Website support.euro.dell.com
Norway Lysaker Website support.euro.dell.com
Panama
Peru
St. Kitts
Portugal Website support.euro.dell.com
Ldell 351
Puerto Rico
09/091
Slovakia Prague Website support.euro.dell.com
421
South Africa Website support.euro.dell.com Johannesburg
Dell
Spain Madrid Website support.euro.dell.com
Sweden Website support.euro.dell.com Upplands Vasby
Taiwan Website support.ap.dell.com
Trinidad/Tobago
Thailand Website support.ap.dell.com
Turks and Caicos
Uruguay
Bracknell Website support.euro.dell.com
Texas
A. Austin
Business
Virgin General Support Islands Venezuela 8001-3605
FCC Notices U.S. Only
Appendix Regulatory Notices
Appendix Regulatory Notices
FCC Identification Information
NOM Information Mexico Only
Glossary
Glossary
Glossary
Glossary
Glossary
Index
Index
Index
Manuel de lutilisateur
Restrictions et Limites de Garantie
Remarques, notice, et précautions
Connexion à un lecteur DVD
Table des matières
Réglage de la taille de limage projetée
Information NOM Mexique Seulement 135
Auto-diagnostic pour vidéo
Menu source de lordinateur
133
Votre projecteur Dell
Votre projecteur Dell
Propos de votre projecteur
Connexion de votre projecteur
Connexion de votre projecteur
Connexion à un lecteur DVD
Connexion à un ordinateur
Connexion à un lecteur DVD avec un câble S-vidéo
Connexion d’un lecteur DVD avec un câble composantes
Connexion d’un lecteur DVD avec un câble composite
Connexion de votre projecteur
Utilisation de votre projecteur
Utilisation de votre projecteur
Mise en marche de votre projecteur
Extinction de votre projecteur
Réglage de la hauteur du projecteur
Réglage de limage projetée
Abaissement du projecteur
Réglage du zoom et de la mise au point du projecteur
Diagonale
Réglage de la taille de limage projetée
Utilisation du panneau de contrôle
Utilisation de votre projecteur
Utilisation de la télécommande
Mode Jeu, sRVB ou mode Utilisateur
Paramètres de limage
Utilisation de laffichage décran
Pour régler la
Menu Gestion
Menu Audio
Menu Langue
Menu source de lordinateur
Menu Réinit. dUsine
Remarque réglez tout d’abord la Fréquence puis le Suivi
Menu de source vidéo
Dépanner votre projecteur
Problème Solution Possible
Dépanner votre projecteur
Dordinateur de lOSD
Problème
Menu Paramètres dimage dans lOSD
Remplacer la lampe
Auto-diagnostic pour vidéo
Dépanner votre projecteur
98 Dépanner votre projecteur
Spécifications
Spécifications
100 Spécifications
Spécifications 101
Modes de Compatibilité
102 Spécifications
Contacter Dell
104 Contacter Dell
International Code
Contacter Dell 105
Australie Sydney
Barbade La
Autriche Vienne
900
Site Web support.euro.dell.com
Brésil
Belgique Bruxelles
Bermudes
Bolivie
Iles Caïmans
011
108 Contacter Dell
Technique support.dell.com.cn
Chili Santiago
Chine Xiamen
592
République Site Web support.euro.dell.com Tchèque Prague
Colombie
110 Contacter Dell
Dominicaine Équateur
Denemark Site Web support.euro.dell.com Copenhague
Dominique
République
990
Finlande Helsinki
112 Contacter Dell
Entreprise
Code du pays 33 Particulier et petite entreprise
Contacter Dell 113
Grenade
Allemagne Langen
6103 Site Web support.euro.dell.com
Grèce Site Web support.euro.dell.com
001
Guatémala
Guyane
Hong Kong Site Web support.ap.dell.com
116 Contacter Dell
Irlande Site Web support.euro.dell.com Cherrywood
Jamaïque
Italie Milan Site Web support.euro.dell.com
Ell
Particulier et petite entreprise
118 Contacter Dell
Japon Kawasaki Site Web support.jp.dell.com
Contacter Dell 119
Amérique latine
Corée Séoul
120 Contacter Dell
853
Luxembourg Site Web support.euro.dell.com
Contacter Dell 121
122 Contacter Dell
Malaisie Penang
Mexique
Néerlandaises
Contacter Dell 123
Pays-Bas Site Web support.euro.dell.com Amsterdam
Pérou
Nouvelle
Zélande
Norvège Site Web support.euro.dell.com Lysaker
St. Kitts et Nevis
Polone Varsovie Site Web support.euro.dell.com
Portugal Site Web support.euro.dell.com
Porto Rico
126 Contacter Dell
Singapour Site Web support.ap.dell.com
005
Slovaquie Site Web support.euro.dell.com Prague
Pacifique
Afrique du Sud Site Web support.euro.dell.com Johannesburg
Pays dAsie du
Sud-Est et du
128 Contacter Dell
Suisse Genève Site Web support.euro.dell.com
Thaïlande Site Web support.ap.dell.com
Taïwan
002
886 Site Web support.ap.dell.com
1344
Commerce
A. Austin, Texas
Contacter Dell 131
132 Contacter Dell
Vénézuéla
Classe a
Appendice Notices de Réglementation
134 Appendice Notices de Réglementation
Informations didentification de la FCC
Information NOM Mexique Seulement
Appendice Notices de Réglementation
Glossaire 137
Glossaire
138 Glossaire
Glossaire 139
140 Glossaire
Index 141
142 Index
Manual del propietario
Restricciones y renuncia de responsabilidades
Notas, avisos y precauciones
153
Tabla de contenidos
156
Auto-diagnóstico para el vídeo 170
157
158
Uso de los menús en pantalla 160
Su proyector Dell 147
Su proyector Dell
148 Su proyector Dell
Acerca de su proyector
Conectando su proyector 149
Conectando su proyector
150 Conectando su proyector
Conectando a una computadora
Conectando a un reproductor DVD
Conectando a un reproductor DVD con un cable S-video
Conectando un reproductor DVD con un cable de componentes
Conectando un reproductor DVD con un cable compuesto
Conectando su proyector 151
Conectando su proyector
Encendido del proyector
Uso del proyector
Apagado del proyector
154 Uso del proyector
Ajuste de la imagen proyectada
Ajuste de la altura del proyector
Bajando la altura del proyector
Uso del proyector 155
Ajuste del foco y zoom del proyector
156 Uso del proyector
Ajuste del tamaño de la imagen de proyección
Uso del proyector 157
Uso del panel de control
158 Uso del proyector
Uso del mando a distancia
Uso del proyector 159
Modo juego, sRGB o modo usuario para que el
160 Uso del proyector
Uso de los menús en pantalla
Uso del proyector 161
Configuración de imagen
162 Uso del proyector
Menú Audio
Uso del proyector 163
Menú Administración
164 Uso del proyector
Menú Lenguaje
Menú Restaurar
Menú de Restaurar
Uso del proyector 165
Menú de Fuente video
Uso del proyector
Localización de fallas en su proyector
Problema
Localización de fallas en su proyector 167
168 Localización de fallas en su proyector
Seleccione Configuración
Posible Solución
Ordenador en el OSD
Localización de fallas en su proyector 169
Cambio de la lámpara
Auto-diagnóstico para el vídeo
170 Localización de fallas en su proyector
Localización de fallas en su proyector 171
Precaución Eliminación de la lámpara sólo para EE.UU
Localización de fallas en su proyector
Especificaciones 173
Especificaciones
174 Especificaciones
Especificaciones 175
Modos de compatibilidad
Especificaciones
Cómo ponerse en contacto con Dell
178 Cómo ponerse en contacto con Dell
Australia Sydney
Código de acceso
179
Sitio web support.euro.dell.com
Austria Viena
180 Cómo ponerse en contacto con Dell
Británicas
Bélgica Bruselas
Brasil
Islas Vírgenes
Islas Caimán
Canadá North
182 Cómo ponerse en contacto con Dell
183
Chile Santiago Ventas, soporte al cliente y soporte
Código del país Técnico
Código del país support.dell.com.cn
184 Cómo ponerse en contacto con Dell
República Checa Sitio web support.euro.dell.com Praga
185
Dinamarca Sitio web support.euro.dell.com Copenague
República
Dominicana Ecuador
186 Cómo ponerse en contacto con Dell
Finlandia Sitio web support.euro.dell.com Helsinki
187
Francia Paris Sitio web support.euro.dell.com Montpellier
Pequeñas y micro empresas
Corporativo
188 Cómo ponerse en contacto con Dell
Alemania Sitio web support.euro.dell.com Langen
189
Grecia Sitio web support.euro.dell.com
La India
Hong Kong Sitio web support.ap.dell.com
190 Cómo ponerse en contacto con Dell
191
Irlanda Sitio web support.euro.dell.com Cherrywood
Ell Pequeñas y micro empresas
Italia Milán Sitio web support.euro.dell.com
192 Cómo ponerse en contacto con Dell
Sitio web support.jp.dell.com
Japón Kawasaki
193
194 Cómo ponerse en contacto con Dell
195
Corea Seúl
América Latina
Luxemburgo Sitio web support.euro.dell.com
Holandesas
Malasia Penang Sitio web support.ap.dell.com
México
Antillas
197
Holanda Sitio web support.euro.dell.com Amsterdam
Perú
Nueva Zelandia
Noruega Sitio web support.euro.dell.com Lysaker
Panamá
Grenadines
Polonia Sitio web support.euro.dell.com Varsovia
Portugal Sitio web support.euro.dell.com
Nevis Sta. Lucia
200 Cómo ponerse en contacto con Dell
Singapur Sitio web support.ap.dell.com
Eslovaquia Sitio web support.euro.dell.com Praga
Sud Africa Sitio web support.euro.dell.com Johannesburgo
España Madrid Sitio web support.euro.dell.com
Países del sudeste
Asiático y el
Pacífico
202 Cómo ponerse en contacto con Dell
Suiza Ginebra Sitio web support.euro.dell.com
Tobago Islas Turks y
Código del país Latitude, Inspiron, Dimension, y
Tailandia Sitio web support.ap.dell.com
Trinidad y
204 Cómo ponerse en contacto con Dell
Negocios
EE.UU. Austin
205
Los EE.UU Venezuela
Islas Vírgenes de
206 Cómo ponerse en contacto con Dell
Apéndice Informaciones regulatorias 207
Información de la FCC sólo para EE.UU
208 Apéndice Informaciones regulatorias
Información NOM sólo México
Apéndice Informaciones regulatorias 209
210 Apéndice Informaciones regulatorias
Glosario 211
Glosario
W . d e l l . c o m s u p p o r t . d e l l . c o m
Glosario 213
W . d e l l . c o m s u p p o r t . d e l l . c o m
Índice 215
Índice
216 Índice
Manual do Proprietário
Restriçoes e Renúncias
Notas, Advertências e Precauçoes
227
Conteúdo
224
Conexão a um aparelho de DVD 224
Auto-diagnóstico para Vídeo 244
231
232
234
Projetor Dell 221
Projetor Dell
222 Projetor Dell
Sobre o projetor
Conexão do projetor 223
Conexão do projetor
224 Conexão do projetor
Conexão a um computador
Conexão a um aparelho de DVD
Conexão do aparelho de DVD com um cabo S-video
Conexão do aparelho de DVD com um cabo de componente
Conexão do aparelho de DVD com um cabo composto
Conexão do projetor
Uso do projetor 227
Uso do projetor
Como ligar o projetorr
Como desligar o projetor
Como diminuir a altura do projetor
Ajuste da imagem projetada
Ajuste do zoom e do foco do projetor
Como aumentar a altura do projetor
Uso do projetor 229
230 Uso do projetor
Ajuste do tamanho da imagem projetada
Uso do projetor 231
Uso do painel de controle
232 Uso do projetor
Uso do controle remoto
Uso do projetor 233
234 Uso do projetor
Uso do OSD
Uso do projetor 235
Configurações de imagem
236 Uso do projetor
Menu Áudio
Uso do projetor 237
Menu Administração
238 Uso do projetor
Menu Idioma
Menu de Conf. Original
Menu Fonte do computador
Nota Ajuste primeiro a Freqüência e, depois, o Tracking
Menu Fonte de vídeo
Uso do projetor 239
Uso do projetor
Problema Possível Soluçao
Localizando problemas no seu Projetor
241
Computadortab
242 Localizando problemas no seu Projetor
Possível Soluçao continuação
Ajustes tab
243
TEMPERATURAluz está
Auto-diagnóstico para Vídeo
244 Localizando problemas no seu Projetor
Troca da lâmpada
245
Precauçao Descarte da Lâmpada Somente para os EUA
W . d e l l . c o m s u p p o r t . d e l l . c o m
Especificaçoes 247
Especificaçoes
248 Especificaçoes
Especificaçoes 249
Modos de compatibilidade
Especificaçoes
Entre em contato com a Dell
252 Entre em contato com a Dell
Código Serviço
Entre em contato com a Dell 253
Support.euro.dell.com
Áustria Viena
254 Entre em contato com a Dell
Bolívia
Bélgica
Bruxelas Support.euro.dell.com
Bermudas
Ilhas Cayman
York, Ontário
256 Entre em contato com a Dell
Entre em contato com a Dell 257
258
Código do País support.dell.com.cn
Tcheca Praga Support.euro.dell.com
Colômbia
Entre em contato com a Dell 259
260 Entre em contato com a Dell
Dinamarca
Copenhagen Support.euro.dell.com
Dominicana Equador
Entre em contato com a Dell 261
Finlândia
Helsinki Support.euro.dell.com
Ell 358
262 Entre em contato com a Dell
France Paris
Montpellier Support.euro.dell.com
Ell Micro e Pequenos Negócios
Entre em contato com a Dell 263
AlemanhaLange
Guiana
Grécia
264 Entre em contato com a Dell
Entre em contato com a Dell 265
Hong Kong
Support.ap.dell.com
Índia
266 Entre em contato com a Dell
Entre em contato com a Dell 267
Itália Milao
Support.jp.dell.com
Japao Kawasaki
268 Entre em contato com a Dell
Entre em contato com a Dell 269
270 Entre em contato com a Dell
Coreia Seoul
Entre em contato com a Dell 271
Antilhas
Malásia Penang
272 Entre em contato com a Dell
Entre em contato com a Dell 273
Lysaker Support.euro.dell.com
Nova Zelândia
Nicarágua
Noruega
Sao Cristóvao e
Polônia
Varsóvia Support.euro.dell.com
Portugal
276 Entre em contato com a Dell
Singapura
Singapura Support.ap.dell.com
Slováquia Praga
Da Ásia e Pacífico
África do Sul
Joanesburgo Support.euro.dell.com
Países do Sudeste
Vasby Support.euro.dell.com
Suécia Upplands
Suíça Genebra
Trindade/Tobago
Taiwan
886
Tailândia
280 Entre em contato com a Dell
Bracknell Site na internet Código Support.euro.dell.com
598-2521
Uruguai Assistência Geral
Entre em contato com a Dell 281
Negócios
Entre em contato com a Dell 283
Ilhas Assistência Geral Virgens Venezuela 8001-3605
Entre em contato com a Dell
Appendix Regulatory Notices 285
Advertências da FCC Apenas para os Estados Unidos
286 Appendix Regulatory Notices
Informaçao NOM Apenas para o México
Glossário 287
Glossário
288 Glossário
Glossário 289
290 Glossário
Índice 291
292 Índice