Preset memory

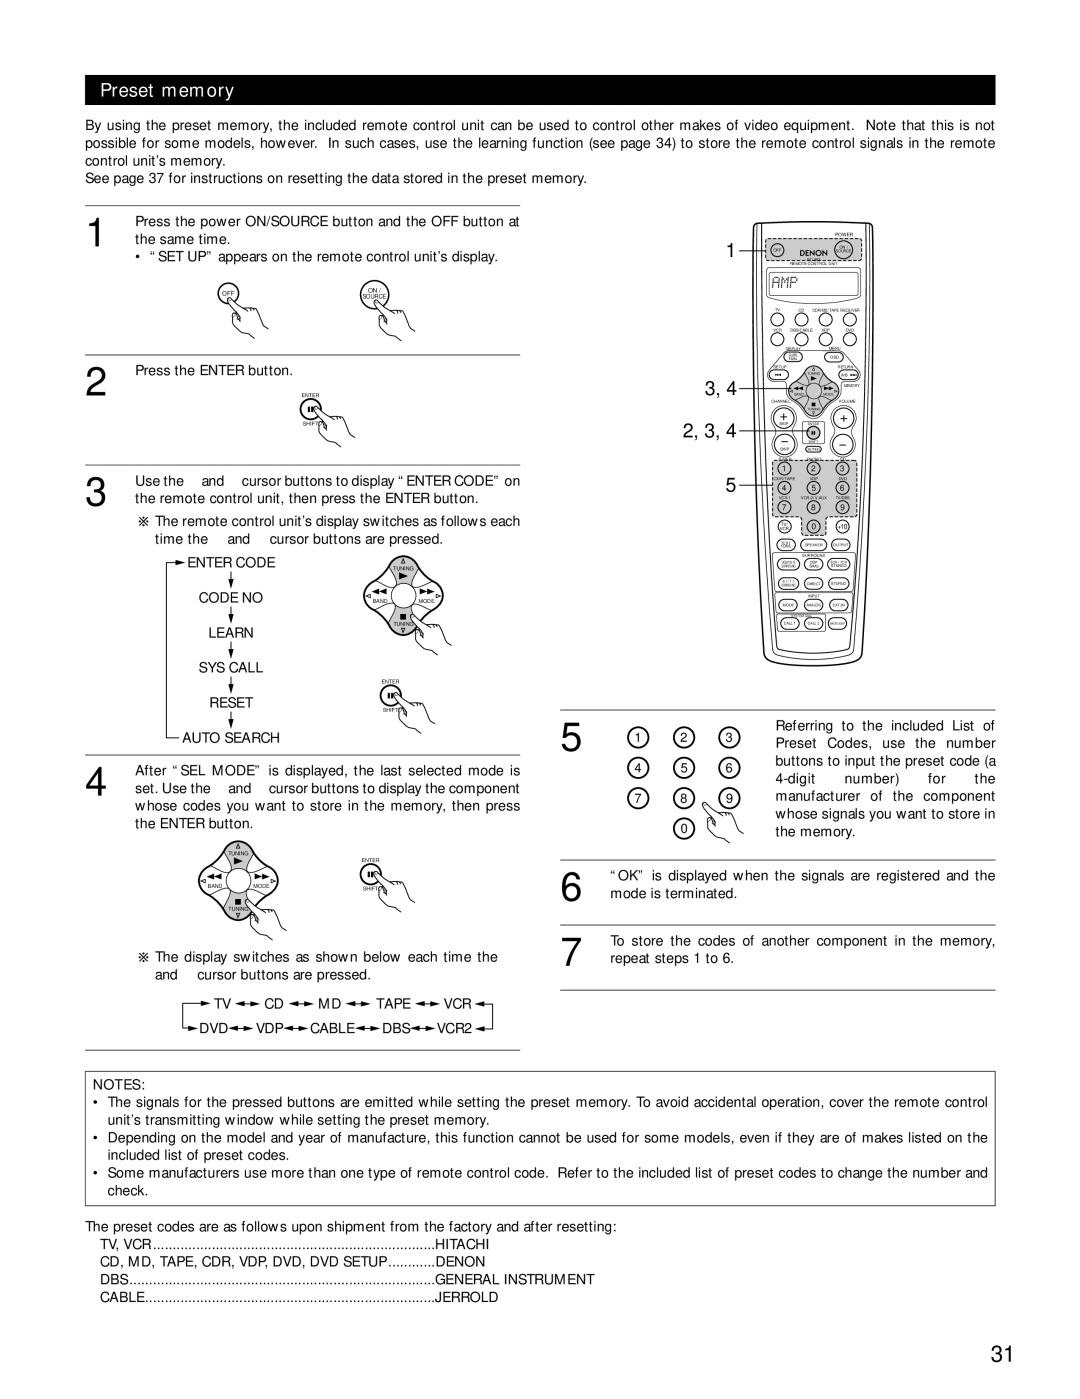
By using the preset memory, the included remote control unit can be used to control other makes of video equipment. Note that this is not possible for some models, however. In such cases, use the learning function (see page 34) to store the remote control signals in the remote control unit’s memory.

See page 37 for instructions on resetting the data stored in the preset memory.

1

Press the power ON/SOURCE button and the OFF button at


the same time.


• “SET UP” appears on the remote control unit’s display.

OFF

ON /

SOURCE


POWER

1

OFF


ON /


SOURCE


RC-883


REMOTE CONTROL UNIT


TV

CD CDR/MD/ TAPE RECEIVER


VCR

DBS/CABLE

VDP

DVD

2

Press the ENTER button. ENTER


SHIFT

3, 4 2, 3, 4

DISPLAY


MENU

SURR.


OSD

PARA.


SETUP


RETURN


TUNING

A/B


MEMORY

BAND


MODE

CHANNEL


VOLUME

+

TUNING

+


SKIP

ENTER

-

SHIFT

-

SKIP

MUTING

TUNER PHONO CD

1 2 3

3

Use the D and H cursor buttons to display “ENTER CODE” on


the remote control unit, then press the ENTER button.


The remote control unit’s display switches as follows each


time the D and H cursor buttons are pressed.


ENTER CODE


TUNING


CODE NO

BAND

MODE


TUNING

5

CDR/TAPE

VDP

DVD

4

5

6


VCR-1

VCR-2/V.AUX

TV/DBS


7

8

9


TV/

0

+10


VCR


TEST

SPEAKER

OUTPUT


TONE


SURROUND


DOLBY/DTS

DSP

5CH / 7CH


SURROUND

SIMU.

STEREO


6.1 / 7.1

DIRECT

STEREO


SURROUND


INPUT


MODE

ANALOG

EXT.IN


SYSTEM CALL


CALL 1

CALL 2

BACKLIGHT


LEARN


SYS CALL


ENTER


RESET

SHIFT

5


AUTO SEARCH


1

2

3


4

After “SEL MODE” is displayed, the last selected mode is


4

5

6

set. Use the D and H cursor buttons to display the component


7

8

9


whose codes you want to store in the memory, then press


the ENTER button.

0


TUNING


ENTER

Referring to the included List of Preset Codes, use the number buttons to input the preset code (a

4-digit number) for the manufacturer of the component whose signals you want to store in the memory.

BAND

MODE

SHIFT

6

“OK” is displayed when the signals are registered and the


mode is terminated.

TUNING

The display switches as shown below each time the D

7

To store the codes of another component in the memory,


repeat steps 1 to 6.

and H cursor buttons are pressed.


TV CD MD TAPE VCR

DVD VDPCABLEDBSVCR2

NOTES:

The signals for the pressed buttons are emitted while setting the preset memory. To avoid accidental operation, cover the remote control unit’s transmitting window while setting the preset memory.

Depending on the model and year of manufacture, this function cannot be used for some models, even if they are of makes listed on the included list of preset codes.

Some manufacturers use more than one type of remote control code. Refer to the included list of preset codes to change the number and check.

The preset codes are as follows upon shipment from the factory and after resetting:

TV, VCR

HITACHI

CD, MD, TAPE, CDR, VDP, DVD, DVD SETUP

DENON

DBS

GENERAL INSTRUMENT

CABLE

JERROLD

31

Page 31
Image 31
Denon AVR-3802 manual 2, 3

AVR-3802 specifications

The Denon AVR-3802 is a noteworthy feature-rich audio/video receiver that stands out in the realm of home theater systems. Released in the early 2000s, it continues to be appreciated by audiophiles and home cinema enthusiasts alike, thanks to its robust performance and advanced technologies.

One of the standout features of the AVR-3802 is its impressive power output. With a 110 watts per channel rating over 7 channels, it provides ample power to drive a variety of speakers, allowing users to create a dynamic home theater experience. This results in clear, powerful sound across a range of audio formats, from music to movies.

The AVR-3802 is equipped with a comprehensive array of inputs and outputs. It includes multiple analog and digital inputs, allowing for the connection of various audio sources such as CD players, DVD players, and gaming consoles. Additionally, the receiver supports up to seven channels of surround sound, making it compatible with numerous audio formats including Dolby Digital and DTS, which are crucial for cinematic sound experiences.

Another key feature is the incorporation of Denon's proprietary technologies, such as the "Advanced Surround Processing" which enhances the spatial audio experience. This feature helps in creating an immersive environment, utilizing different sound processing modes tailored for different content types, whether it's a concert, movie, or video game.

Denon has also ensured that the AVR-3802 displays excellent video performance. It offers multiple video inputs, including composite, S-video, and component video, facilitating high-quality video playback. The receiver supports up to 1080p video resolution, ensuring compatibility with high-definition displays. Additionally, it includes a built-in video upscaling feature that enhances lower resolution content to optimize the viewing experience.

The user interface on the AVR-3802 is designed with usability in mind. A large, easy-to-read display combined with intuitive remote control navigation simplifies the process of adjusting settings, programming presets, and switching between inputs.

In summary, the Denon AVR-3802 remains a solid choice for those seeking a high-performance audio/video receiver. With its robust power handling, versatile connectivity options, advanced surround sound processing, and high-definition video capabilities, it provides an excellent foundation for building a home entertainment system. Enthusiasts can enjoy rich, immersive audio experiences coupled with stunning video quality, making the AVR-3802 a lasting component in the world of home theaters.