FIREPLACE INSTALLATION

Installing Optional Blower Accessories (Cont.)

17

FIREPLACE INSTALLATION

Continued

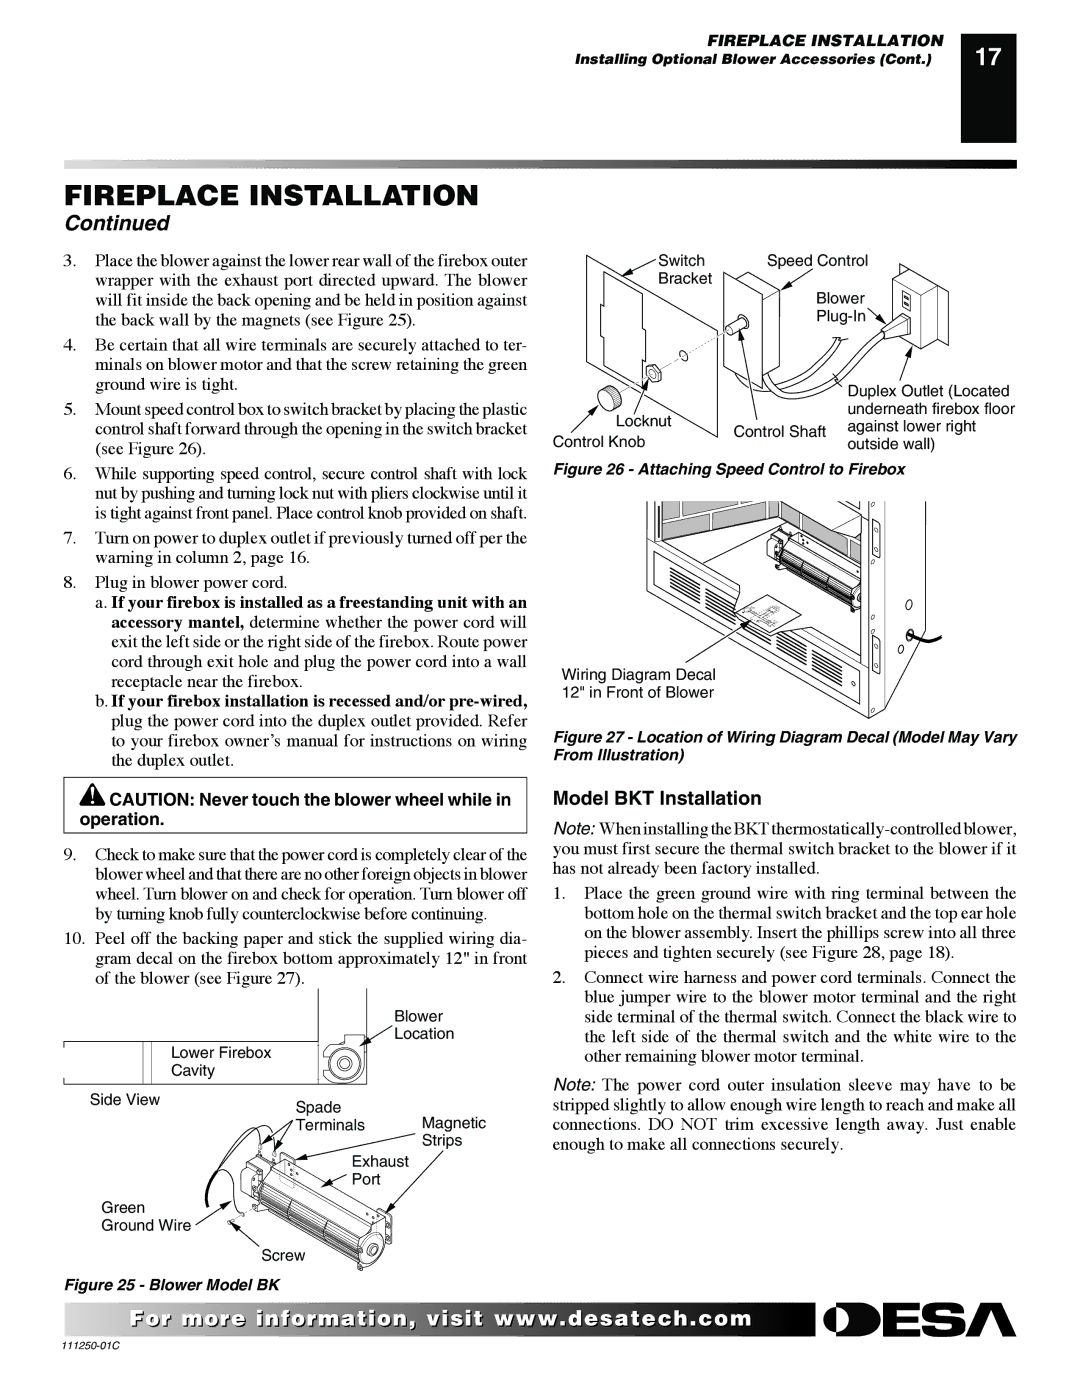
3.Place the blower against the lower rear wall of the firebox outer wrapper with the exhaust port directed upward. The blower will fit inside the back opening and be held in position against the back wall by the magnets (see Figure 25).

4.Be certain that all wire terminals are securely attached to ter- minals on blower motor and that the screw retaining the green ground wire is tight.

5.Mount speed control box to switch bracket by placing the plastic control shaft forward through the opening in the switch bracket (see Figure 26).

6.While supporting speed control, secure control shaft with lock nut by pushing and turning lock nut with pliers clockwise until it is tight against front panel. Place control knob provided on shaft.

7.Turn on power to duplex outlet if previously turned off per the warning in column 2, page 16.

8.Plug in blower power cord.

a.If your firebox is installed as a freestanding unit with an accessory mantel, determine whether the power cord will exit the left side or the right side of the firebox. Route power cord through exit hole and plug the power cord into a wall receptacle near the firebox.

b.If your firebox installation is recessed and/or pre-wired, plug the power cord into the duplex outlet provided. Refer to your firebox owner’s manual for instructions on wiring the duplex outlet.

CAUTION: Never touch the blower wheel while in operation.

9.Check to make sure that the power cord is completely clear of the blower wheel and that there are no other foreign objects in blower wheel. Turn blower on and check for operation. Turn blower off by turning knob fully counterclockwise before continuing.

10.Peel off the backing paper and stick the supplied wiring dia- gram decal on the firebox bottom approximately 12" in front of the blower (see Figure 27).


Blower


Location


Lower Firebox


Cavity


Side View

Spade


Magnetic


Terminals


Strips

Exhaust

Port

Green

Ground Wire

Screw

Switch

Speed Control

Bracket


Blower


Plug-In


Duplex Outlet (Located

Locknut


underneath firebox floor

Control Shaft

against lower right

Control Knob

outside wall)


Figure 26 - Attaching Speed Control to Firebox

Wiring Diagram Decal

12" in Front of Blower

Figure 27 - Location of Wiring Diagram Decal (Model May Vary From Illustration)

Model BKT Installation

Note: When installing the BKT thermostatically-controlled blower, you must first secure the thermal switch bracket to the blower if it has not already been factory installed.

1.Place the green ground wire with ring terminal between the bottom hole on the thermal switch bracket and the top ear hole on the blower assembly. Insert the phillips screw into all three pieces and tighten securely (see Figure 28, page 18).

2.Connect wire harness and power cord terminals. Connect the blue jumper wire to the blower motor terminal and the right side terminal of the thermal switch. Connect the black wire to the left side of the thermal switch and the white wire to the other remaining blower motor terminal.

Note: The power cord outer insulation sleeve may have to be stripped slightly to allow enough wire length to reach and make all connections. DO NOT trim excessive length away. Just enable enough to make all connections securely.

Figure 25 - Blower Model BK

For morevisit www..com

111250-01C

Page 17
Image 17
Desa (V)T36NA SERIES installation manual Model BKT Installation, Attaching Speed Control to Firebox

(V)T36NA SERIES specifications

The Desa (V)T36NA SERIES represents a significant advancement in the realm of energy-efficient heating solutions, combining cutting-edge technologies with user-centric design. This series is renowned for its ability to deliver reliable heating performance while ensuring a minimal environmental impact. One of the standout features of the Desa (V)T36NA SERIES is its innovative use of high-efficiency ceramic burners. These burners not only provide superior heat output but also enhance the overall thermal efficiency of the unit, ensuring that energy consumption is kept to a minimum.

This series is equipped with a sleek, contemporary design that seamlessly fits into various home interiors. The aesthetic appeal is complemented by a range of customizable options, including different finishes and decorative elements, allowing homeowners to select a model that matches their personal style and home decor. Another notable aspect of the Desa (V)T36NA SERIES is its advanced thermostat control technology. This feature enables precise temperature regulation, ensuring consistent comfort while optimizing energy usage.

Safety is a paramount concern in the design of the Desa (V)T36NA SERIES. Each unit comes with multiple safety features, including an automatic shut-off system and a protective glass front, which provides a barrier against accidental contact. This focus on safety does not detract from the performance; rather, it enhances the user experience, providing peace of mind for families.

In terms of installation, the Desa (V)T36NA SERIES offers flexibility with venting options that cater to various home layouts. This adaptability simplifies the installation process and makes it easier to integrate the heating system into existing structures. Furthermore, these units are designed with ease of maintenance in mind, featuring accessible components that allow for straightforward servicing.

Another characteristic that sets the Desa (V)T36NA SERIES apart is its commitment to sustainability. Utilizing environmentally friendly materials and designs, this series minimizes emissions and energy consumption, aligning with modern environmental standards. Overall, the Desa (V)T36NA SERIES represents an optimal choice for discerning homeowners seeking an efficient, stylish, and reliable heating solution. With its impressive combination of features, technologies, and characteristics, this series is poised to redefine comfort and sustainability in home heating.