Manuals
/
Eiki
/
TV and Video
/
CRT Television
Eiki
LC-XWP2000 manual Installation, Connecting PC to the Projector, To connect Computer cable RGB
Models:
LC-XWP2000
1
28
59
59
Download
59 pages
11.56 Kb
25
26
27
28
29
30
31
32
<
>
Troubleshooting
Specs
Install
Lamp Replacement
Maintenance
Connecting to an external speaker system
Symptom
Reset all
Setting Up the Projector
Turning on the Projector - Procedure
Page 28
Image 28
Installation
Connecting PC to the Projector
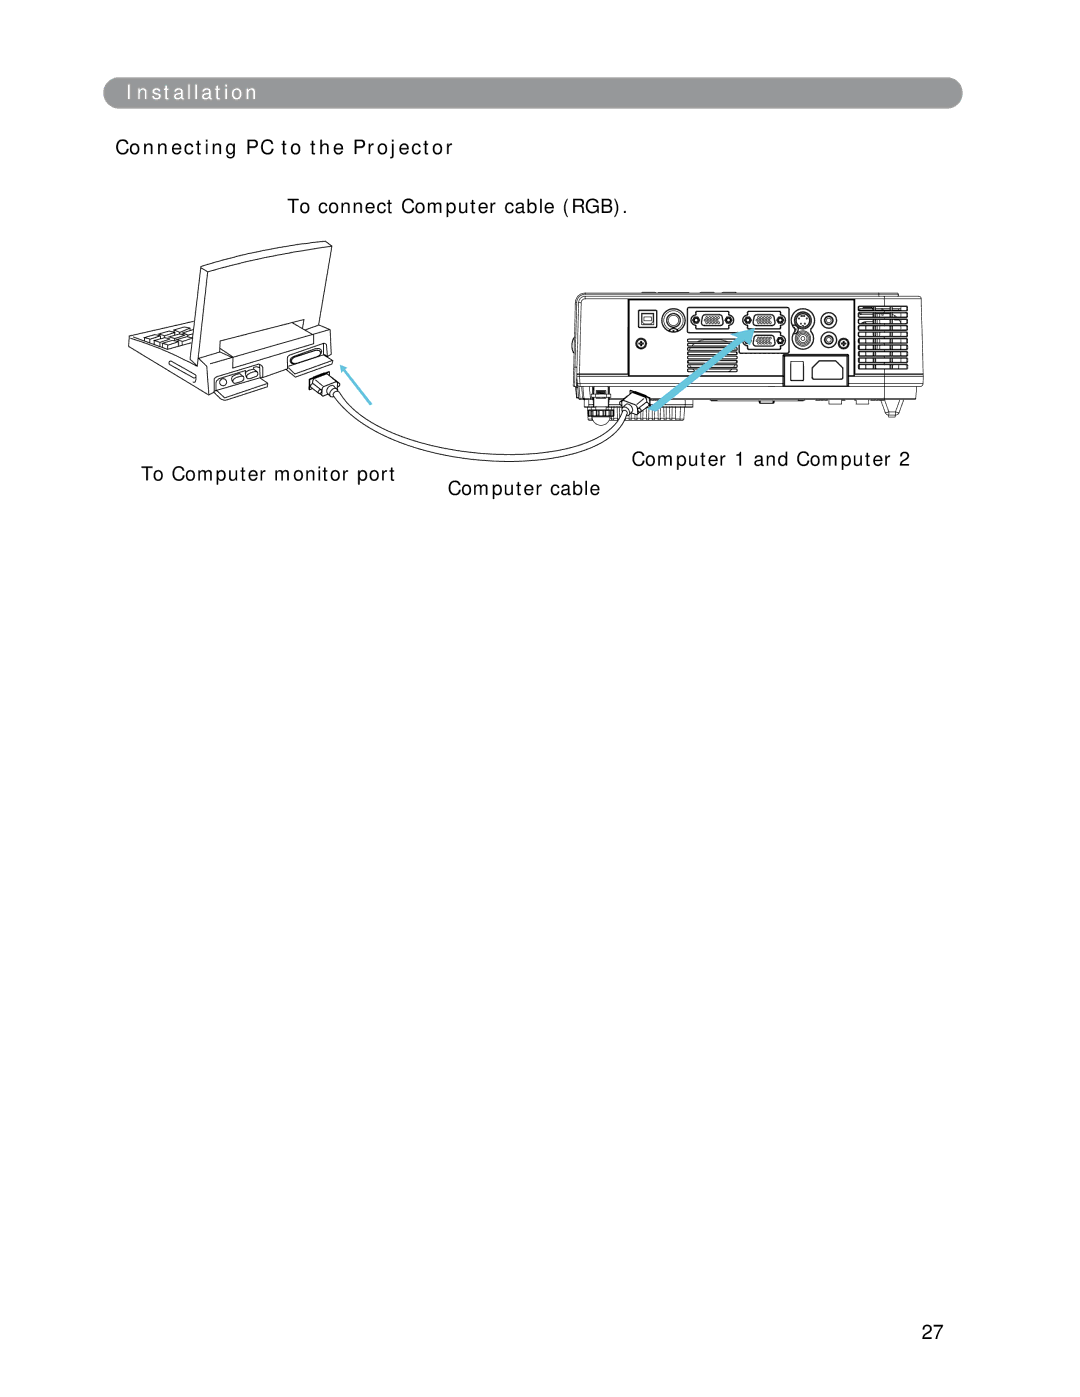
To connect Computer cable (RGB).
To Computer monitor port
Computer 1 and Computer 2
Computer cable
27
Page 27
Page 29
Page 28
Image 28
Page 27
Page 29
Contents
LC-XWP2000
OWNER’S MANUAL
MULTIMEDIA PROJECTOR
Features
Remote Control Batteries Installation
Contents
Adjusting the Screen Image
Fu n ct i o n s of Men u OSD
Ap p en d
Safety Instructions
Typical Symbols
If a problem should occur
Do not install on an unstable surface
Safety Instructionscontinued
Do not open the cabinet
Do not look through the lens when the lamp is on
Do not use any power cable except those supplied with the projector
Avoid shock or impact on the projector
Do not shine the laser beam onto yourself or other
Safety Instructionscontinued
Care and maintenance
Battery usage
Ask your dealer for details about internal cleaning
Safety Instructionscontinued
Pr odu ct safet y labels
EIKI
ModelLC-XIP2000 Input
Serial no
Checking the Package Contents
Video Cable
Audio Cable
Filter
Part Names and Functions:
Main Unit
1 Zoom ring
2 Focus ring
5 Front adjustable foot
6 Foot adjust button
Pa r t N a m e s a n d Fu n ct i o n s
Main Unit
Select s b et w een RGB i n p u t sou r ce - Com p u t er i n 1 →
Display or hides the OSD main menu page
Input Analog RGB video signal from a computer
Connecting to an external speaker system
1. Suspension bracket fixing points 4 points
Bottom View
2. Air filter cover
Par t N am e s an d Fu n ct i o n s
Rem o t e Co n t r o l Po w er b u t t on
Remote Control Batteries Installation
Part Names and Functions
Setting Up the Projector
Installation
Front projection Rear
Setting Up the Projector Rear ceiling projection
Installation
Front ceiling projection
A B Ratio= 6.5
I n st al l at i o n
Adjusting the Image Position
Moving the Projector
1. Use the carry bag when moving the projector.option
carry bag
Rem ove the lens cover
WARNING If no image are projected, change the input signal
Installation
Turning on the Projector
Installation
Connecting PC to the Projector
To connect Computer cable RGB
To Computer monitor port
Desktop PC
Laptop PC
Connecting Video to the Projector 1. Connect to a video source
3. Connect YPbPr plug at projector computer in 2 port and video source like DVD player for video signal
Turning on the Projector - Procedure
Basic Operation
KEYSTONE
INPUT
6. The power indicator will flash green
8. Rotate the zoom ring to adjust the screen size
9. Rotate the focus ring to adjust the focus
Turning on the Projector - Procedure
Turning off the Projector - Procedure
Do not set the power switch to off or unplug the
projector during the cool-down sequence. Not allowing
the lamp to cool properly will greatly reduce the life
Rotate the Zoom Ring to adjust the image
1. Power button 5. Menu button 3. Auto button 4.I nput button
Fu n ct i o n s o f Men u OSD
Co m pu t er Mo de - PI CTURE Men u
Functions of Menu OSD
Computer Mode-AUDIO Menu
Computer Mode-SETTING Menu
Functions of Menu OSD
Computer Mode-ADVANCED Menu
Reset all
Functions of Menu OSD
Computer Mode-ADVANCED Menu
Blank on
Functions of Menu OSD
5.PRESENTATION
Computer Mode-PRESENTATION Menu
Reset Lamp Timer
Functions of Menu OSD
Video Mode-PICTURE Menu
Functions of Menu OSD
Video Mode-AUDIO Menu
Video Mode-SETTING Mode
Functions of Menu OSD
Video Mode-ADVANCED Menu
Reset all
Functions of Menu OSD
Computer Mode-ADVANCED Menu
Blank on
5.PRESENTATI ON
Fu n ct i o n s o f M en u OSD
Technical Specifications
Panel Resolution
Signal Compatibility
Power
Maintenance and Troubleshooting
Ceiling Mounted Installation Guide
W ARNI NG
Mai n t en an ce an d Tr o u b l esh o o t i n g
Maintenance and Troubleshooting
Lamp Replacement
Maintenance and Troubleshooting
Indicators
Power
Lamp
Maintenance and Troubleshooting
Symptom
Possible cause
Remedy
List of Supported Monitor Displays
Computer mode
ComponentYPbPr
Composite/S-video
Co n f i g u r at io n o f Ter m i n al
Y Pb Pr
U.S.A
Deutschland & Österreich
China
Canada