Gaggenau CK 481-6 manual Installation

Models: CK 481-6

1 31
Download 31 pages 13.06 Kb
Page 30
Image 30
Installation

Installation


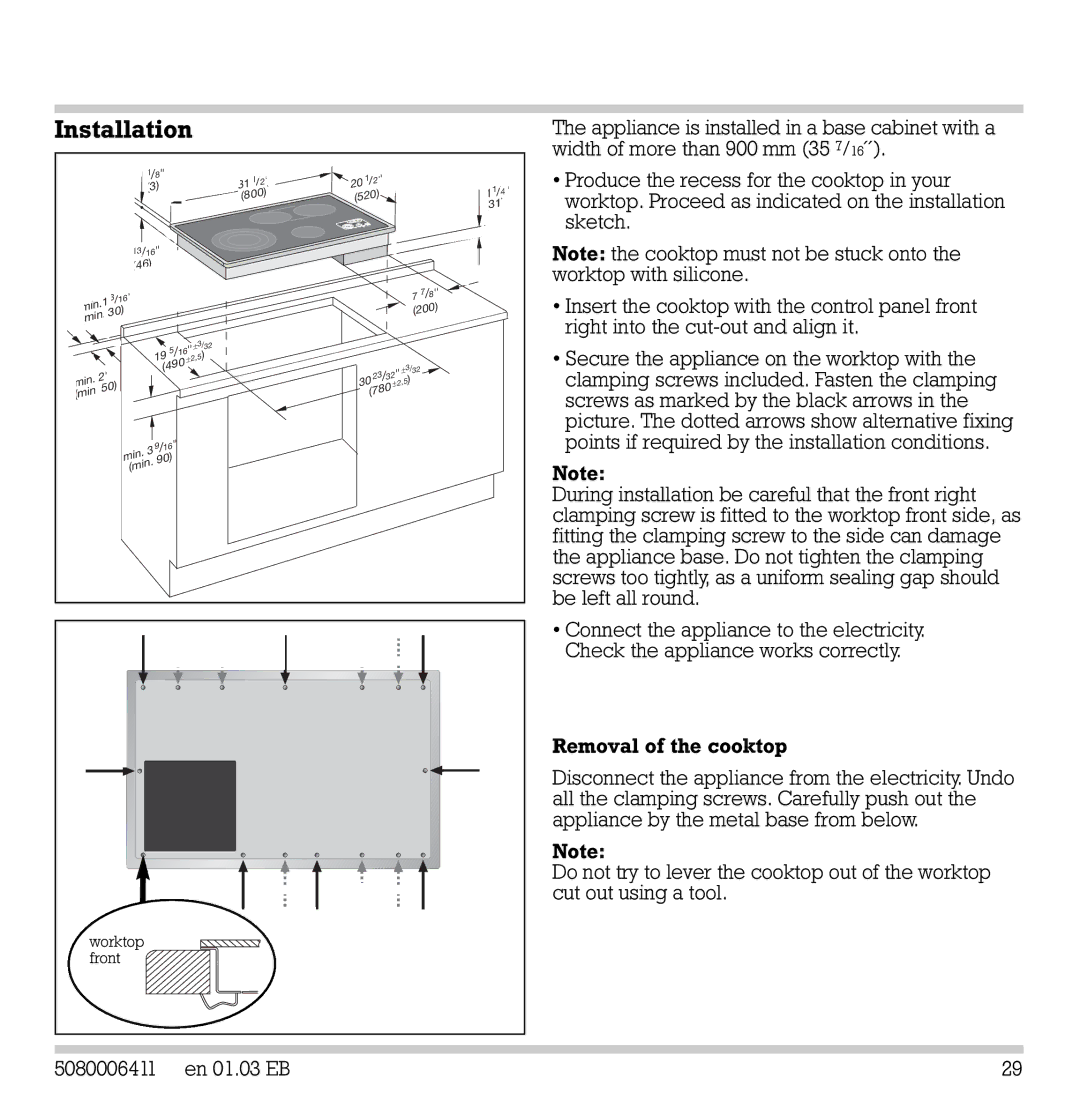
The appliance is installed in a base cabinet with a


width of more than 900 mm (35 7/16´).


/8''


1


1


''


1


31

/2''

20

/2


1

• Produce the recess for the cooktop in your


(3)


(800)

(520)


1

/4''

worktop. Proceed as indicated on the installation


(31)


sketch.


1

13/16''


Note: the cooktop must not be stuck onto the


(46)


worktop with silicone.


3

''


7

/8''


/16


7


• Insert the cooktop with the control panel front


(200)


. 30)


min

.1


(min


right into the cut-out and align it.


3/

32


5

/16

''

±


• Secure the appliance on the worktop with the


)


(490

± 2,5


3/


19


.

2''


''

±

)

32


clamping screws included. Fasten the clamping

min


30


±


23/32

2,5


. 50)


(780


(min


screws as marked by the black arrows in the


picture. The dotted arrows show alternative fixing


. 3

9/16''


points if required by the installation conditions.


m

in

.

90)


(min


Note:


During installation be careful that the front right


clamping screw is fitted to the worktop front side, as


fitting the clamping screw to the side can damage


the appliance base. Do not tighten the clamping


screws too tightly, as a uniform sealing gap should


be left all round.


• Connect the appliance to the electricity.


Check the appliance works correctly.


Removal of the cooktop


Disconnect the appliance from the electricity. Undo


all the clamping screws. Carefully push out the


appliance by the metal base from below.


Note:


Do not try to lever the cooktop out of the worktop


cut out using a tool.

worktop


front


5080006411


en 01.03 EB


29

Page 30
Image 30
Gaggenau CK 481-6 manual Installation