Installation Instructions

10InSTAllInG THE AnTI-TIP DEVICE

wARnInG!

nRange must be secured with an approved Anti-Tip device.

nUnless properly installed, the range could be tipped by you or a child standing, sitting or leaning on an open door.

nAfter installing the Anti-Tip device, verify that

it is in place by carefully attempting to tilt the range forward.

nThis range has been designed to meet all recognized industry tip standards for all normal conditions.

nThe use of this device does not preclude tipping of the range when not properly installed.

nIf the Anti-Tip Device supplied with the range does not fit this application, use the Anti-Tip Device WB2X7909.

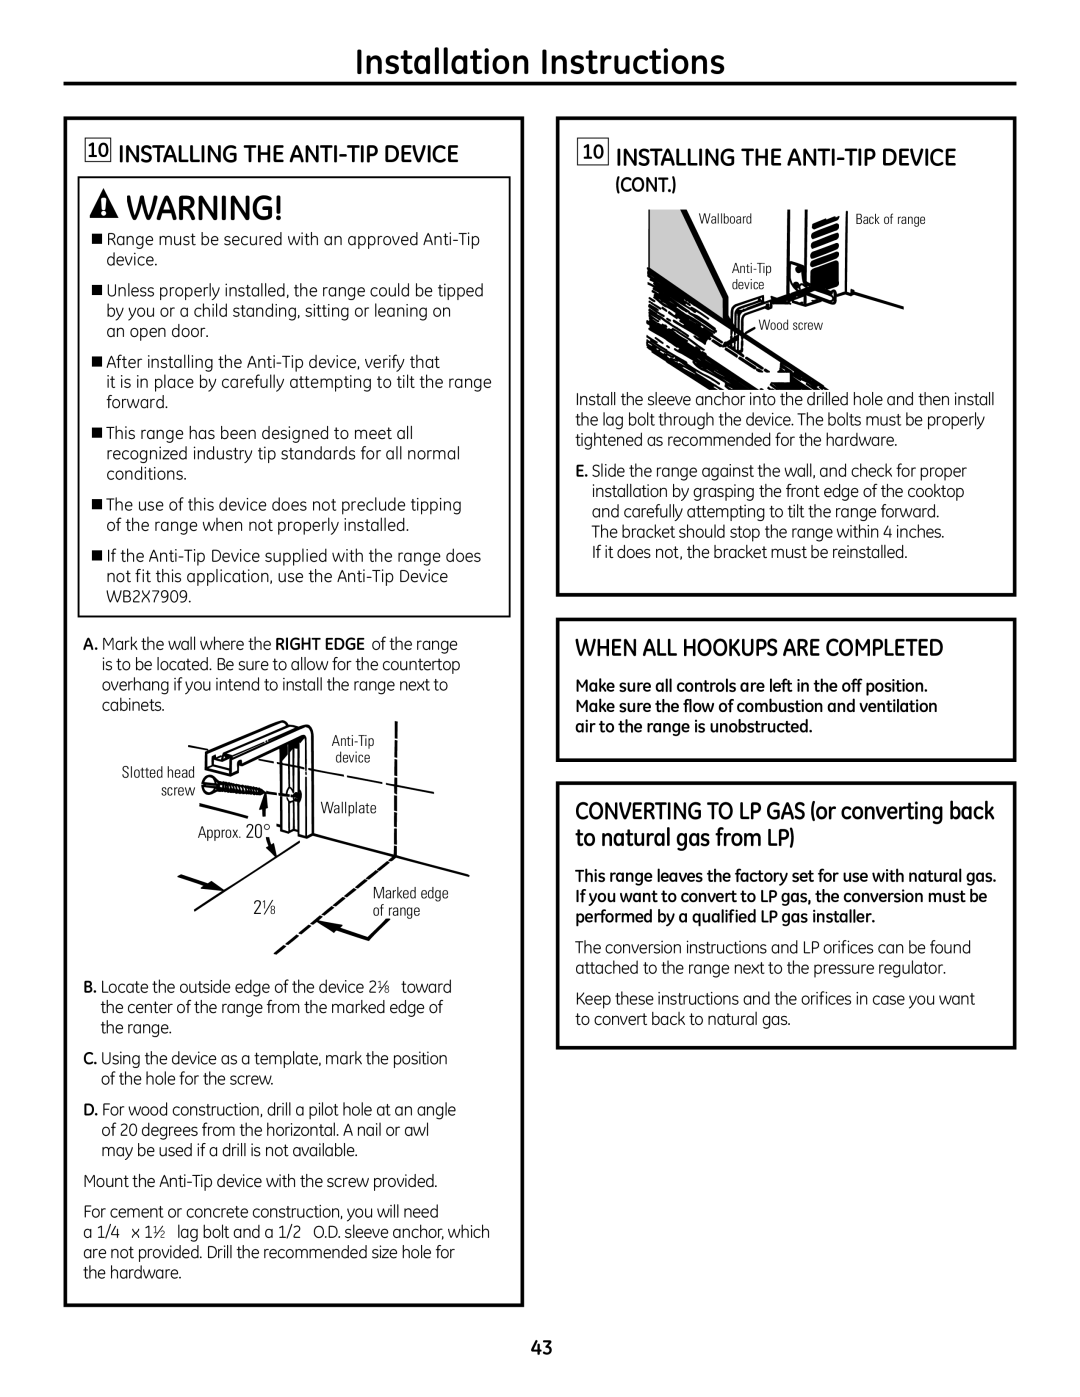
A. Mark the wall where the RIGHT EDGE of the range is to be located. Be sure to allow for the countertop overhang if you intend to install the range next to cabinets.

Anti-Tip

device

Slotted head screw

Wallplate Approx. 20°

218

Marked edge

of range

B. Locate the outside edge of the device 218toward the center of the range from the marked edge of the range.

C. Using the device as a template, mark the position of the hole for the screw.

D. For wood construction, drill a pilot hole at an angle of 20 degrees from the horizontal. A nail or awl may be used if a drill is not available.

Mount the Anti-Tip device with the screw provided.

For cement or concrete construction, you will need

a 1/4x 112lag bolt and a 1/2O.D. sleeve anchor, which are not provided. Drill the recommended size hole for the hardware.

10InSTAllInG THE AnTI-TIP DEVICE

(ConT.)

Wallboard

Back of range

Anti-Tip device

Wood screw

Install the sleeve anchor into the drilled hole and then install the lag bolt through the device. The bolts must be properly tightened as recommended for the hardware.

E. Slide the range against the wall, and check for proper installation by grasping the front edge of the cooktop and carefully attempting to tilt the range forward.

The bracket should stop the range within 4 inches. If it does not, the bracket must be reinstalled.

wHEn All HooKUPS ARE CoMPlETED

Make sure all controls are left in the off position. Make sure the flow of combustion and ventilation air to the range is unobstructed.

ConVERTInG To lP GAS (or converting back to natural gas from lP)

This range leaves the factory set for use with natural gas. If you want to convert to lP gas, the conversion must be performed by a qualified lP gas installer.

The conversion instructions and LP orifices can be found attached to the range next to the pressure regulator.

Keep these instructions and the orifices in case you want to convert back to natural gas.

43

Page 43
Image 43
GE JGB428SERSS, 49-85179 installation instructions InSTAllInG the AnTI-TIP Device, WHEn All HooKUPS are CoMPlETED

JGB428, JGB428SERSS, 49-85179 specifications

The GE 49-85179, JGB428SERSS, and JGB428 are part of General Electric's innovative line of kitchen appliances, particularly focusing on ranges that enhance the cooking experience while providing reliable performance. These models are particularly known for their blend of advanced technology, user-friendly design, and energy efficiency.

The GE 49-85179 is a freestanding gas range that boasts a sleek and modern design, making it suitable for any contemporary kitchen. One of its standout features is the innovative edge-to-edge cooktop, which offers a larger cooking surface for more cooking flexibility. With up to five burners, including a powerful 18,000 BTU burner, the range allows for rapid boiling, sautéing, and simmering. This makes it an ideal appliance for both home cooks and culinary enthusiasts who demand performance.

The incorporation of the Convection Bake feature in the GE 49-85179 ensures even baking results, with hot air circulating within the oven, thus eliminating hot spots. This technology allows for faster cooking times and improved food consistency, making it easier to deliver perfectly cooked meals. The range to also achieves precise temperature control, ensuring that users can attain the perfect cooking conditions for a variety of dishes.

Similarly, the JGB428SERSS model emphasizes both functionality and aesthetics. This gas range features a large oven capacity, perfect for cooking multiple dishes at once. The self-cleaning feature saves time and effort, allowing users to maintain their appliance with minimal hassle. Its oven includes baking and broiling elements that provide heat from both the top and bottom, allowing chefs to achieve restaurant-quality results right at home.

The JGB428 also highlights GE's commitment to energy efficiency, utilizing advanced technology to reduce power consumption while still delivering powerful cooking performance. With an intuitive digital display and straightforward controls, this model is designed for seamless user interaction, making it easier to set cooking times, temperatures, and select different cooking modes.

In summary, the GE 49-85179 and its counterparts—the JGB428SERSS and JGB428—are characterized by their smart design, advanced cooking technologies, and energy efficiency. Together, they represent a commitment to enhancing the culinary experience, providing home cooks with the tools they need to create delicious meals with confidence and ease. With these ranges, General Electric continues to innovate in the realm of home cooking appliances.