Installation
ATTENTION INSTALLER
Instructions
Before You Begin
Installation Instructions
IMPORTANT SAFETY INSTRUCTIONS
For Your Safety
Electrical Requirements
Pre-Installation Checklist
Installation Instructions
DO NOT LIFT THE DOOR BY THE HANDLE
These ovens are not approved for stackable installations
Cutout for 27″ 68.6 cm Single Built-In Ovens only
For JKS10, JKP30, JKP70, PK916, ZEK938 models only
Installation Instructions
Cutout for 27″ 68.6 cm Double Built-In Ovens only
For JKP35, JKP55, JKP75, PK956, ZEK958 models only
Installation Instructions
Cutout for 27″ 68.6 cm Single Built-In Ovens only Under Counter
Installation Instructions
For JKS10, JKP30, JKP70, PK916, ZEK938 models only
MUST SUPPORT 150 LBS. 68 Kg
Cabinetry
Cutout for 27″ 68.6 cm Single or
Double Built-In Ovens only - Over a Warming Drawer
Single 27″ 68.6 cm
Combined Advantium or Microwave Oven and Wall Oven Installation
Cutout for 27″ 68.6 cm Single Ovens only
Single 27″ 68.6 cm Oven
Below an Advantium or
Side by Side Installations
Cutout for 30″ 76.2 cm Single Built-In Ovens only
For JTP30, JTP70, PT916, PT920, ZET938 models only
Installation Instructions
For JTP35, JTP55, JTP75, PT956, PT960, ZET958 models only
Installation Instructions
Cutout for 30″ 76.2 cm Double Built-In Ovens only
Cutout for 30″ 76.2 cm Single Built-In Ovens only Under Counter
Installation Instructions
Side by Side Installations
For JTP30, JTP70, PT916, PT920, ZET938 models only
Cutout for 30″ 76.2 cm Single or Double
Built-In Ovens only - Over a Warming Drawer
Single 30″ 76.2 cm
Double 30″ 76.2 cm
Cutout for 30″76.2 cm Single Ovens only
Single 30″ 76.2 cm Oven
Combined Advantium or Microwave Oven and Wall Oven Installation
Cabinetry
Electrical Connections
WARNING Improper
Installation Instructions
ATTENTION INSTALLER
B3 New Construction and Four-Conductor Branch Circuit Connection
B4 Three-Conductor Branch Circuit Connection
Installation Instructions
Securing the Oven in the Opening
WARNING Mounting
C1 Sliding the Oven Into the Opening
C2 Drilling the Pilot Holes and Mounting the Oven
C3 Preparing for the Bottom Trim Installation
C4 Installing the Metal Bottom Trim
Installation Instructions
c. Remove the trim
Replacing the Oven Door
Installation Instructions
Operation Checklist
Pre-Test Checklist
Installation Instructions
Page
Instrucciones
de instalación
Antes de empezar
Partes incluidas
Instrucciones de instalación
INSTRUCCIONES DE SEGURIDAD IMPORTANTES
Para su seguridad
Requisitos eléctricos
Lista de control antes de la instalación
Instrucciones de instalación
¡NO LEVANTE LA PUERTA POR LA EMPUÑADURA
Corte para los hornos de una unidad de 27″ 68,6 cm solamente
Para los modelos JKS10, JKP30, JKP70, PK916, ZEK938 solamente
Estos hornos no están aprobados para las instalaciones apilables
Instrucciones de instalación
Corte para los hornos de dos unidades de 27″ 68,6 cm solamente
Para los modelos JKP35, JKP55, JKP75, PK956, ZEK958 solamente
Instrucciones de instalación
Para los modelos JKS10, JKP30, JKP70, PK916, ZEK938 solamente
NOTA Este horno está aprobado
DEBE SOPORTAR 150 LIBRAS 68 Kg
Gabinetes
Horno individual de 27″
Horno doble de 27″
68,6 cm sobre una
Horno individual de 27″ 68,6 cm
Gabinetes
Para los modelos JKS10, JKP30, JKP70, PK916, ZEK938 solamente
las instrucciones para la instalación que se remiten
Corte para los hornos de una unidad de 30″ 76,2 cm solamente
Instalaciones de lado a lado
Para los modelos JTP30, JTP70, PT916, PT920, ZET938 solamente
Instrucciones de instalación
Corte para los hornos de dos unidades de 30″ 76,2 cm solamente
Para los modelos JTP35, JTP55, JTP75, PT956, PT960, ZET958 solamente
Instrucciones de instalación
Instalaciones de lado a lado
Para los modelos JTP30, JTP70, PT916, PT920, ZET938 solamente
DEBE SOPORTAR 150 LIBRAS 68 Kg
Horno individual de 30″
Horno doble de 30″
76,2 cm sobre una
Gabinetes
Horno individual de 30″ 76,2 cm
Gabinetes
Para los modelos JTP30, JTP70, PT916, PT920, ZET938 solamente
Conexiones eléctricas
ATENCIÓN AL INSTALADOR
Instrucciones de instalación
ADVERTENCIA
B4 Conexión de circuito ramal de tres conductores
Instrucciones de instalación
Posición firme del horno en la abertura
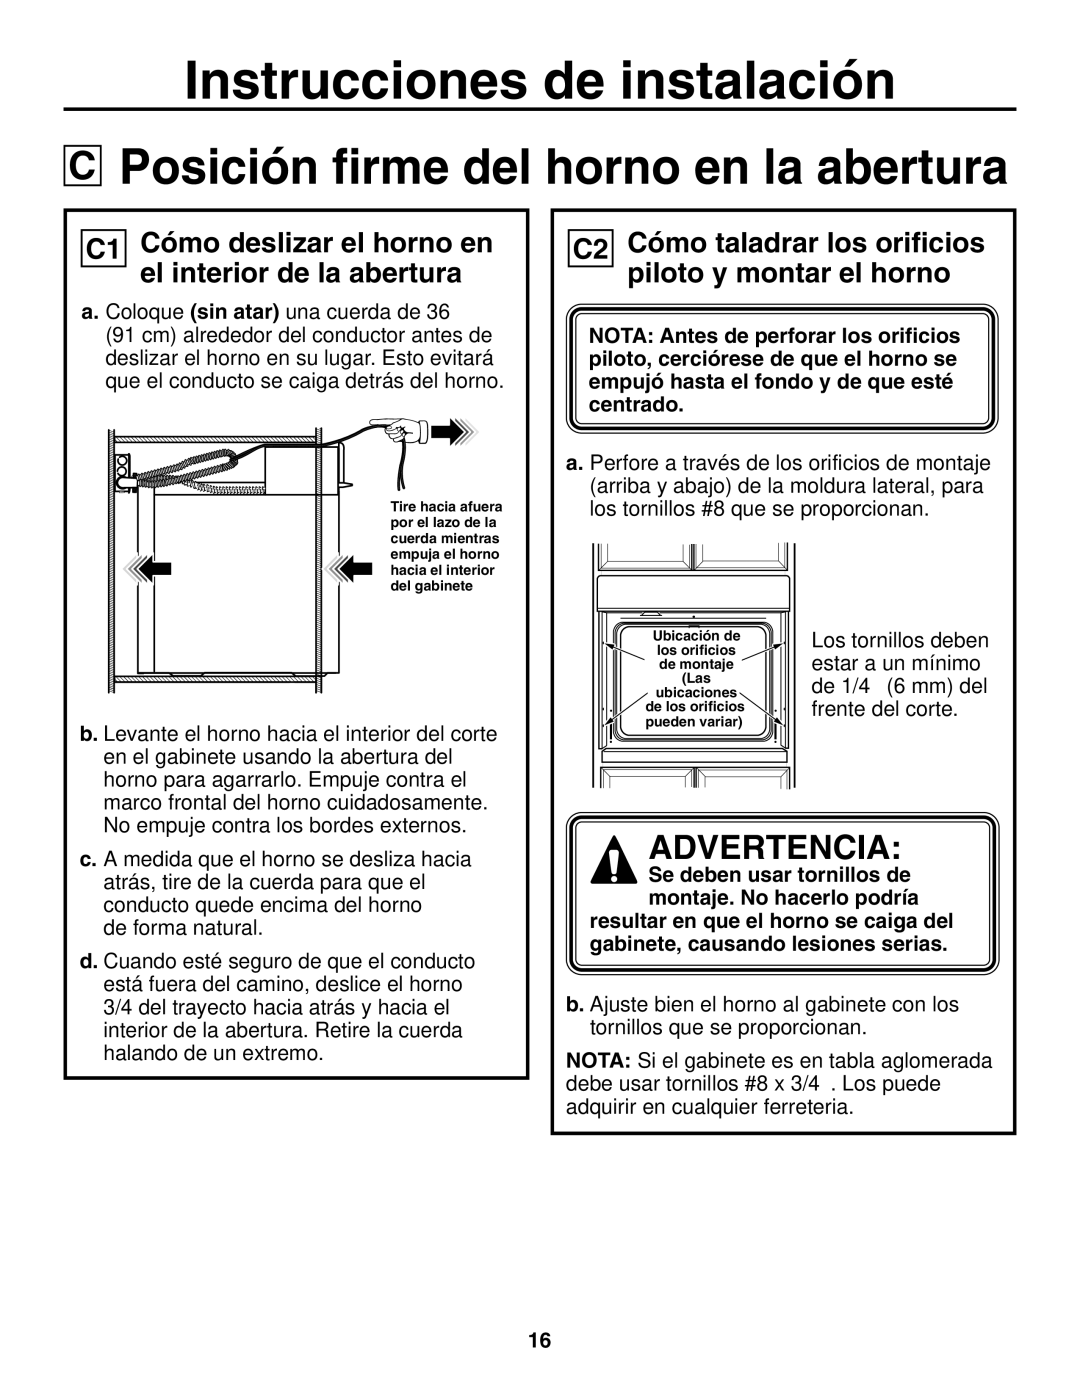
C1 Cómo deslizar el horno en el interior de la abertura
C2 Cómo taladrar los orificios piloto y montar el horno
Instrucciones de instalación
C3 Preparación para la instalación de la moldura de fondo
C4 Cómo instalar la moldura de fondo metálica
Instrucciones de instalación
Cómo instalar la puerta del horno
Instrucciones de instalación
Lista de control antes de la prueba
Lista de control para la operación
A. ADVERTENCIA
Instrucciones de instalación
Notas