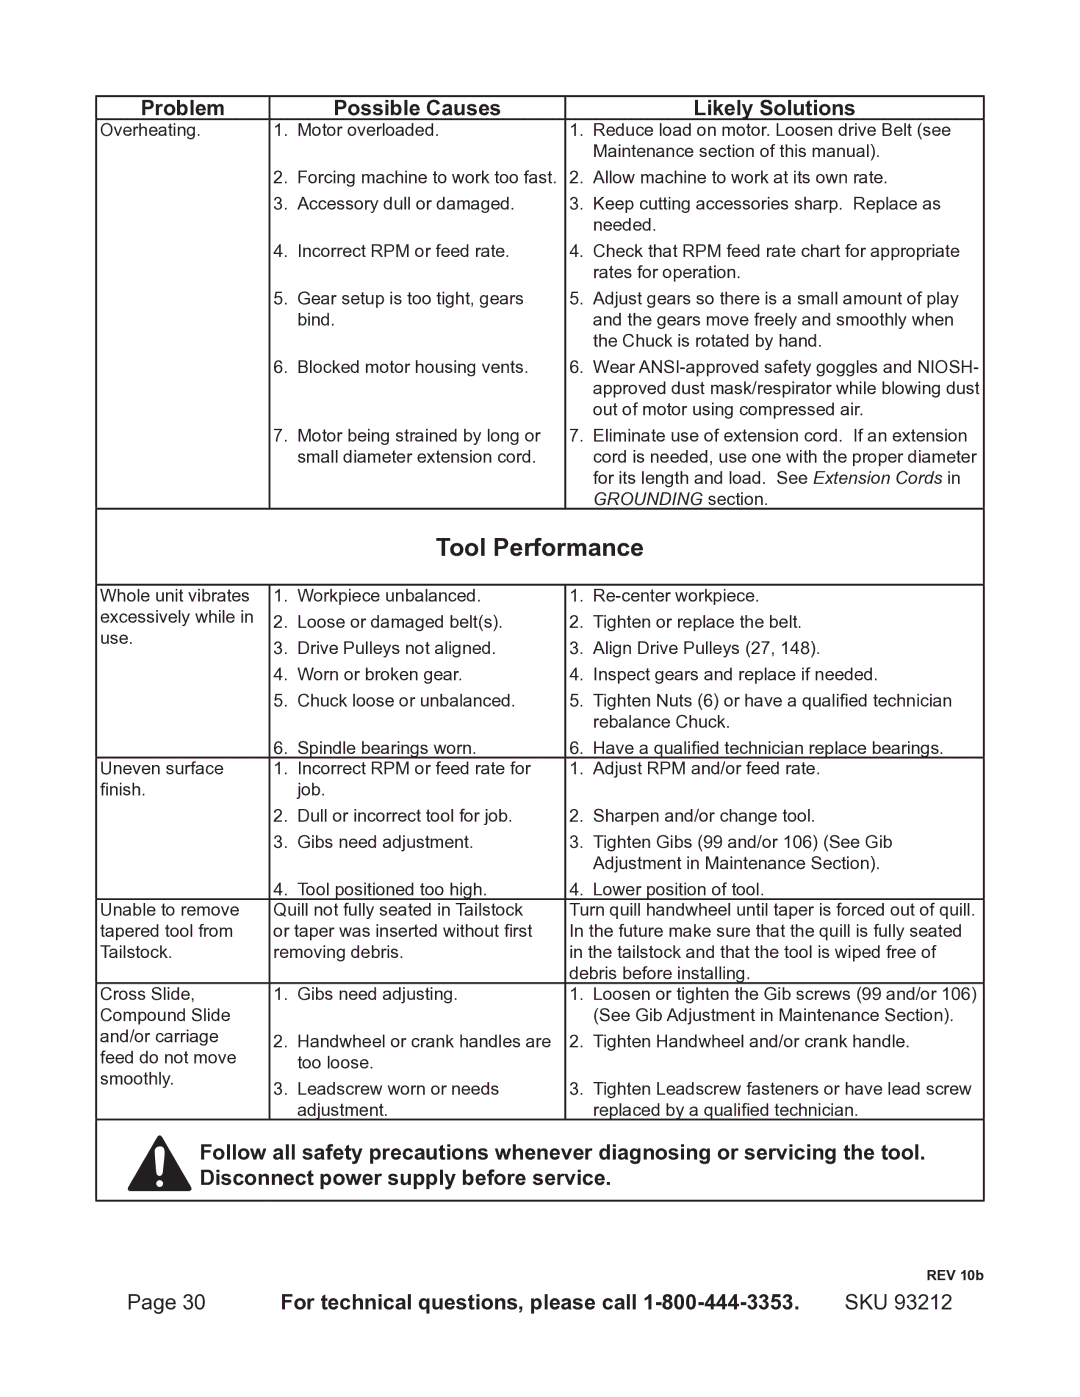
Problem |
| Possible Causes |
| Likely Solutions |
Overheating. | 1. Motor overloaded. | 1. | Reduce load on motor. Loosen drive Belt (see | |
|
|
|
| Maintenance section of this manual). |
| 2. | Forcing machine to work too fast. | 2. | Allow machine to work at its own rate. |
| 3. | Accessory dull or damaged. | 3. | Keep cutting accessories sharp. Replace as |
|
|
|
| needed. |
| 4. | Incorrect RPM or feed rate. | 4. | Check that RPM feed rate chart for appropriate |
|
|
|
| rates for operation. |
| 5. | Gear setup is too tight, gears | 5. | Adjust gears so there is a small amount of play |
|
| bind. |
| and the gears move freely and smoothly when |
|
|
|
| the Chuck is rotated by hand. |
| 6. | Blocked motor housing vents. | 6. | Wear |
|
|
|
| approved dust mask/respirator while blowing dust |
|
|
|
| out of motor using compressed air. |
| 7. | Motor being strained by long or | 7. | Eliminate use of extension cord. If an extension |
|
| small diameter extension cord. |
| cord is needed, use one with the proper diameter |
|
|
|
| for its length and load. See Extension Cords in |
|
|
|
| GROUNDING section. |
|
| Tool Performance | ||
|
|
|
| |
Whole unit vibrates | 1. Workpiece unbalanced. | 1. | ||
excessively while in | 2. | Loose or damaged belt(s). | 2. | Tighten or replace the belt. |
use. | 3. | Drive Pulleys not aligned. | 3. | Align Drive Pulleys (27, 148). |
| ||||
| 4. | Worn or broken gear. | 4. | Inspect gears and replace if needed. |
| 5. | Chuck loose or unbalanced. | 5. | Tighten Nuts (6) or have a qualified technician |
|
|
|
| rebalance Chuck. |
| 6. | Spindle bearings worn. | 6. | Have a qualified technician replace bearings. |
Uneven surface | 1. Incorrect RPM or feed rate for | 1. | Adjust RPM and/or feed rate. | |
finish. |
| job. |
|
|
| 2. | Dull or incorrect tool for job. | 2. | Sharpen and/or change tool. |
| 3. | Gibs need adjustment. | 3. | Tighten Gibs (99 and/or 106) (See Gib |
|
|
|
| Adjustment in Maintenance Section). |
| 4. | Tool positioned too high. | 4. | Lower position of tool. |
Unable to remove | Quill not fully seated in Tailstock | Turn quill handwheel until taper is forced out of quill. | ||
tapered tool from | or taper was inserted without first | In the future make sure that the quill is fully seated | ||
Tailstock. | removing debris. | in the tailstock and that the tool is wiped free of | ||
|
|
| debris before installing. | |
Cross Slide, | 1. Gibs need adjusting. | 1. | Loosen or tighten the Gib screws (99 and/or 106) | |
Compound Slide |
|
|
| (See Gib Adjustment in Maintenance Section). |
and/or carriage | 2. Handwheel or crank handles are | 2. | Tighten Handwheel and/or crank handle. | |
feed do not move |
| too loose. |
|
|
smoothly. | 3. | Leadscrew worn or needs | 3. | Tighten Leadscrew fasteners or have lead screw |
| ||||
|
| adjustment. |
| replaced by a qualified technician. |
Follow all safety precautions whenever diagnosing or servicing the tool. Disconnect power supply before service.
|
| REV 10b |
Page 30 | For technical questions, please call | SKU 93212 |
