INSTALLATION

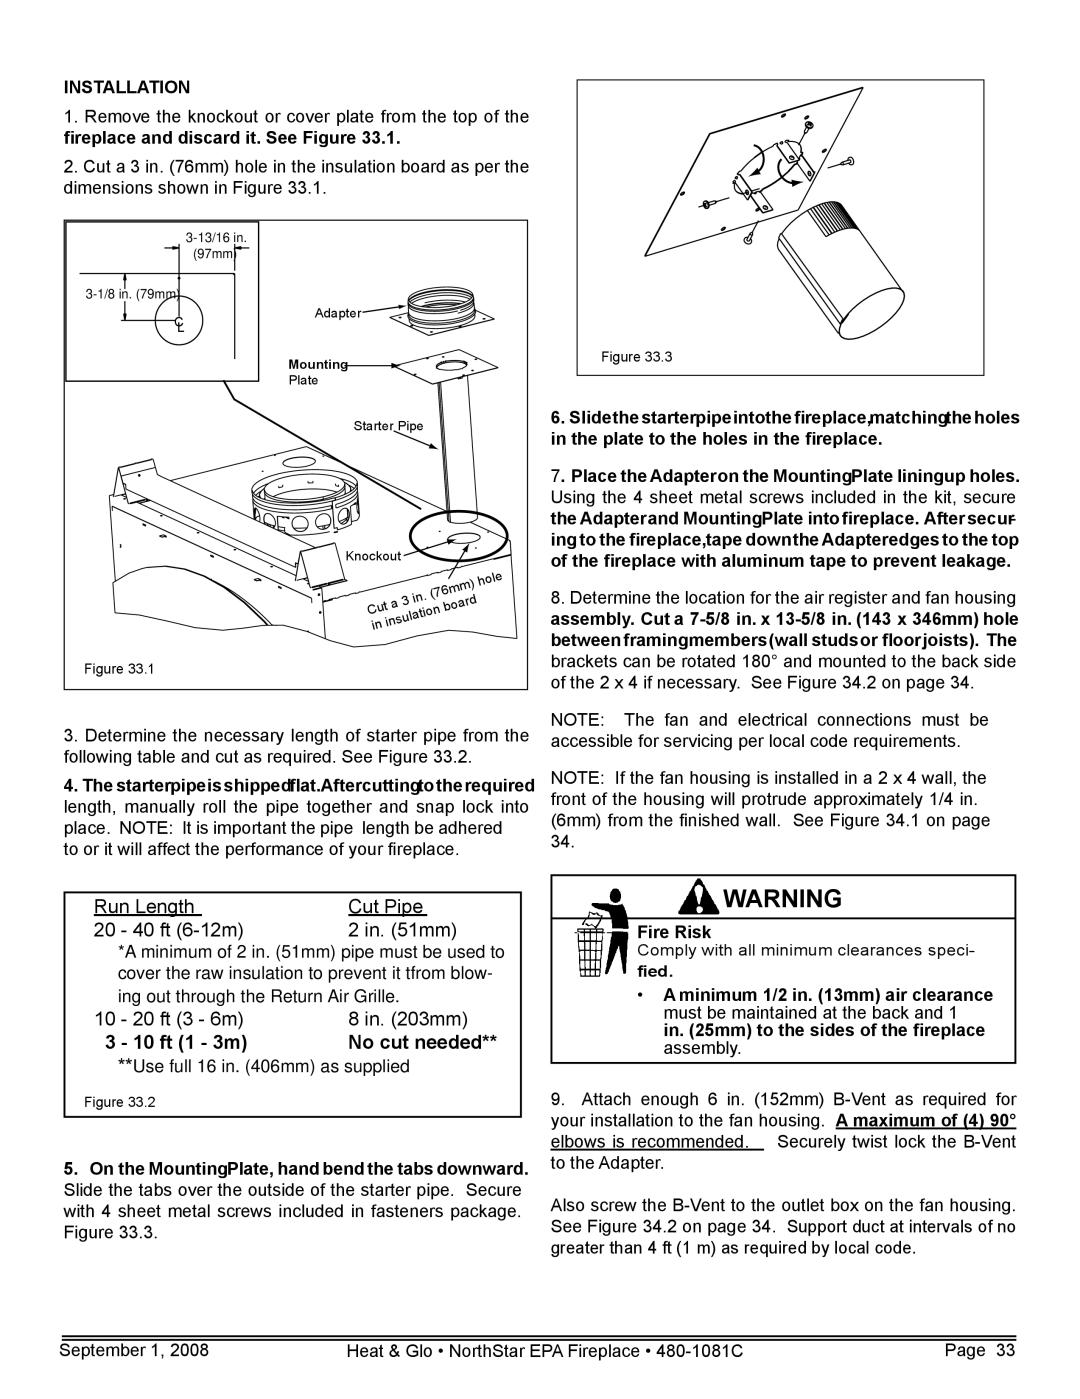
1.Remove the knockout or cover plate from the top of the fireplace and discard it. See Figure 33.1.

2.Cut a 3 in. (76mm) hole in the insulation board as per the dimensions shown in Figure 33.1.


3-13/16 in.


(97mm)


3-1/8 in. (79mm)


C

Adapter


L


Mounting


Plate


Starter Pipe


Knockout


le


ho


.(76mm)


Cuta

in

board


ininsulation


Figure 33.1


3.Determine the necessary length of starter pipe from the following table and cut as required. See Figure 33.2.

4.The starter pipe is shipped flat. After cutting to the required length, manually roll the pipe together and snap lock into place. NOTE: It is important the pipe length be adhered to or it will affect the performance of your fireplace.

Run Length

Cut Pipe

20

- 40 ft (6-12m)

2 in. (51mm)*


*A minimum of 2 in. (51mm) pipe must be used to


cover the raw insulation to prevent it tfrom blow-


ing out through the Return Air Grille.

10

- 20 ft (3 - 6m)

8 in. (203mm)

3

- 10 ft (1 - 3m)

No cut needed**

**Use full 16 in. (406mm) as supplied

Figure 33.2

5.On the Mounting Plate, hand bend the tabs downward.

Slide the tabs over the outside of the starter pipe. Secure with 4 sheet metal screws included in fasteners package. Figure 33.3.

Figure 33.3

6.Slide the starter pipe into the fireplace, matching the holes in the plate to the holes in the fireplace.

7. Place the Adapter on the Mounting Plate lining up holes. Using the 4 sheet metal screws included in the kit, secure the Adapter and Mounting Plate into fireplace. After secur- ing to the fireplace, tape down the Adapter edges to the top of the fireplace with aluminum tape to prevent leakage.

8.Determine the location for the air register and fan housing assembly. Cut a 7-5/8 in. x 13-5/8 in. (143 x 346mm) hole between framing members (wall studs or floor joists). The brackets can be rotated 180° and mounted to the back side of the 2 x 4 if necessary. See Figure 34.2 on page 34.

NOTE: The fan and electrical connections must be accessible for servicing per local code requirements.

NOTE: If the fan housing is installed in a 2 x 4 wall, the front of the housing will protrude approximately 1/4 in. (6mm) from the finished wall. See Figure 34.1 on page 34.

WARNING

Fire Risk

Comply with all minimum clearances speci- fied.

A minimum 1/2 in. (13mm) air clearance must be maintained at the back and 1 in. (25mm) to the sides of the fireplace assembly.

9.Attach enough 6 in. (152mm) B-Vent as required for your installation to the fan housing. A maximum of (4) 90° elbows is recommended. Securely twist lock the B-Vent to the Adapter.

Also screw the B-Vent to the outlet box on the fan housing. See Figure 34.2 on page 34. Support duct at intervals of no greater than 4 ft (1 m) as required by local code.

September 1, 2008

Heat & Glo • NorthStar EPA Fireplace • 480-1081C

Page 33

Page 33
Image 33
Hearth and Home Technologies NorthStar-GT, NorthStar-NT Run Length Cut Pipe Ft 6-12m, 20 ft 3 6m 10 ft 1 3m No cut needed

NorthStar-GT, NorthStar-BK, NorthStar-NT specifications

Hearth and Home Technologies has established itself as a leader in the production of innovative heating appliances, particularly with the launch of its NorthStar series: NorthStar-NT, NorthStar-BK, and NorthStar-GT. These models are designed to deliver superior performance, aesthetic appeal, and advanced technology, making them an excellent choice for modern homes.

The NorthStar-NT model is ideally suited for those seeking a reliable and efficient heating solution. It boasts a powerful, advanced heating technology that maximizes heat output while minimizing fuel consumption. The NorthStar-NT employs a unique combustion system that ensures a cleaner burn, resulting in fewer emissions and a lower environmental impact. The sleek design of the NorthStar-NT allows it to blend seamlessly into any room, making it not just a heating unit but also an attractive focal point.

On the other hand, the NorthStar-BK variant stands out for its versatility and aesthetic flexibility. It offers an array of customizable options, enabling homeowners to match the unit's appearance with their interior decor. The NorthStar-BK features a large viewing area, which enhances the visual appeal of the flames while providing efficient heat distribution. This model incorporates user-friendly controls that allow for easy temperature adjustments, ensuring that comfort is just a button away.

The NorthStar-GT model elevates the heating experience with its advanced smart technology features. Equipped with Wi-Fi connectivity, the NorthStar-GT allows users to control the appliance remotely via a smartphone app. This model also supports voice-activated commands, integrating seamlessly with smart home systems. The NorthStar-GT emphasizes energy efficiency, with programmable settings that enable users to optimize heating schedules to their lifestyle, ultimately contributing to energy savings.

All three NorthStar models feature durable construction and high-quality materials designed to withstand years of use. Their construction ensures not only longevity but also safety, with multiple safety features integrated into each model. Easy maintenance and cleaning options further enhance their user-friendly design.

In summary, the Hearth and Home Technologies NorthStar series including the NorthStar-NT, NorthStar-BK, and NorthStar-GT brings together cutting-edge technology, unparalleled efficiency, and stunning aesthetics. Each model caters to different needs, ensuring that homeowners can find the perfect heating solution that fits their style and requirements.