D. Install Attic Insulation Shield

WARNING! Fire Risk. DO NOT allow loose materials or insulation to touch vent. Hearth & Home Technologies Inc. requires the use of an attic shield.

The National Fuel Gas Code ANSI Z223.1 and NFPA 54 requires an attic shield constructed of 26 gauge minimum metal that extends at least 2 in. (51 mm) above insulation.

Attic shields must meet specified clearance and be se- cured in place.

Flat Ceiling Installation

• Remove one shield from box.

NOTICE: Cut previously installed batt insulation to make room for the attic insulation shield.

Wrap shield around pipe if pipe is already installed in


area to be insulated.

Match the three holes in each side and fasten with three


screws to form a tube.

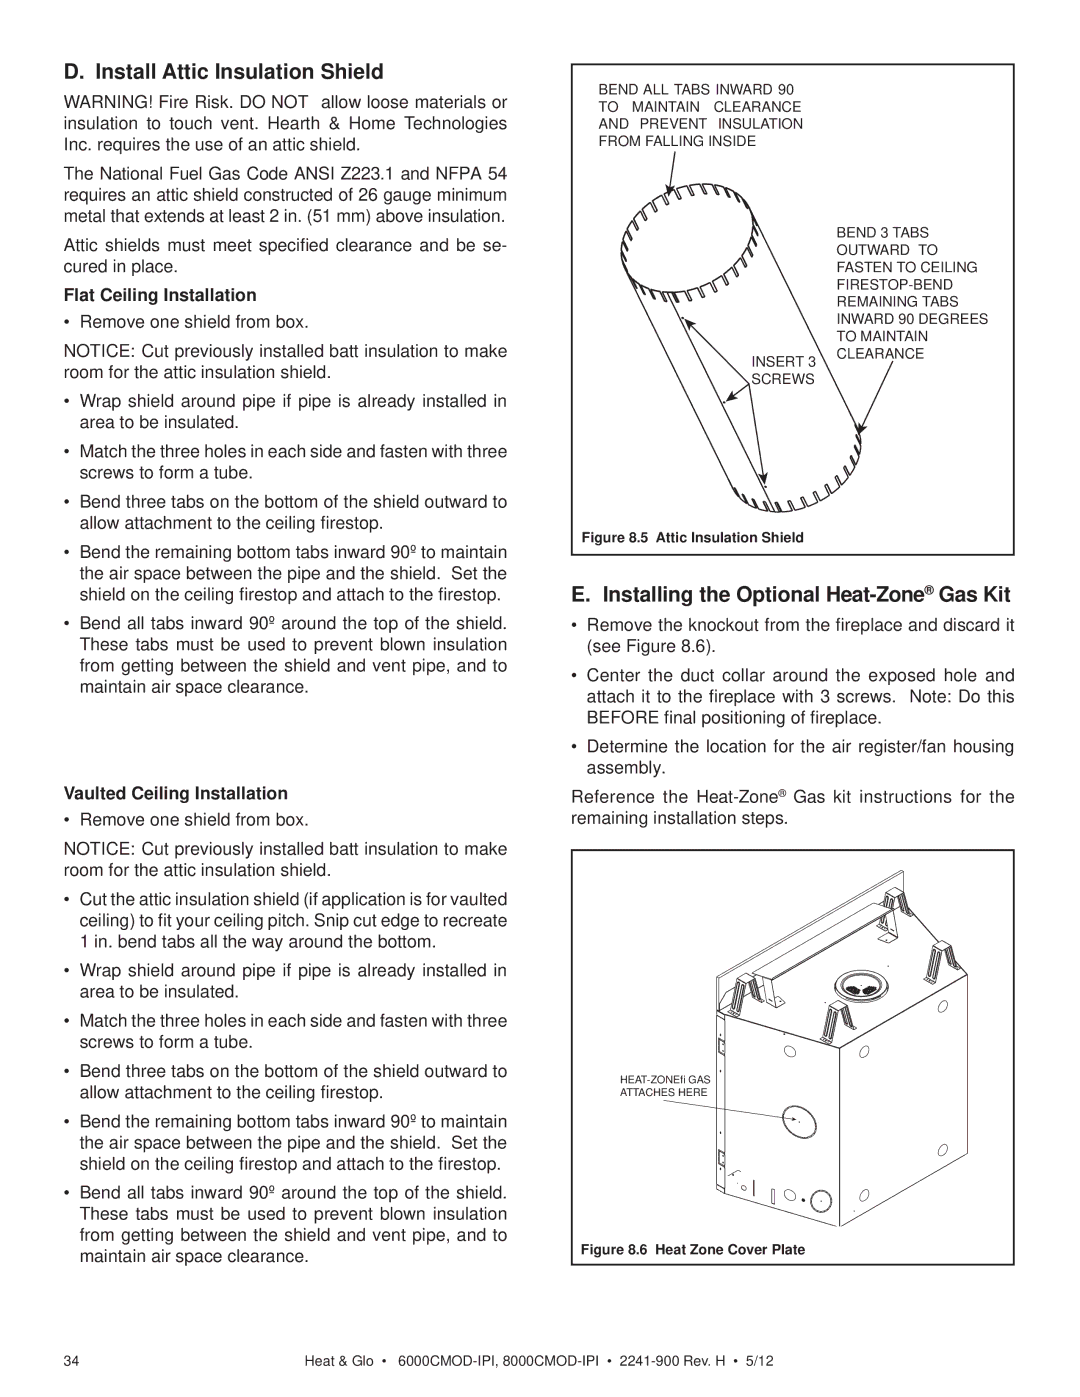
Bend three tabs on the bottom of the shield outward to


allow attachment to the ceiling firestop.

Bend the remaining bottom tabs inward 90º to maintain


the air space between the pipe and the shield. Set the

BEND ALL TABS INWARD 90° TO MAINTAIN CLEARANCE AND PREVENT INSULATION FROM FALLING INSIDE

INSERT 3

SCREWS

Figure 8.5 Attic Insulation Shield

BEND 3 TABS

OUTWARD TO FASTEN TO CEILING FIRESTOP-BEND REMAINING TABS INWARD 90 DEGREES TO MAINTAIN CLEARANCE

shield on the ceiling firestop and attach to the firestop.

• Bend all tabs inward 90º around the top of the shield.

These tabs must be used to prevent blown insulation

from getting between the shield and vent pipe, and to

maintain air space clearance.

Vaulted Ceiling Installation

• Remove one shield from box.

NOTICE: Cut previously installed batt insulation to make room for the attic insulation shield.

Cut the attic insulation shield (if application is for vaulted ceiling) to fit your ceiling pitch. Snip cut edge to recreate 1 in. bend tabs all the way around the bottom.

Wrap shield around pipe if pipe is already installed in area to be insulated.

Match the three holes in each side and fasten with three screws to form a tube.

Bend three tabs on the bottom of the shield outward to allow attachment to the ceiling firestop.

Bend the remaining bottom tabs inward 90º to maintain the air space between the pipe and the shield. Set the shield on the ceiling firestop and attach to the firestop.

Bend all tabs inward 90º around the top of the shield. These tabs must be used to prevent blown insulation from getting between the shield and vent pipe, and to maintain air space clearance.

E. Installing the Optional Heat-Zone®Gas Kit

Remove the knockout from the fireplace and discard it (see Figure 8.6).

Center the duct collar around the exposed hole and attach it to the fireplace with 3 screws. Note: Do this BEFORE final positioning of fireplace.

Determine the location for the air register/fan housing assembly.

Reference the Heat-Zone®Gas kit instructions for the remaining installation steps.

HEAT-ZONE® GAS

ATTACHES HERE

Figure 8.6 Heat Zone Cover Plate

34

Heat & Glo • 6000CMOD-IPI, 8000CMOD-IPI2241-900 Rev. H • 5/12

Page 34
Image 34
Heat & Glo LifeStyle 8000CMOD-IPI, 6000CMOD-IPI Install Attic Insulation Shield, Installing the Optional Heat-ZoneGas Kit

6000CMOD-IPI, 8000CMOD-IPI specifications

The Heat & Glo LifeStyle 6000CMOD-IPI and 8000CMOD-IPI models represent the pinnacle of modern fireplace design, marrying aesthetics with advanced technology to create a unique heating experience. These versatile, linear gas fireplaces are designed to seamlessly integrate into any living space while offering exceptional performance and style.

One of the standout features of the LifeStyle series is its impressive heating efficiency. Both models utilize advanced heating technology to maximize warmth while minimizing energy consumption. The innovative IPI (Intermittent Pilot Ignition) system enhances efficiency by using a pilot light only when the fireplace is in use, ensuring that energy costs remain low.

The design of the LifeStyle series is both contemporary and customizable. Homeowners have the option to choose from various finishes, media styles, and decorative elements. The large, expansive viewing area enhances the ambiance of any room, showcasing the mesmerizing flames. The 6000CMOD-IPI with its 60-inch firebox and the 8000CMOD-IPI with an 80-inch firebox add a dramatic focal point to any setting.

Another significant innovation incorporated in these models is the use of advanced flame technology. This feature allows for an adjustable flame height, providing flexibility in terms of heat output and visual effects. Users can tailor the flames to suit mood and occasion, whether they desire a cozy ambiance for a quiet evening or a more robust heat output for entertaining.

The user-friendly controls add to the convenience of the LifeStyle series. Homeowners can easily operate the fireplace with a remote control or smart home integration, enabling adjustments from the comfort of their seating. Additionally, the fireplaces come equipped with a safety shut-off feature, providing peace of mind while enhancing user safety.

Maintenance is simplified with the LifeStyle series as well. The design minimizes creosote buildup and offers easy access for cleaning. The contemporary linear design also allows for easy installation, making it an appealing choice for both new builds and renovations.

In summary, the Heat & Glo LifeStyle 6000CMOD-IPI and 8000CMOD-IPI models combine cutting-edge heating technology, elegant design, and user-friendly features. These fireplaces not only serve as a source of comfort but also enhance the aesthetic appeal of any living space, making them a valuable addition for homeowners looking to elevate their interiors with warmth and style.