Contents
HOSHIZAKI STACKABLE CRESCENT CUBER
Sep
Peachtree City, GA
Complete and detailed explanation of the problem
HOSHIZAKI AMERICA, INC 618 Highway 74 South
Attn HOSHIZAKI Technical Support Department
CONTENTS
1. Service for Refrigerant Lines
IV. Service Diagnosis
V. Removal and Replacement of Components
a Refrigerant Recovery
I. Specifications 1. Icemaker
KM-1300SAH
KM-1300SWH
KM-1300SRH
KM-1300SAH3
KM-1300SWH3
KM-1300SRH3
2. Condensing Unit
URC-12F
SPECIFICATIONS MODEL URC-12F
II.General Information 1. Construction
aKM-1300SAH, KM-1300SAH3
b KM-1300SWH, KM-1300SWH3
c KM-1300SRH, KM-1300SRH3
a Solid-StateControl
Features of Control Products “E” Controller Board
2. Controller Board
b Controller Board
6 LED Lights and Audible Alarm Safeties
3High Temperature Safety - 127 ± 7F
4Low Water Safety
5High Voltage Cut-out
Cycle
1 Minute Fill Cycle
Harvest Cycle
Reverse Pump Out
Control Products HOS-001ABoard
cSequence 1st Cycle
2nd Cycle and after with pump drain
2nd Cycle and after with no pump drain
d Controls and Adjustments
2Defrost Timer
Temperature F
iDisconnect the connector K3 on the board
SETTING
Dip Switch
3 Drain Timer
SETTING
Dip Switch
e Checking the Controller Board
Page
1.Water Circuit and Refrigerant Circuit
III. Technical Information
aKM-1300SAH, KM-1300SAH3
b KM-1300SWH, KM-1300SWH3
c KM-1300SRH, KM-1300SRH3
2.Wiring Diagrams
aKM-1300SAH, KM-1300SWH
Cut-out
b KM-1300SRH
Note Pressure Switch
PSIG
c KM-1300SAH3, KM-1300SWH3
Cut-out
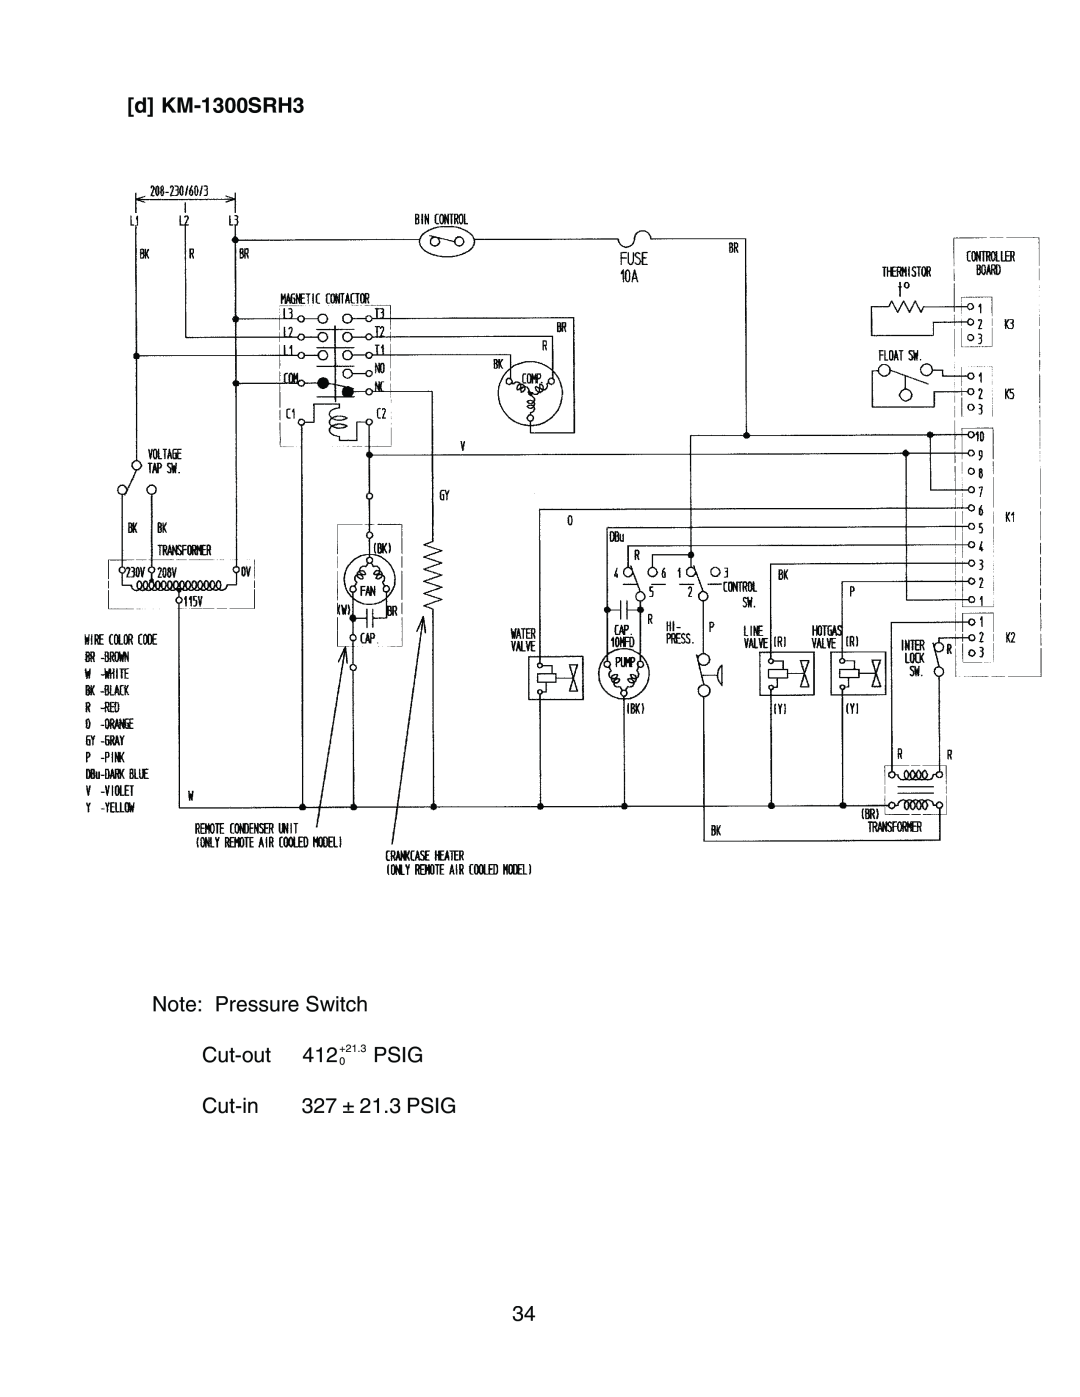
d KM-1300SRH3
Note Pressure Switch
4120+21.3 PSIG
3. Timing Chart
Page
1283
4.Performance Data
aKM-1300SAH
1143
1278
b KM-1300SWH
1284
2033
1163
c KM-1300SRH
1296
2300
1132
d KM-1300SAH3
1320
2150
1287
e KM-1300SWH3
1254
2090
1266
f KM-1300SRH3
1308
2270
Possible Cause
IV. Service Diagnosis 1. No Ice Production
Problem
Remedy
Remedy
Problem
Possible Cause
1 Continued from
Remedy
Problem
Possible Cause
3 Continued from
Remedy
Problem
Possible Cause
5 Continued from
Possible Cause
2. Evaporator is Frozen Up
Problem
Remedy
5. Other
3. Low Ice Production
4. Abnormal Ice
Problem
a Refrigerant Recovery
V. Removal and Replacement of Components
1.Service for Refrigerant Lines
b Evacuation and Recharge R-404A
2. Brazing DANGER
3. Removal and Replacement of Compressor
4. Removal and Replacement of Drier
5. Removal and Replacement of Expansion Valve
1Turn off the power supply 2Remove the panels
7. Removal and Replacement of Evaporator
1Turn off the power supply
Page
1Turn off the power supply
11. Removal and Replacement of Thermistor
12. Removal and Replacement of Fan Motor
13. Removal and Replacement of Water Valve
14. Removal and Replacement of Pump Motor
15. Removal and Replacement of Spray Tubes
VI. Maintenance and Cleaning Instructions
1. Preparing the Icemaker for Long Storage
1Remove the front panel. Except water-cooledmodel
2. Cleaning and Sanitizing Procedures
a Cleaning Procedure
25Turn off the power supply after 5 minutes
20Turn off the power supply after 3 minutes
22Move the control switch to the “WASH” position
23Replace the front panel in its correct position
3Pour the sanitizing solution into the water tank
3. Maintenance
![[d] KM-1300SRH3](/images/new-backgrounds/64264/6426467x1.webp)