950C Series English
Acknowledgments
Table of Contents
Page
Special Features of Your HP DeskJet Printer
Introduction
Thank You For Buying an HP DeskJet Printer
Printer Literature about your printer
For Windows 3.1x Users
Finding More Information
Guide
Printing Basics
Buttons and Lights
Tray
Paper Trays
OUT Tray
Printer Maintenance Tips
Photo Tray
Photo Tray load
Photo paper here
How to Print
Finding the HP Printer Properties Dialog Box
From your software program, try this Click File Print
Printer Setup
Or try this
Setup Tab
Select the appropriate page settings
Cancel -Cancels your changes and closes the dialog box
Printer Properties Dialog Box
Features Tab
Advanced Tab
Check here to choose a Two-Sided printing method
Check here to print multiple pages per sheet. Choose
Printer Services Tab
HP DeskJet Toolbox
For Windows 95, 98, and Windows NT
Level tab…
Getting the Right Paper
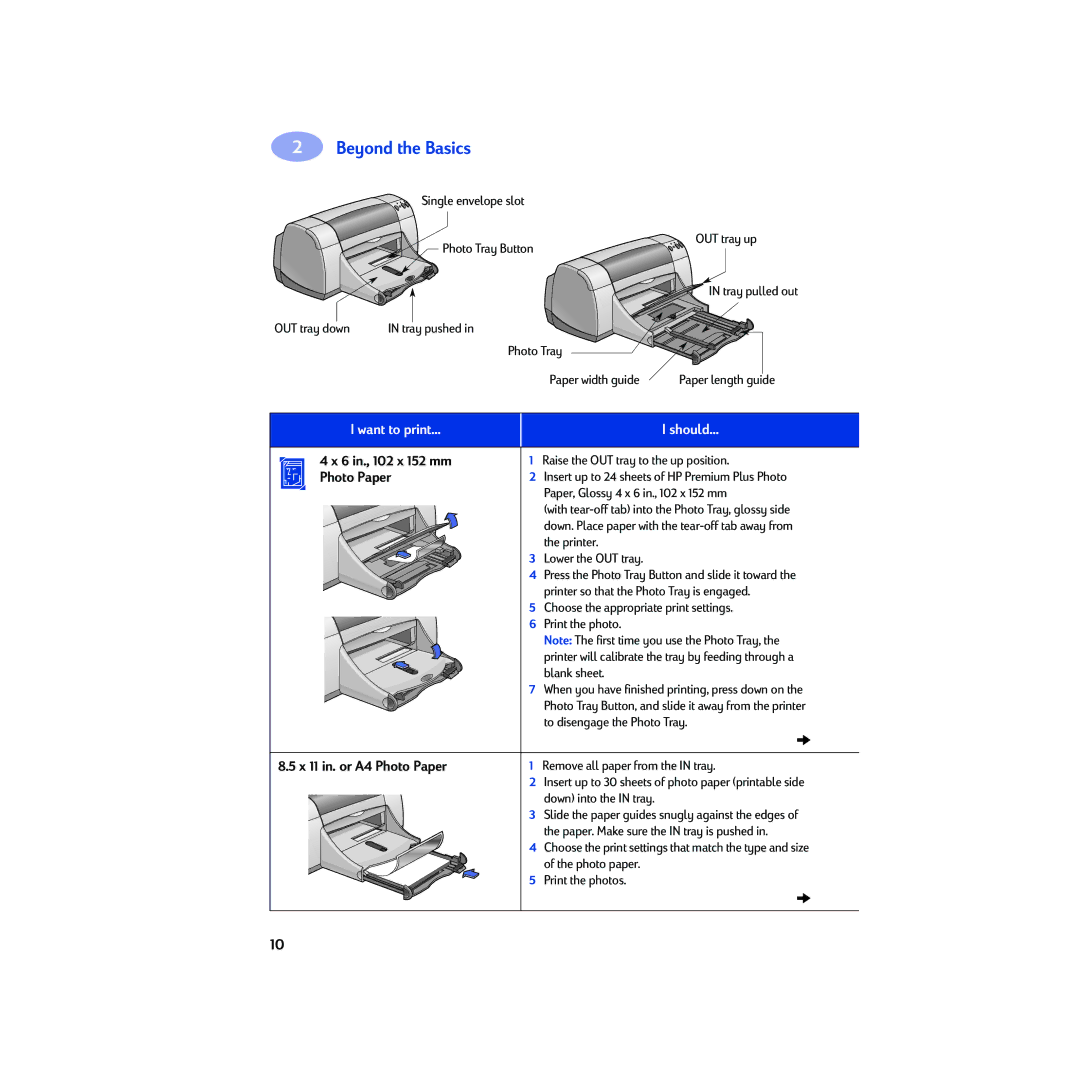
Beyond the Basics
Printing on Different Types of Paper and Media
X 11 in. or A4 Photo Paper
Paper, Glossy
Orientation Choose appropriate orientation
Paper Type Choose appropriate HP Photo Paper type
For best results use HP Photo Paper
Stack of envelopes
Slot. Push the envelope in until it stops
Size of the envelope
Print the envelope
Paper Type Choose Plain Paper Print Quality Choose Normal
Paper from the in tray
Cards
Print the cards
Pull out the in tray
Paper Type Choose appropriate HP Greeting Card type
Paper Size Choose appropriate card size
For best results use HP Greeting Card Paper
Align the card edges before inserting the cards
Iron-on Transfers
Labels
Paper Type Choose HP Iron-On T-Shirt Transfers
Paper Size Choose appropriate size
Transparencies
Paper Type Choose transparency type
Banners
Posters
Paper Type Choose HP Banner Paper or Plain Paper
Poster Printing Check this box and choose size 2x2, 3x3, or
Manual Two-Sided Printing Book Binding Tablet Binding
Begin printing
HP print settings to choose Guidelines to remember
Paper Type Choose appropriate type
Beyond the Basics
Using and Caring for Your Print Cartridges
Print Cartridge Status Light flashes when one
Problem with color print Cartridge
Yellow indicator arrow
Existing print cartridge
Consider replacing the color
Low on ink
Consider replacing the black
Using and Caring for Your Print Cartridges
Replacing Print Cartridges
To replace a print cartridge
Cradle latch
Contacts
Remove the protective vinyl tape
Storing Print Cartridges
Cleaning Print Cartridges
When Do You Need to Clean?
If You See Missing Lines or Dots
If You See Ink Streaks
Manually Cleaning the Print Cartridges
Nozzle plate Clean
Cradle wall
Manually Cleaning the Print Cartridge Cradle
Print a test page. From the HP Toolbox, click Print a Test
Troubleshooting Tips
Your printer software didn’t install properly
Select Start Run
Remove HP DeskJet 950C Series software
Program Manager, select
Control Panel
Getting Help When Things Go Wrong
Click the Device Manager tab
Insert the Rear Access Door
Are secure
Tray Tray correctly
Close the printer’s top cover
Why won’t it print?
Run
Open
Setup Tab on
You may be using a
Enable Hardware ECP to speed photo
Click on the Configuration tab
Flashing Be reset
Be patient Flashing Data
Close the top cover Light is flashing
All of the lights are Printer may need to
Left Poster Printing on
Make sure that you are using media
Rather than using plain paper
Media Intended for HP DeskJet printers
Wrong side of the media Down
Programs
950C Series
Go to the Setup tab in the printer
You may not have fully
Engaged the Photo Tray Slowly slide it toward the printer
Far may crease your photo paper
HP Customer Care Online
HP Customer Care Audio Tips U.S. Only
HP Customer Care User Forums
HP Customer Care by Email
Printer Software
HP Customer Care Repair
HP Customer Care by Phone
Extended Warranty Options
After the Free Phone Support Period
Setup Instructions
Using a Parallel Cable
If a New Hardware Found dialog box appears, click Cancel
More About Your Printer
Using a USB Cable Requires Windows
Install USB software. a Click Next
Install printer software. a Click Next
Check Specify a Location, then click Browse
Specifications
Black Text Print Speed
Language codes
Media Handling
Regulatory Notices
Legal Information
Hewlett-Packard Company
Limited Warranty Statement
HP Year 2000 Warranty
Index
Maintenance Print cartridges 25 printer
Borders Normal mode 6
Replacement 27 status 25 status light 1 storing 29 using
Labels
Printer Accessories iii, A-6buttons
Printer properties 6 problems installing 33 settings
Problems Banner printing
Color
Services
Setting up printer iii settings, see print settings setup
Single envelope slot 2 size
Speed, printing
Appendix
Printing in Windows
Windows 3.1x Setup Tab
Windows 3.1x Features Tab
Windows 3.1x Services Tab
Use the Services tab to perform routine printer maintenance
Windows 3.1x Color Tab
Check here to print in shades of gray Choose Manual, then
Windows 3.1x HP DeskJet 950C Toolbox
How Do I?
Minimum Printing Margins
System Requirements
Supplies and Accessories
Printer Quick Start Posters and User’s Guides
Part Name Part Number
Quick Start Language Poster
Availability of special media varies by country
Paper and Other Media
Paper Type/Description Part Number
Ordering Information
Basicweg
LAS ROZAS, Madrid Sweden
Venezuela 58 2 239-4244/4133
Palo Alto, CA 94304, U.S.A
Environmental Statement
Reduction and Elimination
Recycling
Energy Consumption